Subscription-based models have become a cornerstone of modern eCommerce. Whether you run a subscription box service, a membership site, or offer recurring product deliveries, managing subscription data is a critical part of your WooCommerce operations. Unlike regular orders, subscription orders require more detailed tracking due to their recurring nature, renewal cycles, and billing complexity. Exporting this type of data correctly allows store owners to maintain financial accuracy, fulfill customer expectations, and integrate with third-party systems such as CRMs, ERPs, or accounting software.
Out of the box, WooCommerce Subscriptions provides a solid foundation for managing recurring payments, but it does not include robust export functionality. For businesses that need structured, filtered, and automated reports, the native options fall short. This is where Advanced Order Export for WooCommerce by AlgolPlus becomes essential. The plugin extends WooCommerce’s capabilities by enabling detailed, customizable, and automated exports specifically tailored to handle subscription data.
Subscription Exports: What Makes Them Unique
Exporting WooCommerce subscription orders differs from standard orders in several ways. Each subscription can include multiple related records over time, such as initial sign-ups, renewals, payment retries, or failed transactions. These must be captured and understood in the context of the entire subscription lifecycle. Without accurate exports, it’s easy to miss important billing events or underreport recurring revenue.
With the Advanced Order Export plugin, store owners can apply filters to isolate subscription-related activity. This includes filtering by order status such as active, on-hold, or cancelled, and by dates relevant to subscription renewals rather than just original purchase dates. Additionally, the plugin allows exports based on specific payment gateways or customer metadata, ensuring that recurring orders are correctly categorized and delivered to the right systems.
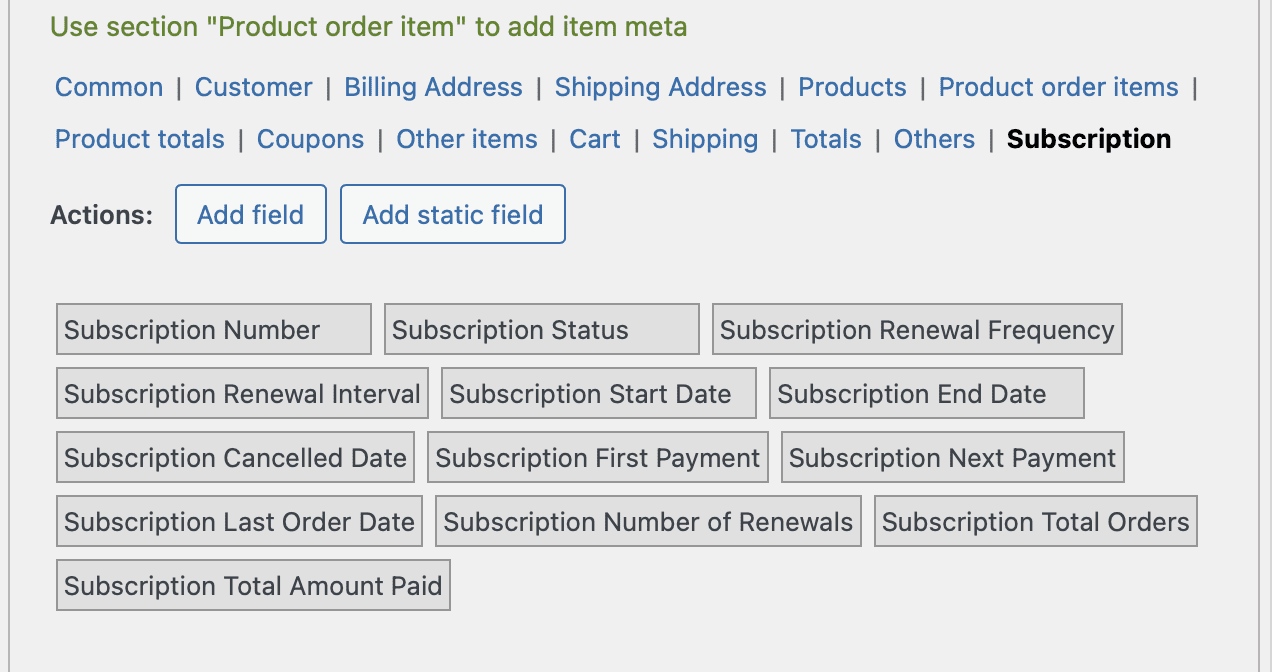
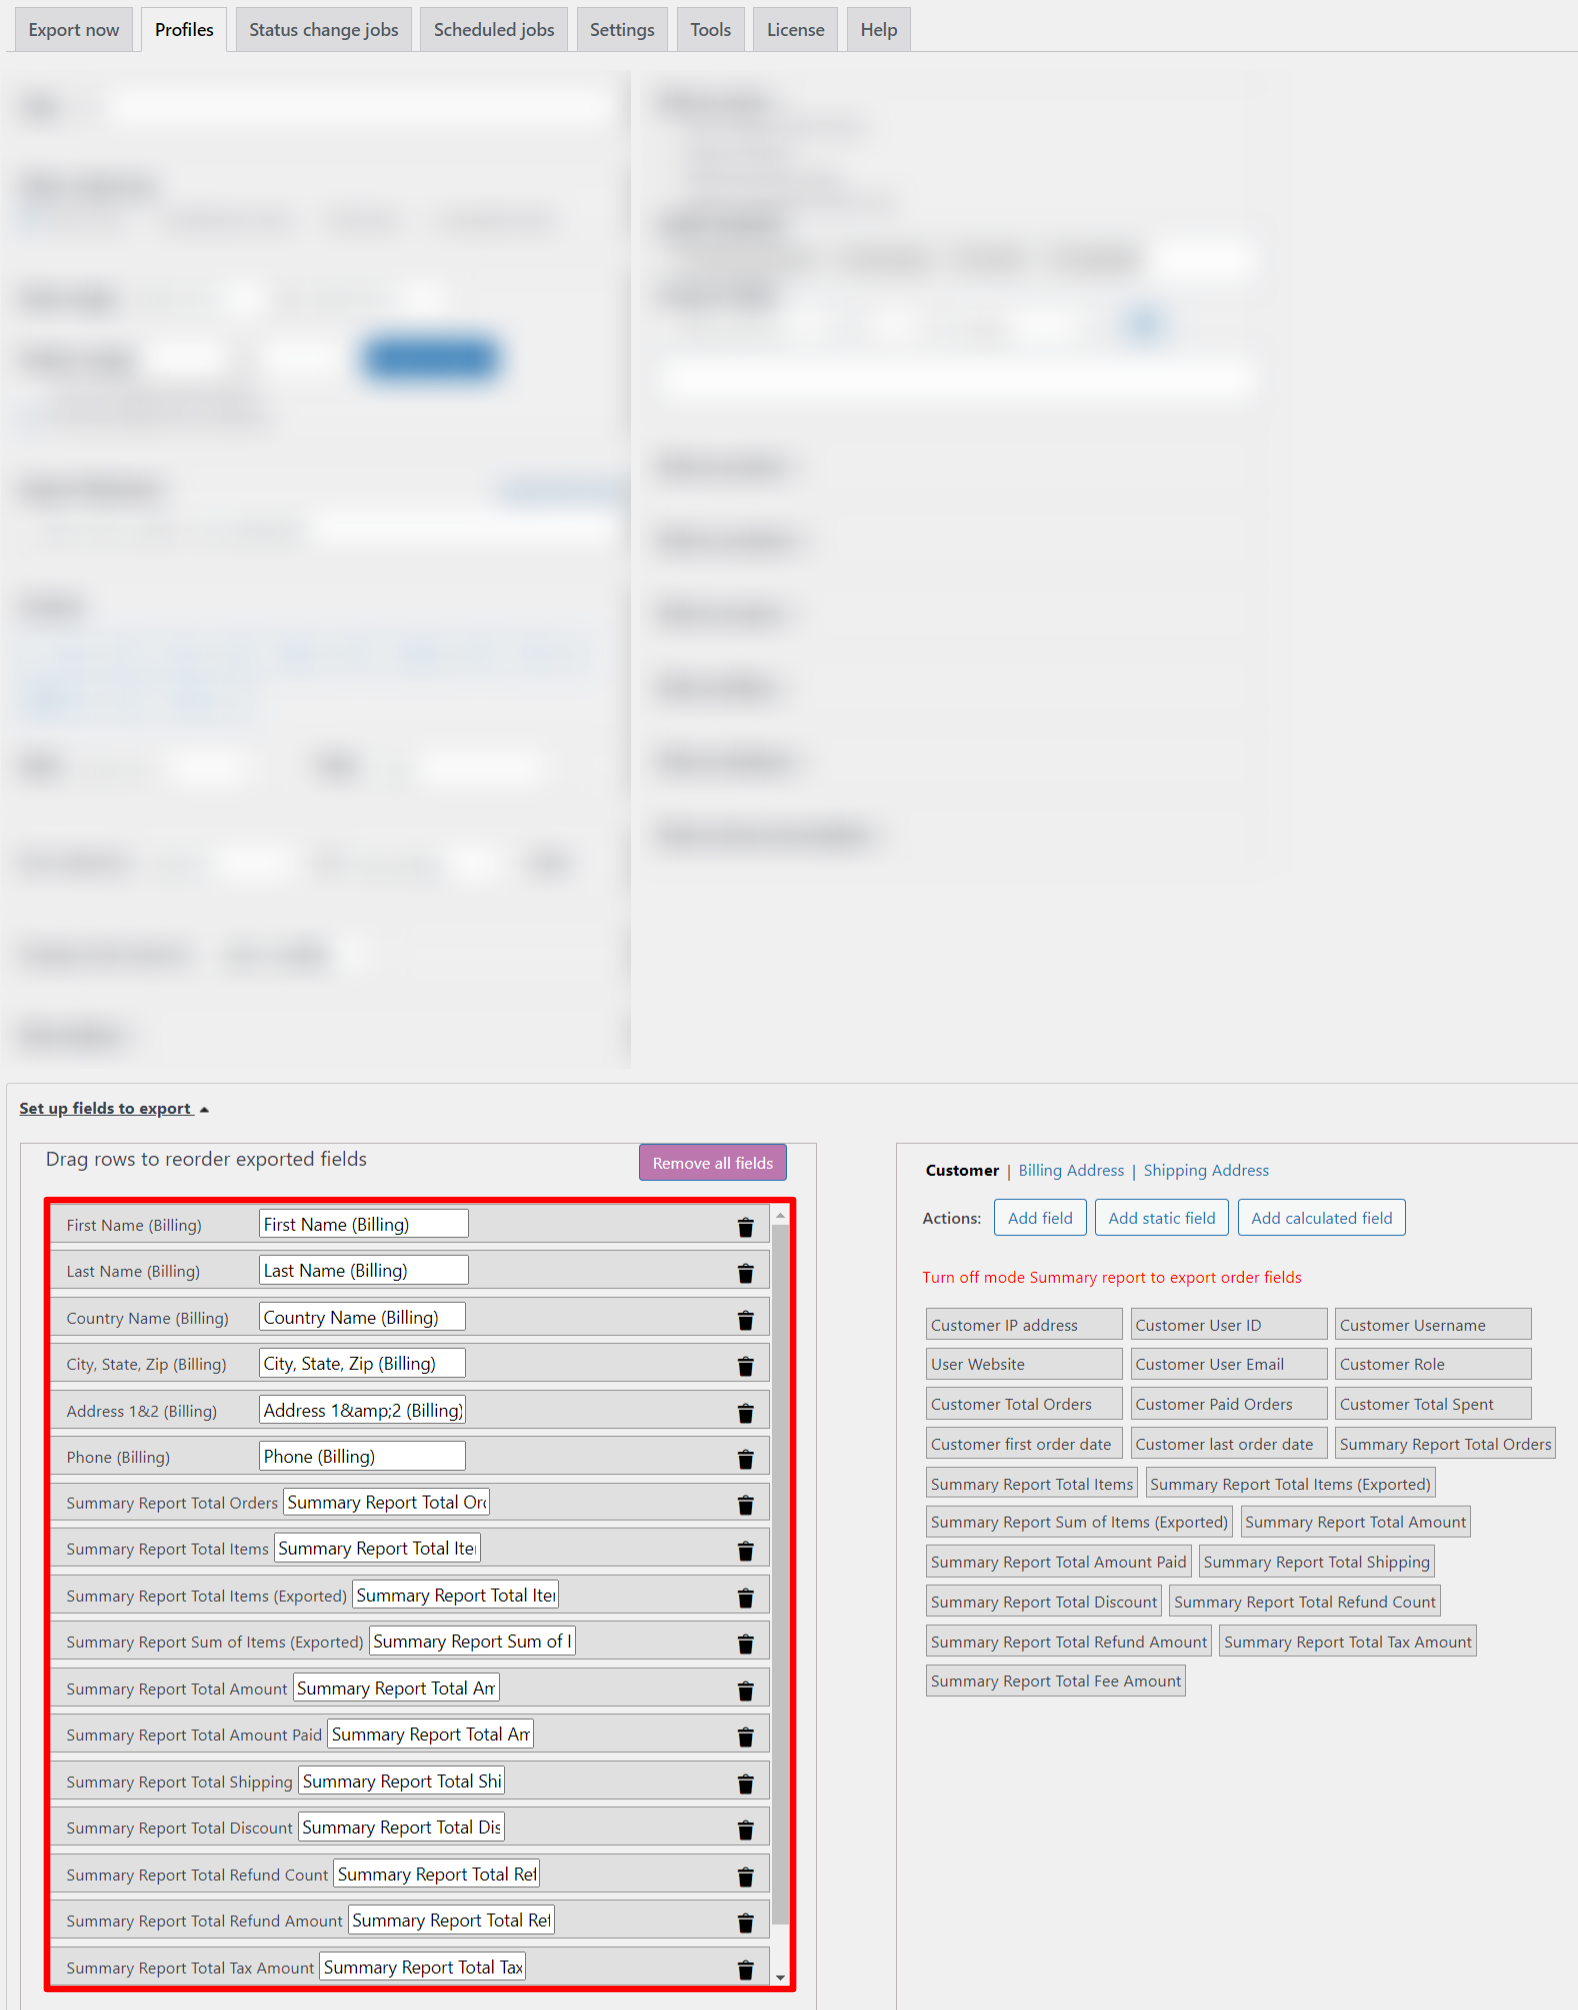
Export fields for the subscriptions
This level of detail is particularly useful when sending data to accounting teams or platforms that rely on recurring revenue recognition. By distinguishing initial charges from recurring ones and associating each order with its parent subscription, business owners gain clear visibility into performance and retention trends.
Automating Subscription Reports for Efficiency
A major advantage of the Advanced Order Export plugin is its ability to automate report generation. Subscription orders can be exported automatically on a set schedule or triggered by changes in order status. This ensures that subscription data is always current and delivered to stakeholders without manual effort. For instance, weekly reports of all renewed subscriptions can be sent directly to your finance department or fulfillment center.
The plugin supports multiple export formats including CSV, XLS, XML, and JSON, which means your subscription data can integrate seamlessly with third-party tools. Whether you’re syncing to Google Sheets, uploading to a cloud drive, or pushing data via Zapier, the process is streamlined and customizable. You can even include custom fields associated with subscriptions, giving you full visibility into plan types, billing intervals, or customer preferences.
Supporting Long-Term Subscription Growth
As subscription businesses scale, the volume and complexity of their data increase. Manual data handling becomes error-prone and inefficient. AlgolPlus designed this plugin with scalability in mind, allowing WooCommerce store owners to manage thousands of subscription records without performance issues. Each export profile can be saved, duplicated, and adjusted over time, making it easy to adapt as your reporting needs evolve.
Clients using the plugin report significant reductions in reporting errors and a clearer understanding of subscription metrics. One notable example includes a wellness subscription service that exports monthly reports filtered by payment method to identify churn patterns tied to specific gateways. With this insight, they improved their retry logic and reduced failed renewals by 17 percent.
The plugin also respects privacy and compliance standards by allowing the exclusion of sensitive data where necessary. This is especially important for businesses operating in regions with strict data handling regulations.
Accurately exporting WooCommerce subscription orders is essential for financial reporting, customer service, and long-term business strategy. With Advanced Order Export for WooCommerce, subscription businesses gain a professional-grade tool that delivers accurate, automated, and flexible exports designed to meet the specific needs of recurring revenue models. Whether you are scaling a subscription business or optimizing a high-volume WooCommerce site, this solution ensures your data is always in the right format, at the right time.
There are two things that can support a company during a difficult period: sales and cost management. The profitability of the company and its sustainability depend on how competently a business manages expenses. First, you need to collect all the data on expenses and conduct an in-depth analysis that will help you make the right decisions in order to understand what expenses in your business can be managed at all. In times of crisis, you need to optimize spending, especially carefully, so as not to accidentally reduce profits.
The importance of cutting expenses
An enterprise has only two ways: increase profitability or reduce costs in order to maintain stability in the market. The second option is more acceptable. Every company has something to optimize. For example, find more cost-effective production methods or switch to a new payment schedule with suppliers.
It is important to understand that optimization does not come down to simply reducing a company’s costs. Imagine that the owner of a flower shop decided to open a sales point in another area. Will saving on rent help improve profits? It’s not a fact that the citizens of the area are the target audience of the company.
The manager’s task is to find a way to distribute expenses that will be profitable in current market conditions. Simply put, improve production processes without losing product quality.
Ways to cut expenses
The less money a company spends on its work and the more profit it makes, the more efficient the work. But if you cut expenses without thinking about how it will affect the business, you can also cut profits. You need to have an idea how each expense influences the company’s performance. The first step of saving is to review your company’s current spending. It will help you find areas where you can save money. Analyze the payments: from the largest ones, such as office rent and employee salaries, to the smallest ones, such as office supplies. There will probably be ways to save money without harming your business.
Main methods:
Review of suppliers. Check out offers from different suppliers. Perhaps you will find more favorable conditions that will help reduce production costs. Compare prices, quality and conditions to choose the best option. Sometimes even a small discount from a new partner can lead to significant savings in the long run.
Automation and optimization of processes. Find tasks that can be automated or improved to speed up your work. For example, using warehouse management software will reduce manual labor time and minimize the risk of losses.
Increased employee productivity. Employees are an important resource of the company; their effectiveness depends on their motivation and working conditions. Efficiency often suffers from poorly designed work processes. Make sure employees have and use task management tools. It is also useful to collect eNPS once a year or quarter to know the mood of the team.
Inventory Management. If there is no system for accounting for goods, the company may spend more resources on storage than necessary. Keep track of the number of goods in stock so as not to buy too much or run into shortages. Conduct periodic inventory checks and consider implementing a system to track items to reduce losses. Inventory can be managed using different methods.
Fixed inventory method: always maintain a certain amount of goods in stock.
Fixed order period method: place orders at regular intervals.
Fixed order method: place an order when inventory levels reach a certain point.
Combined method: This method combines elements of the previous methods.
Improving marketing efficiency. Advertising brings customers, so cutting money on it is a dangerous way. However, you have to strive to reduce the cost of attracting one client. Selecting effective channels and increasing the budget in them can help with this. Here are some of the channels:
Social media. Using them will help increase brand awareness. This may be free or inexpensive, depending on your strategy.
SEO (search engine optimization). To attract more visitors, you can improve your site’s visibility in search engines.
Email marketing. Sending regular emails to customers with information about new products, promotions and other news can turn new customers into regular ones.
Contextual advertising. You can place advertisements on websites that your potential clients visit.
Partnership programs. You can cooperate with other companies to mutually promote goods or services.
Event marketing. Attending events related to your industry can increase your brand’s visibility and attract new customers.
Content marketing. You can create useful and interesting content for your clients. For example, blog, video, infographic.
The effectiveness of each method depends on the target audience and industry. Different approaches and analysis of the results will help you better determine which ones work best for your business.
Difference between optimization and reduction
Optimization and expenses reduction are two different approaches to financial management. Downsizing usually means simply reducing your overall spending. This may include reducing the number of employees, reducing salaries, or eliminating unnecessary services or products. However, such an approach can lead to negative consequences, for example, a decrease in the quality of products or services, or a deterioration in the moral climate in the team.
Optimization focuses on increasing the efficiency of resource use. This may include improving processes, automating tasks, and reallocating resources to maximize profits. The goal of optimization is to get more value out of the same or even less cost without sacrificing quality.
Indicators for business performance analysis
Analysis helps you understand the current situation of your business and make decisions to increase its efficiency:
share of expenses to revenue;
dynamics of expenses and income;
competitor indicators;
accounting and management reporting.
Note: Even a marketing strategy needs to be analyzed in order to identify weaknesses and eliminate them. You can find an example of analyzing a marketing hypothesis in our article “Halloween Sales Analysis”.
Already in the process of collecting information, you can find a lot of interesting nuances and opportunities that indicate how a business can reduce costs. For example, find new tariffs and conditions with service providers, attract alternative partners. This analysis gives the entrepreneur a complete picture of business expenses and the ability to manage them.
Advanced Order Export for Woocommerce is a plugin for e-commerce websites. It takes advantage of WordPress express environment and makes it easy to configure and export orders on the fly. It enables users to configure all settings in each template and create its own schedule (view details in “pro version” article). Also, it gives the facility to customize specific fields using PHP.
Orders can be exported in different formats (for example, CSV, XLS or HTML), as well as to different applications like Zapier.
So, what is the easiest way to set up Advanced Order Export for Woocommerce?
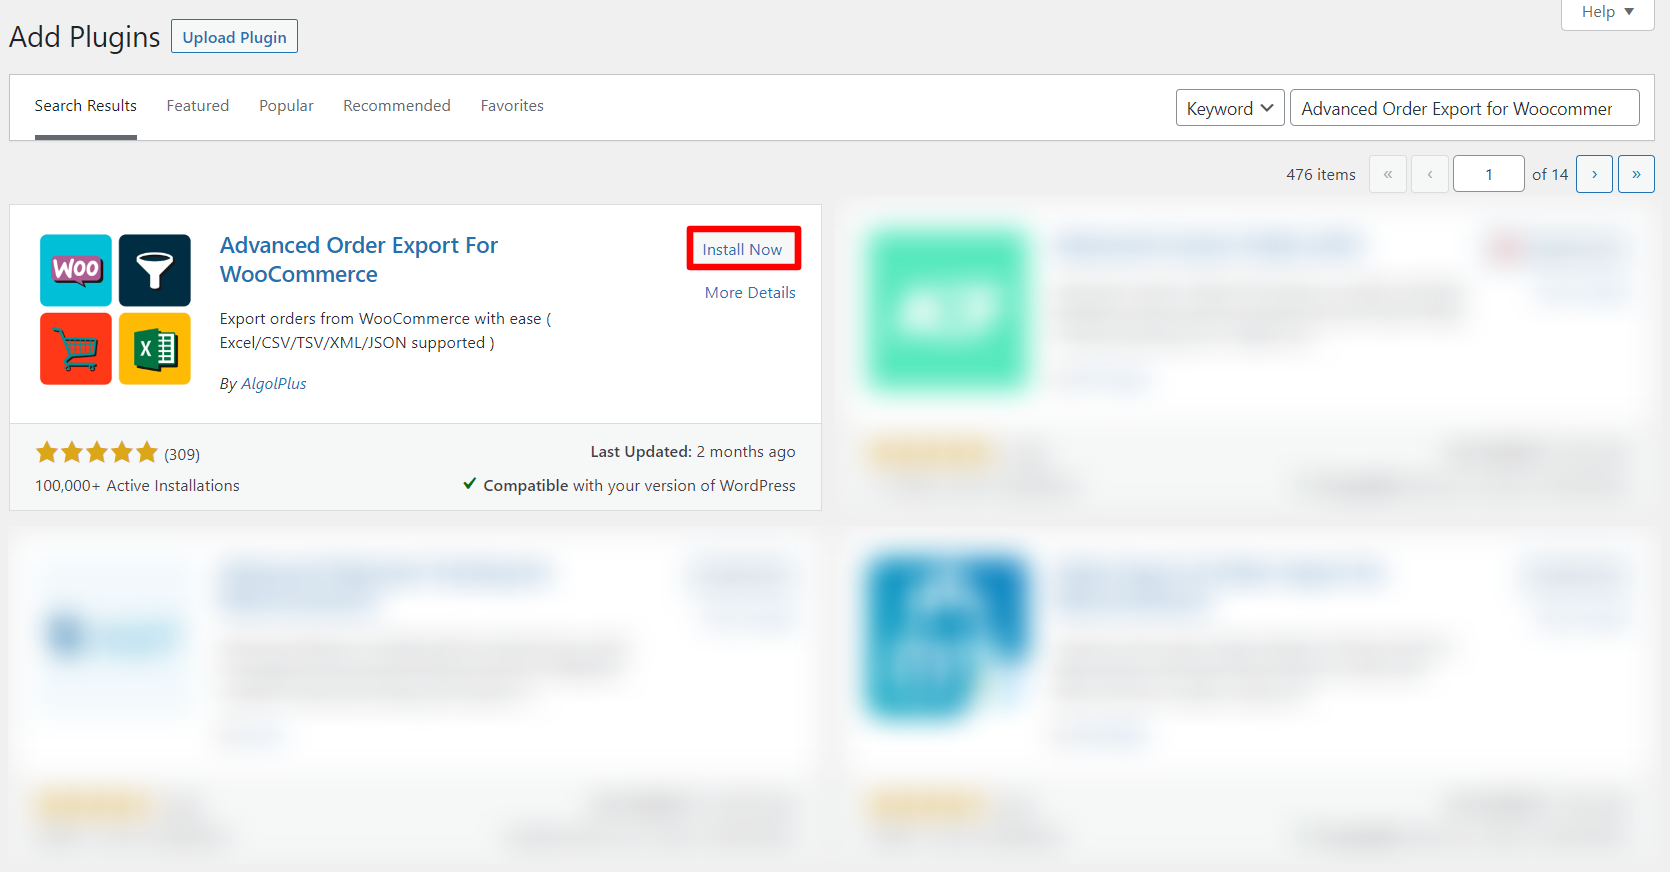
How to install Advanced Order Export for Woocommerce
How to set up Advanced Order Export for Woocommerce
Some parameters in the plugin are set by default. Orders are filtered by the date they were created, the export file name is “orders-%y-%m-%d-%h-%i-%s”, orders are sorted by id in descending order, and all fields are in the export fields.
We will configure the most requested settings and create three different export files: a regular file with multiple orders, summary report by products, and summary report by customers.
First situation: regular file with multiple orders.
First, let’s set the order date range. For this you must click on “Date range” and select the day, month and year from the pop-up calendar.
The pop-up calendar
Then change “Export filename“. To make it clear, orders for which period will be exported, let’s write the following code:
“orders-{from_date}-to-{to_date}”
Export filename
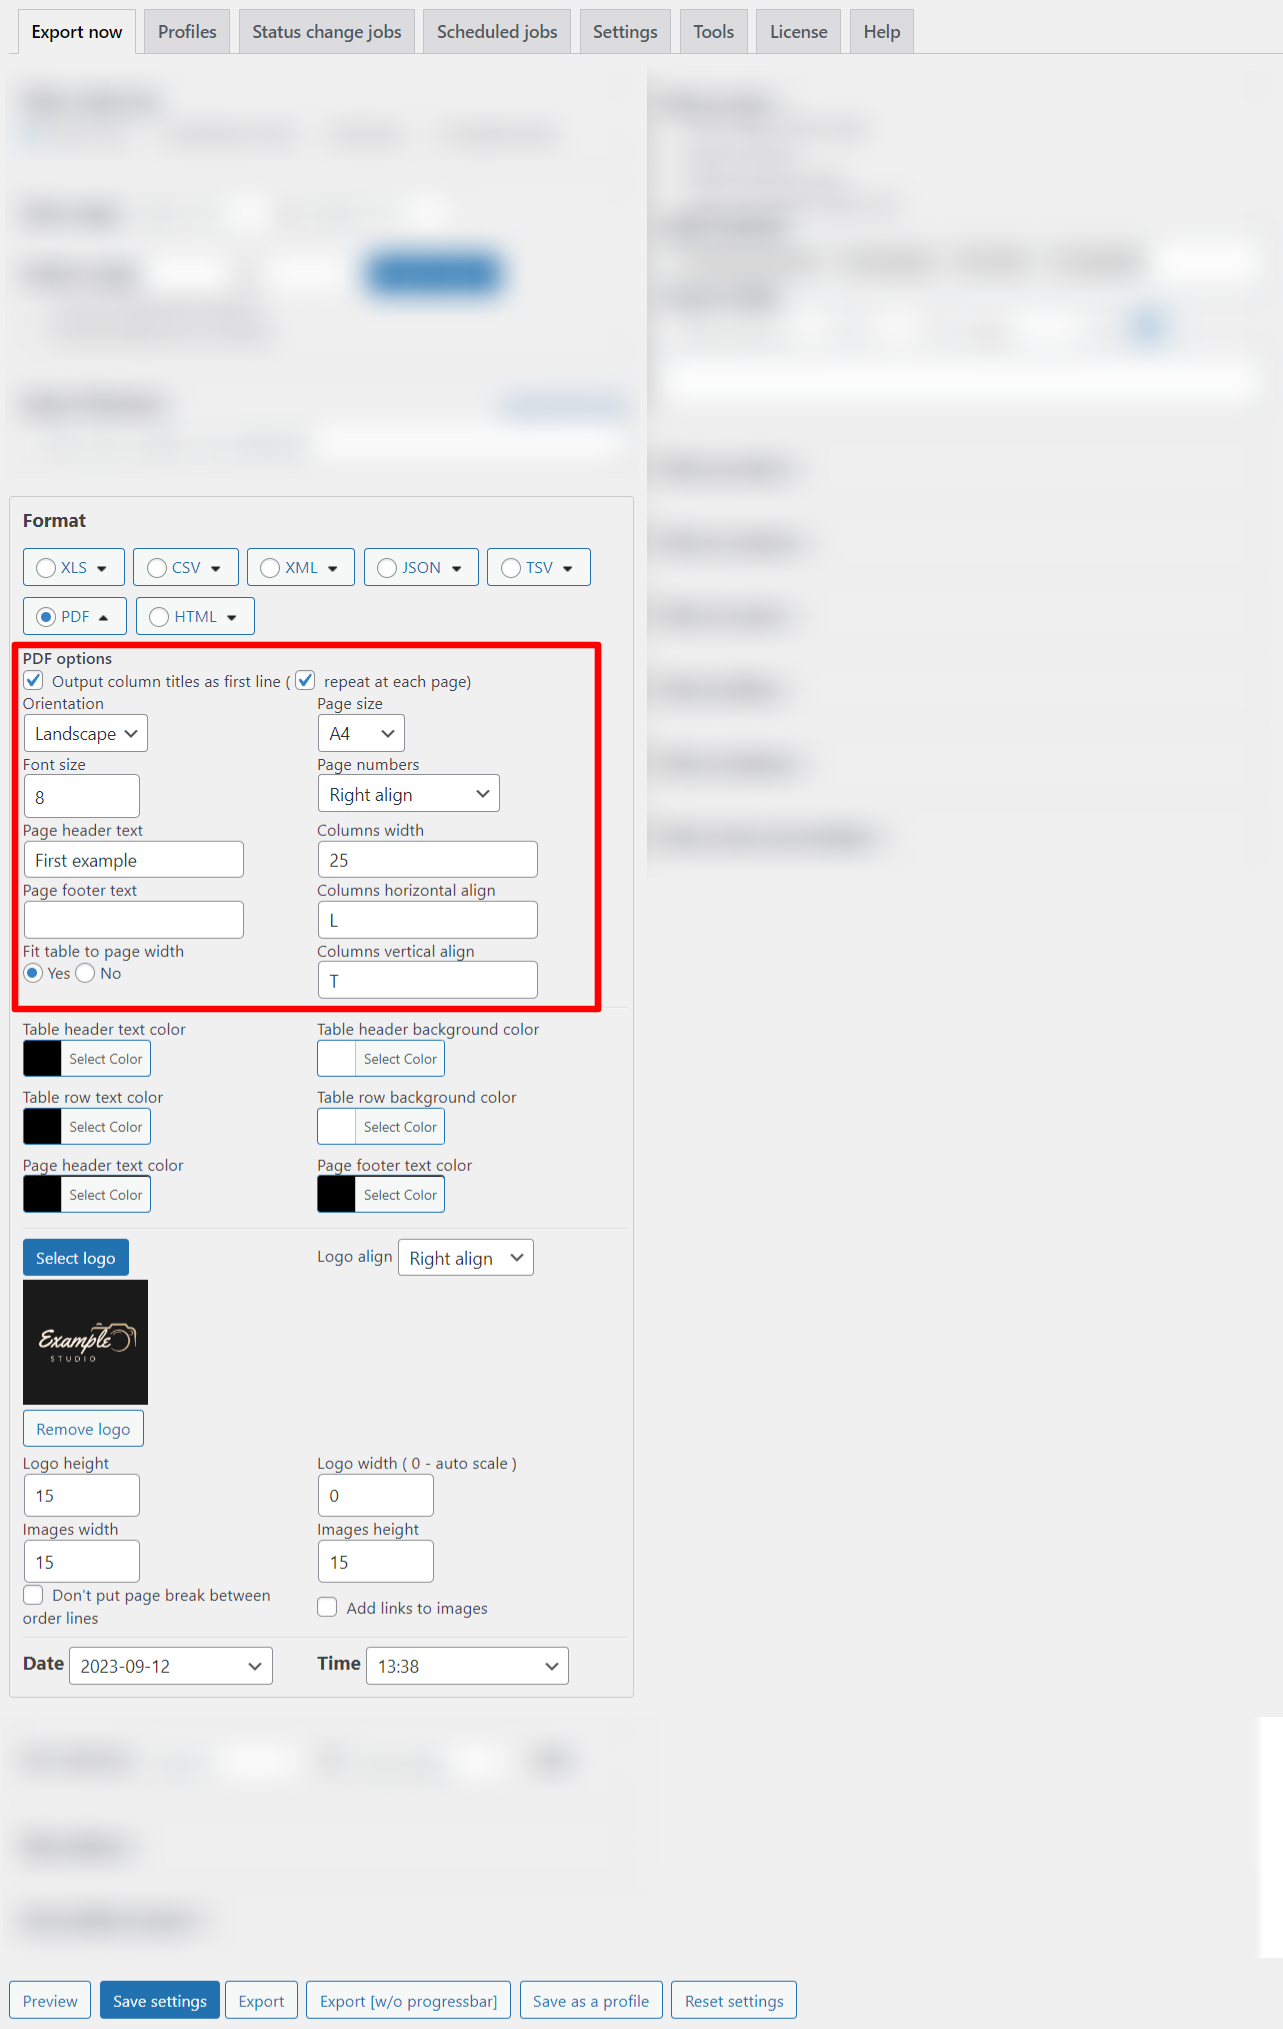
Select format of export file. In our example, it will be a PDF. Set up settings for it. Click again on PDF and choose:
Page number – right align
Page header text – First example
Fit table to page width – Yes
Format of export file
You can also change the colors in your file and add your logo.
You can create several such settings for different types of reports, as well as configure their schedule, automatic export when the order status changes, and the destination. (view details in “pro version” article)
Export the order
Note: Before exporting orders, you must ensure that your list of orders is not empty.
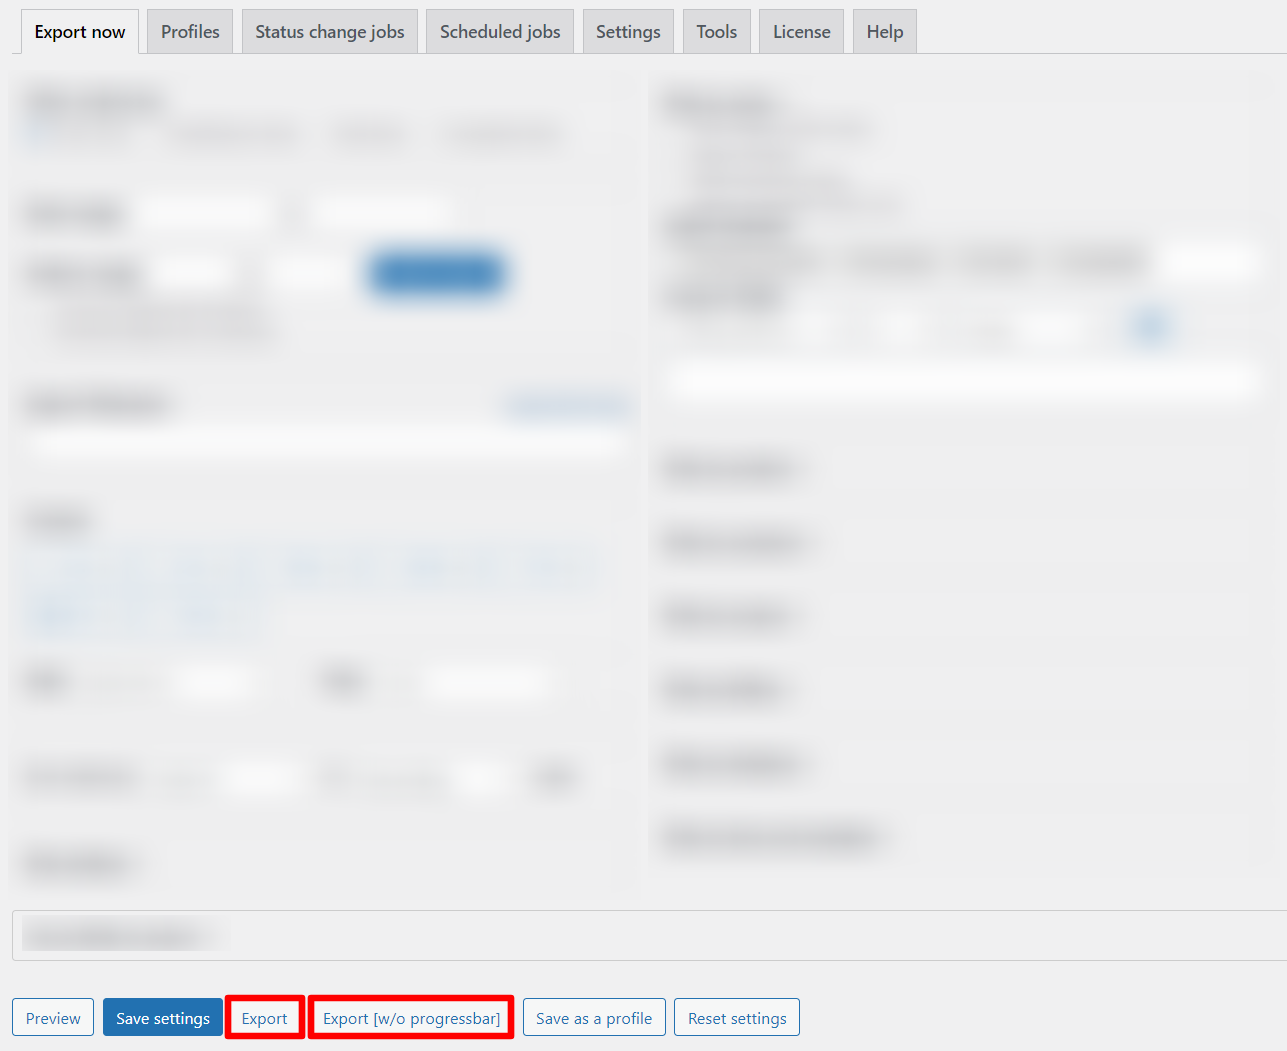
There are two ways to export orders from Woocommerce: “Export” and “Export without progressbar”.
Export orders
For bulk exporting orders, you must use the “Export” button. Otherwise, click on “Export without progressbar”.
The regular file with multiple ordersSummary report by productsSummary report by customers
Conclusion on how to set up Advanced Order Export for Woocommerce.
Now you figured out how to configure Advanced Order Export for Woocommerce. It also has many other equally useful settings. You can read about all of them in our plugin documentation.
The use of third-party applications has become increasingly popular among businesses looking to streamline their operations and improve efficiency. From accounting software to customer relationship management tools, these applications offer a wide range of features that can benefit a business in various ways.
One of the key areas where third-party applications can be particularly useful is in order management. With the rise of e-commerce and online shopping, businesses need to have a robust order management system in place to handle the increasing volume of orders. This is where integrating Advanced Order Export for WooCommerce with third-party applications can be a game-changer.
What is Advanced Order Export?
Advanced Order Export for WooCommerce allows businesses to export their order data in a customizable format. This can include order details such as customer information, product details, shipping information, payment information and etc. This data can then be transferred to third-party applications for further processing.
Integrating Advanced Order Export with Third-Party Applications: The Benefits
Streamlined Order Management Process
Integrating Advanced Order Export for WooCommerce with third-party applications can streamline the order management process. Instead of manually entering order data into different systems, businesses can automatically transfer the data to the third-party application. This eliminates the chances of human error and saves time, allowing businesses to focus on other important tasks.
Improved Efficiency
By automating the transfer of order data, businesses can improve their efficiency. This is because orders can be processed and fulfilled faster, reducing the time it takes for a customer to receive their order. This can lead to increased customer satisfaction and repeat business.
Real-Time Data Synchronization
Integrating Advanced Order Export for WooCommerce with third-party applications allows for real-time data synchronization. This means that any changes made to an order, such as updates to shipping information or product quantities, will be reflected in both the order management system and the third-party application. This ensures that all systems have the most up-to-date information, reducing the chances of errors or delays.
Best Practices for Integrating Advanced Order Export with Third-Party Applications
Integrating Advanced Order Export for WooCommerce with third-party applications can be a complex task and requires careful planning and implementation. One of the key factors to consider when integrating these systems is compatibility. It is essential to ensure that the order export system and the third-party applications are compatible and can communicate effectively with each other.
Note: You can find a complete list of compatible plugins by following this link.
Tickera
Tickera is a popular WordPress plugin that is used by event organizers to sell tickets online. It is a comprehensive and user-friendly solution for managing ticket sales and registrations for events of any size. The plugin integrates seamlessly with any WordPress theme, making it easy for event organizers to create a professional-looking and customizable ticketing system.
An example of a simple event template with the ability to buy a ticket online.
Integrating Tickera with Advanced Order Export For WooCommerce is a straightforward process. You can follow these steps to set it up:
Buy Bridge for WooCommerce. You won’t be able to export tickets until they become a WooCommerce product. Our plugin only works with WooCommerce.
Note: The ticket creation process will be different with this add-on. Read about it here.
Paste the following code into a snippet, for example using the Code Snippets plugin.
Customize your report. We wrote about this in articles and. Without going into details, you can leave all the default settings and choose your desired export format.
The result of integration of Tickera and Advanced Order Export for WooCommerce (fields are customized).
Extra Product Options for WooCommerce by Themehigh
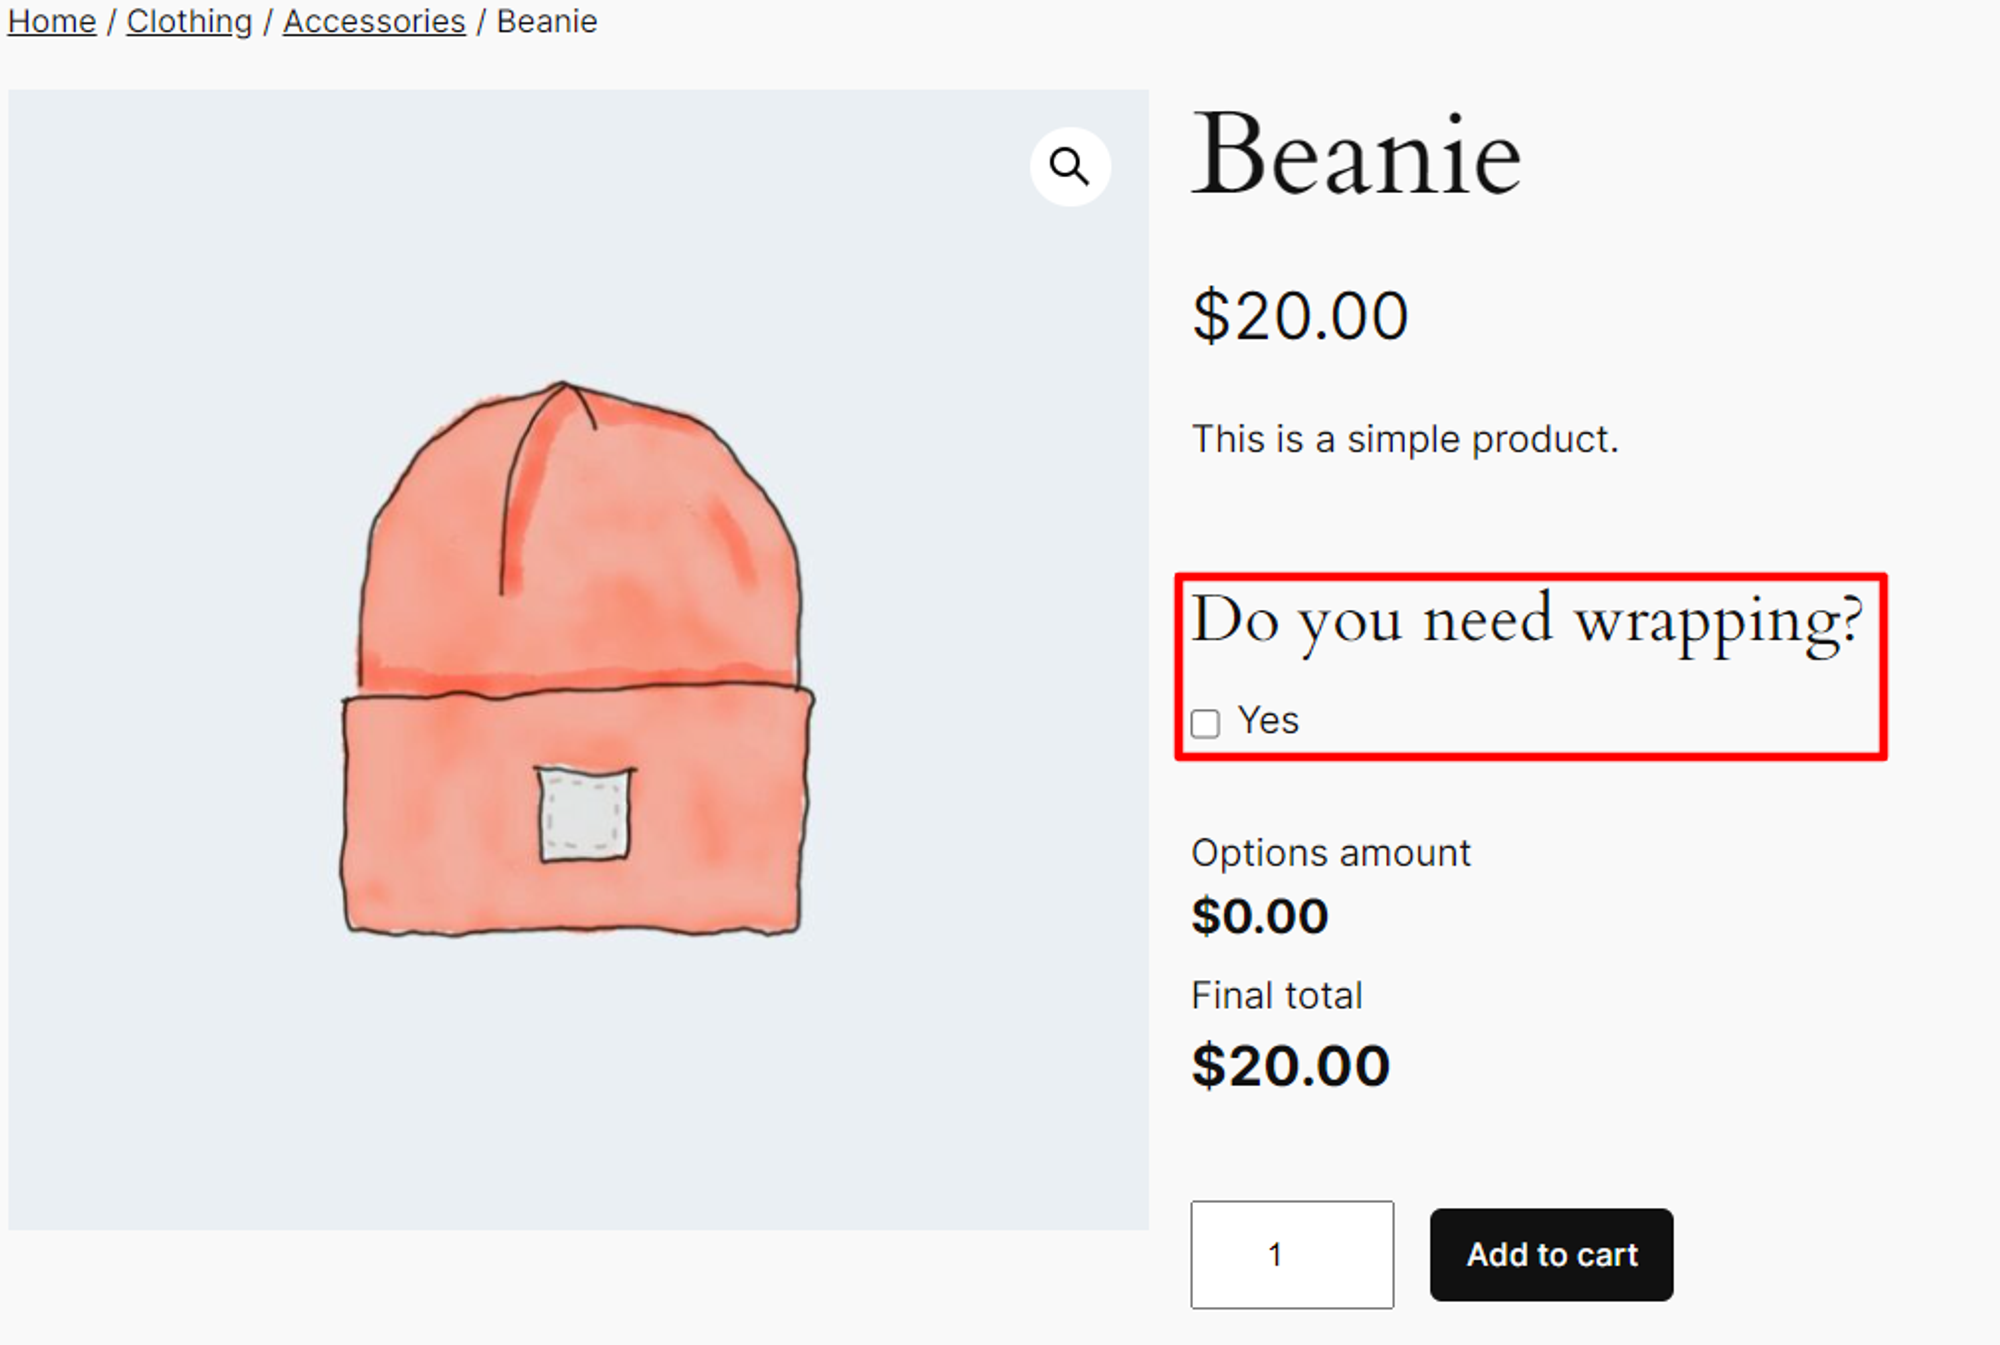
With Extra Product Options for WooCommerce, store owners can create custom fields for their products, such as text fields, drop-down menus, checkboxes, and more. This allows customers to add additional information, such as engraving details or color preferences, to their orders. However, when it comes to exporting these orders, the default WooCommerce export feature does not include the custom product options. This can be a major issue for businesses that rely on these options for their products. By integrating with Advanced Order Export For WooCommerce, store owners can export orders with all the custom product options included.
In an example, the option to select gift wrapping is already available on the product page. Thus, the customer does not need to look for it.
Using Advanced Order Export For WooCommerce integration, we can track how often customers add Gift wrapping to an order. This can be useful in making decisions regarding a product: Should the price be increased or decreased? or remove Gift wrapping altogether?
As with Tickera, you need to paste the following code into the snippet.
// add all options to SINGLE  product row
class WOE_add_TM_cols{
	var $tm_cols = array( 'pos','name','value','price','quantity', 'name_value');
	function __construct() {
		add_filter('woe_get_order_product_fields',array($this,'add_product_fields') );
		add_filter('woe_fetch_order_products', array($this,'fill_tm_cols') ,10, 5);
	}

	function add_product_fields($fields) {
		foreach($this->tm_cols as $tm_col) {
			$fields['tm_field_'.$tm_col] = array('label'=>'TM '.$tm_col,'colname'=>'TM '.$tm_col,'checked'=>1);
		}
		return $fields;
	}

	function fill_tm_cols($products, $order, $labels, $format,$static_vals) {
		$new_products = array();

		foreach( $products as $item_id=>$product) {
			$item_meta = get_metadata( 'order_item', $item_id );

			$pos = 1;
			if( isset($item_meta["_tmcartepo_data"])   AND  is_array($tmfields = maybe_unserialize($item_meta["_tmcartepo_data"][0]))  ) {
				$new_product = $product;
				foreach($tmfields as $tm_field) {
					$tm_field['pos']= $pos++;//set fake field
					$tm_field['name_value'] = $tm_field['name'] . ':' .$tm_field['value'];
					// fill TM columns
					foreach($this->tm_cols as $tm_col) {
						if( !isset($new_product['tm_field_'.$tm_col])) continue;
						if( !empty($new_product['tm_field_'.$tm_col]))
							$new_product['tm_field_'.$tm_col] .= ", " .$tm_field[$tm_col];
						else
							$new_product['tm_field_'.$tm_col] = $tm_field[$tm_col];
					}
				}
				//don't add each option as new product!
				$new_products[] = $new_product;
				$pos++;
			}
			if( isset($item_meta["_tmcartfee_data"])   AND  is_array($tmfields = maybe_unserialize($item_meta["_tmcartfee_data"][0]))  ) {
				$new_product = $product;
				foreach($tmfields[0] as $tm_field) {
					$tm_field['pos']= $pos++;//set fake field
					$tm_field['name_value'] = $tm_field['name'] . ':' .$tm_field['value'];
					// fill TM columns
					foreach($this->tm_cols as $tm_col) {
						if( !isset($new_product['tm_field_'.$tm_col])) continue;
						if( !empty($new_product['tm_field_'.$tm_col]))
							$new_product['tm_field_'.$tm_col] .= ", " .$tm_field[$tm_col];
						else
							$new_product['tm_field_'.$tm_col] = $tm_field[$tm_col];
					}
				}
				//don't add each option as new product!
				$new_products[] = $new_product;
				$pos++;
			}
			if($pos==1) //nothing added - just copy product as is
				$new_products[] = $product;
		}
		return $new_products;
	}
}
new WOE_add_TM_cols();
Then generate a report.
Shipping Multiple Addresses
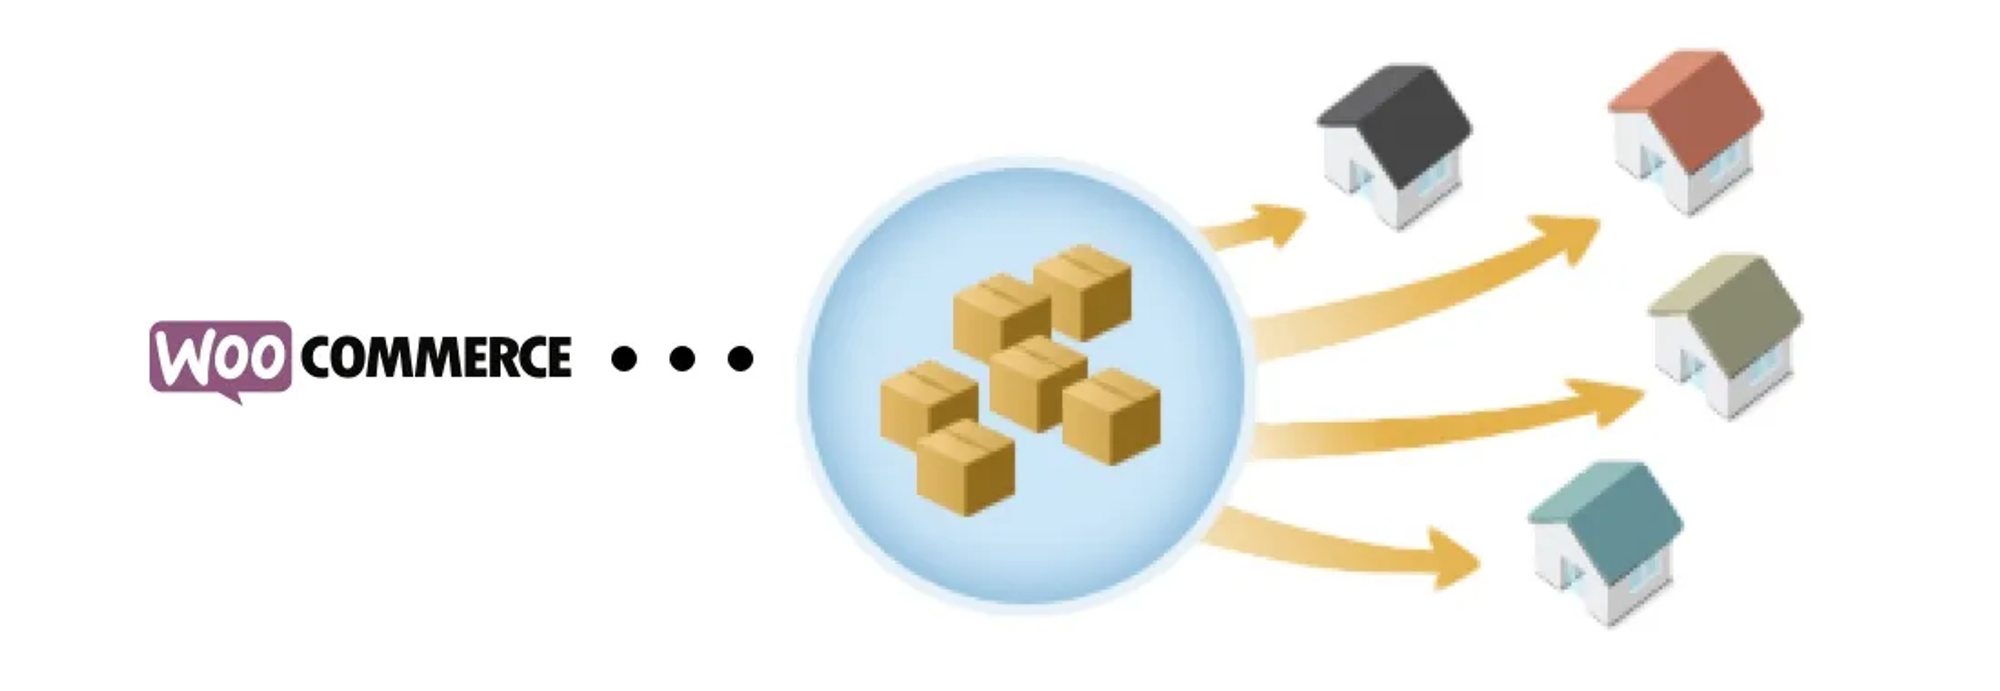
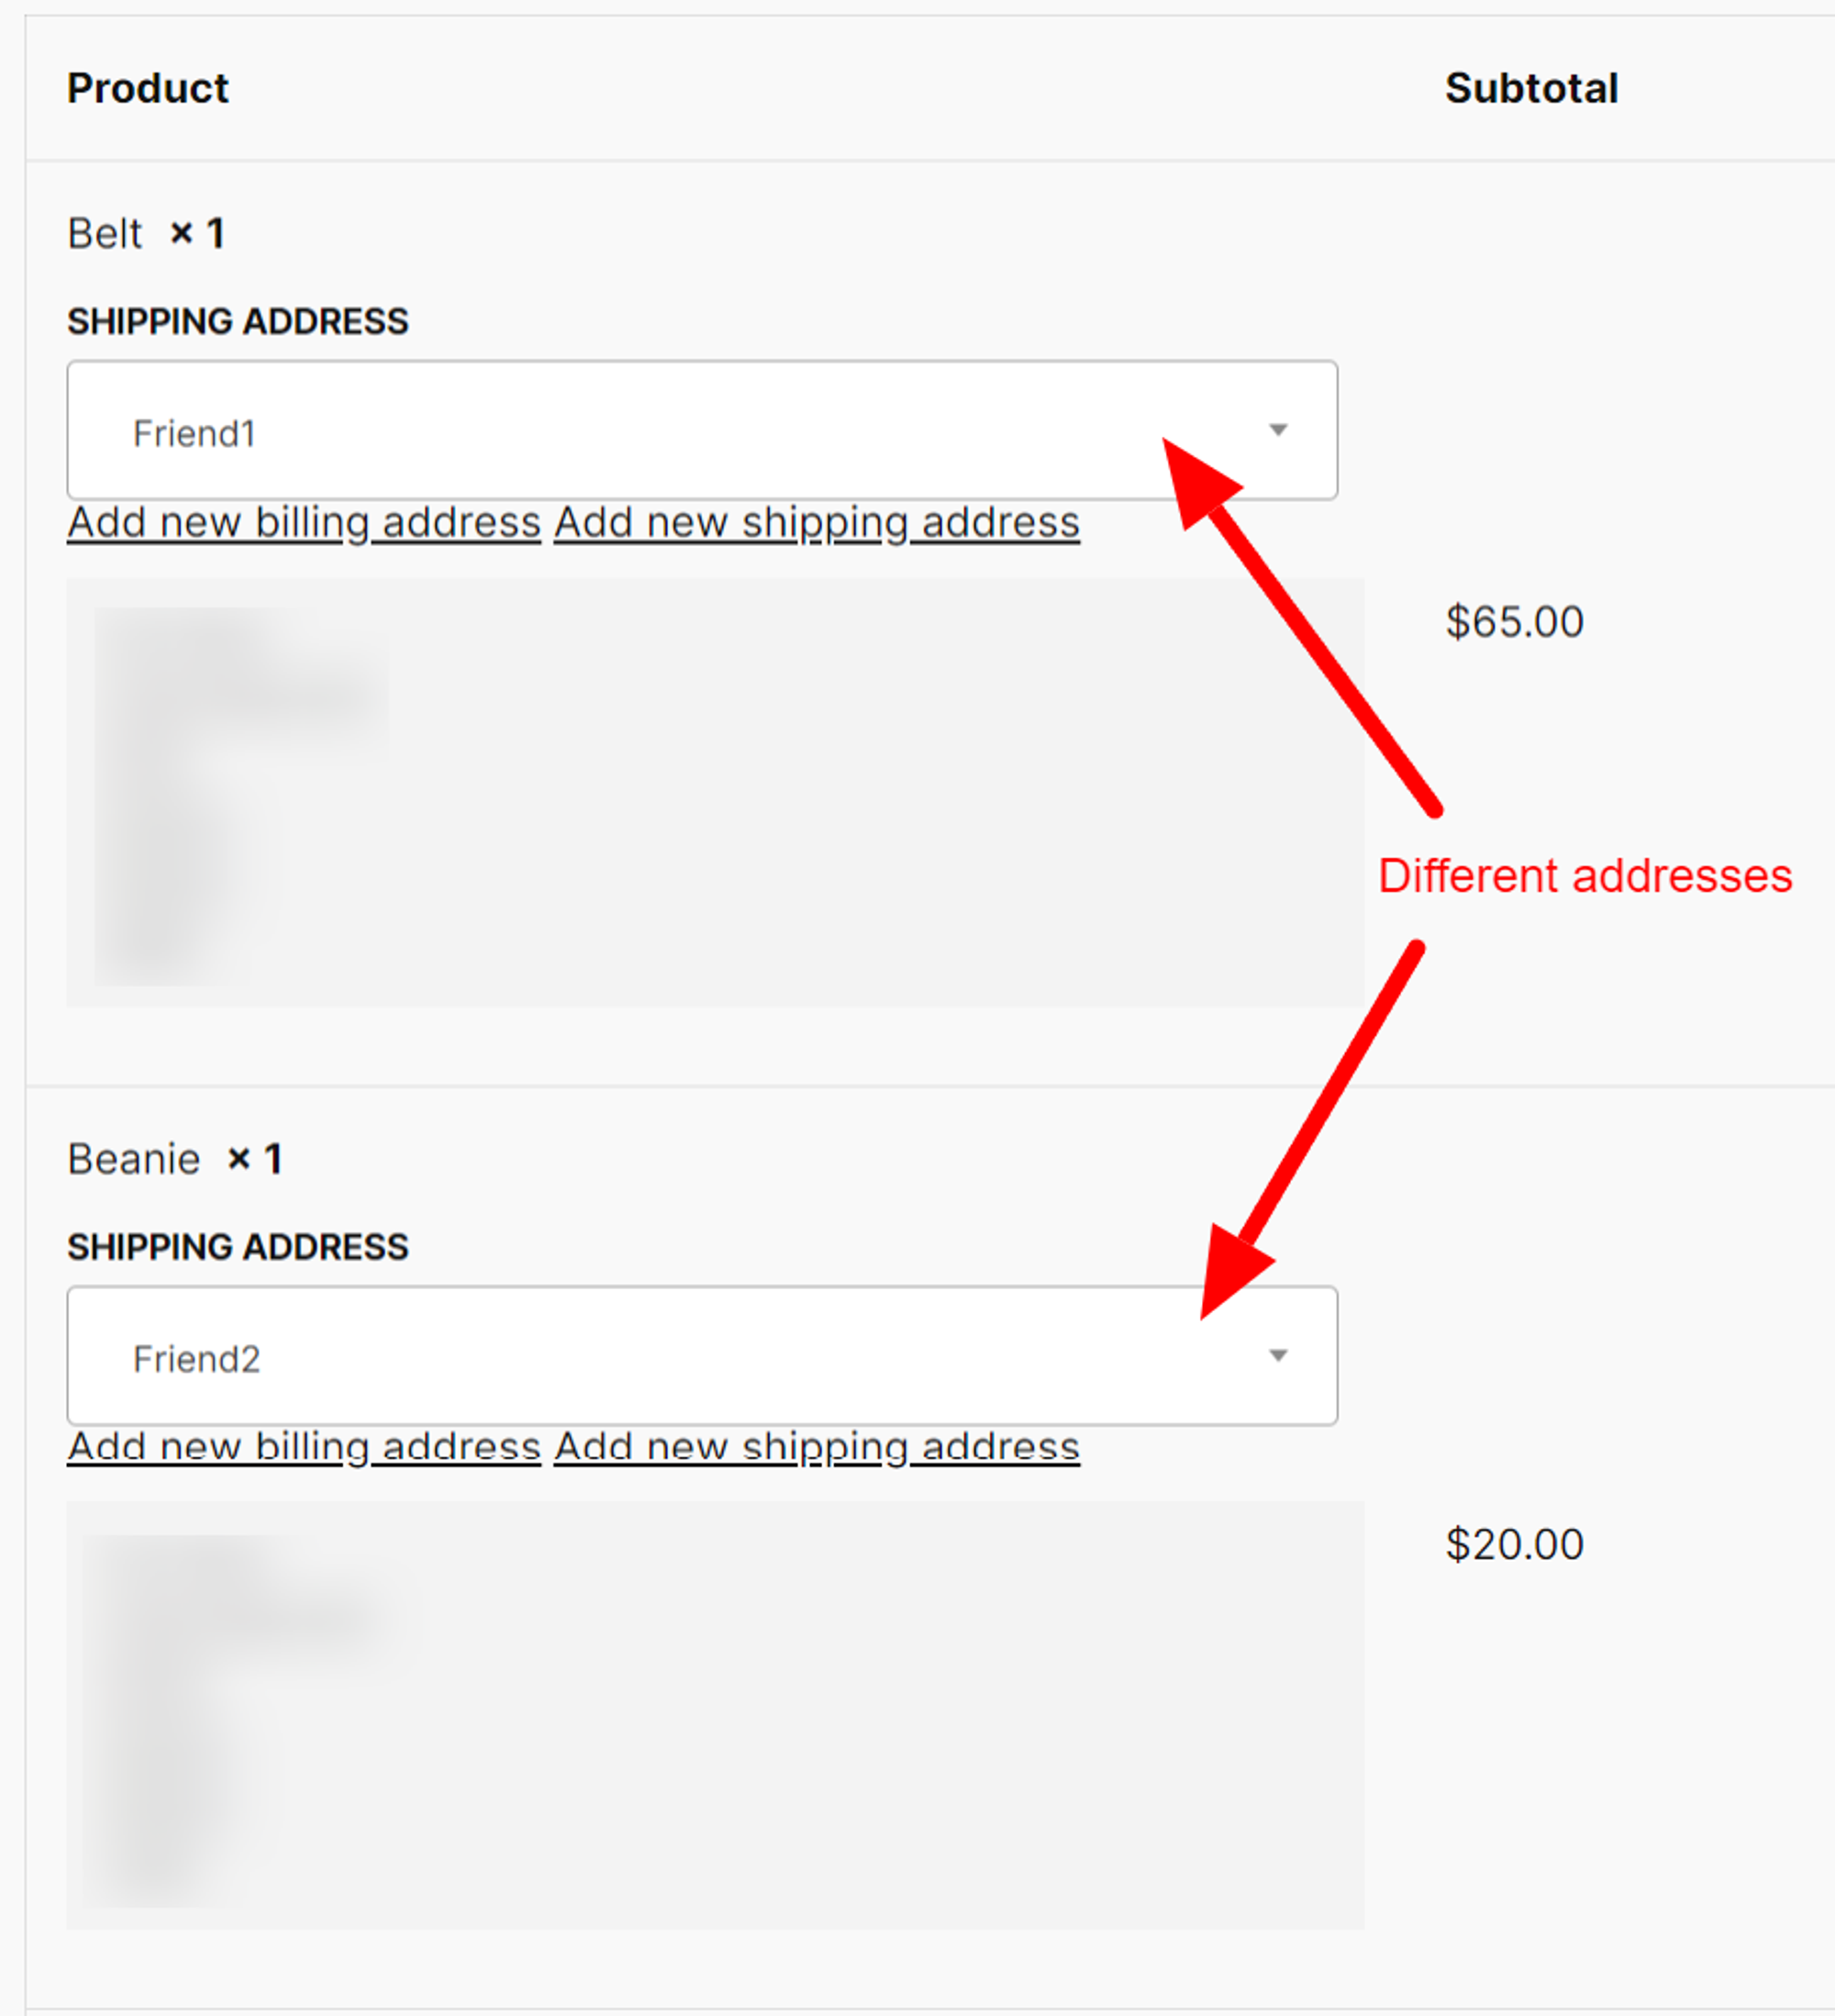
Shipping multiple addresses has become an essential plugin for e-commerce businesses, as it allows customers to ship their purchases to multiple locations with ease. This is especially useful for customers who may want to send gifts to multiple recipients or for businesses that need to fulfill orders to different addresses. Integrating this plugin with Advanced Order Export for WooCommerce takes the shipping process to the next level.
First, let’s clarify how to configure the Shipping multiple addresses plugin. After installation and activation, you will find the new “Multiple Customer Addresses Options” tab. There you need to enable the “Shipping per product” option (located at the very end of the page). After which the buyer will be able to select different shipping or billing addresses for each product at the Checkout page.
As with previous plugins, paste the following code:
//this code adds shipping information for each product
class WOE_add_product_shipping{
	var $qty_shipping, $default_address ;

	function __construct() {
		//add fields to export
		add_filter('woe_get_order_product_fields', array($this,'add_shipping_fields'), 10, 2);
		//remember QTY+Address for each prodct
		add_filter('woe_order_export_started',array($this,'fetch_product_shipping'), 10, 1);
		// rebuild product list based on shipping packages
		add_filter('woe_fetch_order_products',array($this,'rebuild_products_shipping'), 10, 5);
	}

	function add_shipping_fields($fields,$format) {
		$names = array('first_name','last_name','full_name','company','country','address_1','address_2','city','state','postcode','note');
		foreach($names as $f) {
			$fields['shipping_'.$f] = array('label'=>"Product Shipping ".$f,'checked' => 1, 'colname'=>"Product Shipping ".$f);
		}
		return $fields;
	}

	function fetch_product_shipping($order_id){
		$this->qty_shipping = array();
		$shipping_packages = get_post_meta($order_id, '_wcms_packages', true );
		if( !is_array($shipping_packages) )
			$shipping_packages = array();
		foreach($shipping_packages  as $pack) {
			$addr = $pack['destination'];
			foreach($pack["contents"] as $item) {
				$key = $item['cart_key'];
				$addr['full_name'] = trim($addr['first_name'] . " " . $addr['last_name']); // new field
				$addr['note'] = isset($pack['note']) ? $pack['note'] : '';
				if( !isset($this->qty_shipping[$key]) )
					$this->qty_shipping[$key] = array();
				$this->qty_shipping[$key][] = array("qty"=>$item['quantity'],"address"=>$addr);
			}
		}

		//if no pack!
		$order = new WC_Order($order_id);
		$this->default_address = array();
		$names = array('first_name','last_name','company','country','address_1','address_2','city','state','postcode');
		foreach($names as $field)
	                $this->default_address[$field] = $order->{"get_shipping_".$field}();
		$this->default_address['full_name'] = trim($this->default_address['first_name'] . " " . $this->default_address['last_name']); // new field
		$this->default_address['note'] = $order->get_customer_note();
		return $order_id;
	}

	function rebuild_products_shipping($products, $order, $labels, $format, $static) {
		$new_products = array();
		foreach( $products as $item_id=>$row) {
			$item = $order->get_item($item_id);
			$key = $item['_wcms_cart_key'];
			if( !isset($this->qty_shipping[$key])) { // not multishipping package!
				$this->qty_shipping[$key] = array( array("qty"=>$item['qty'], 'address'=>$this->default_address) );
			}
			foreach($this->qty_shipping[$key]  as $new_row) {
				if( isset($row['qty']) )
					$row['qty'] = $new_row['qty'];
				if( isset($row['qty_minus_refund']) )
					$row['qty_minus_refund'] = $new_row['qty'];
				foreach($new_row['address'] as $k=>$v) {
					$k = 'shipping_'.$k;
					if( isset($row[$k]) )
						$row[$k] = $v;
				}
				$new_products[]= $row;
			}
		}
		return $new_products;
	}

}
new WOE_add_product_shipping();
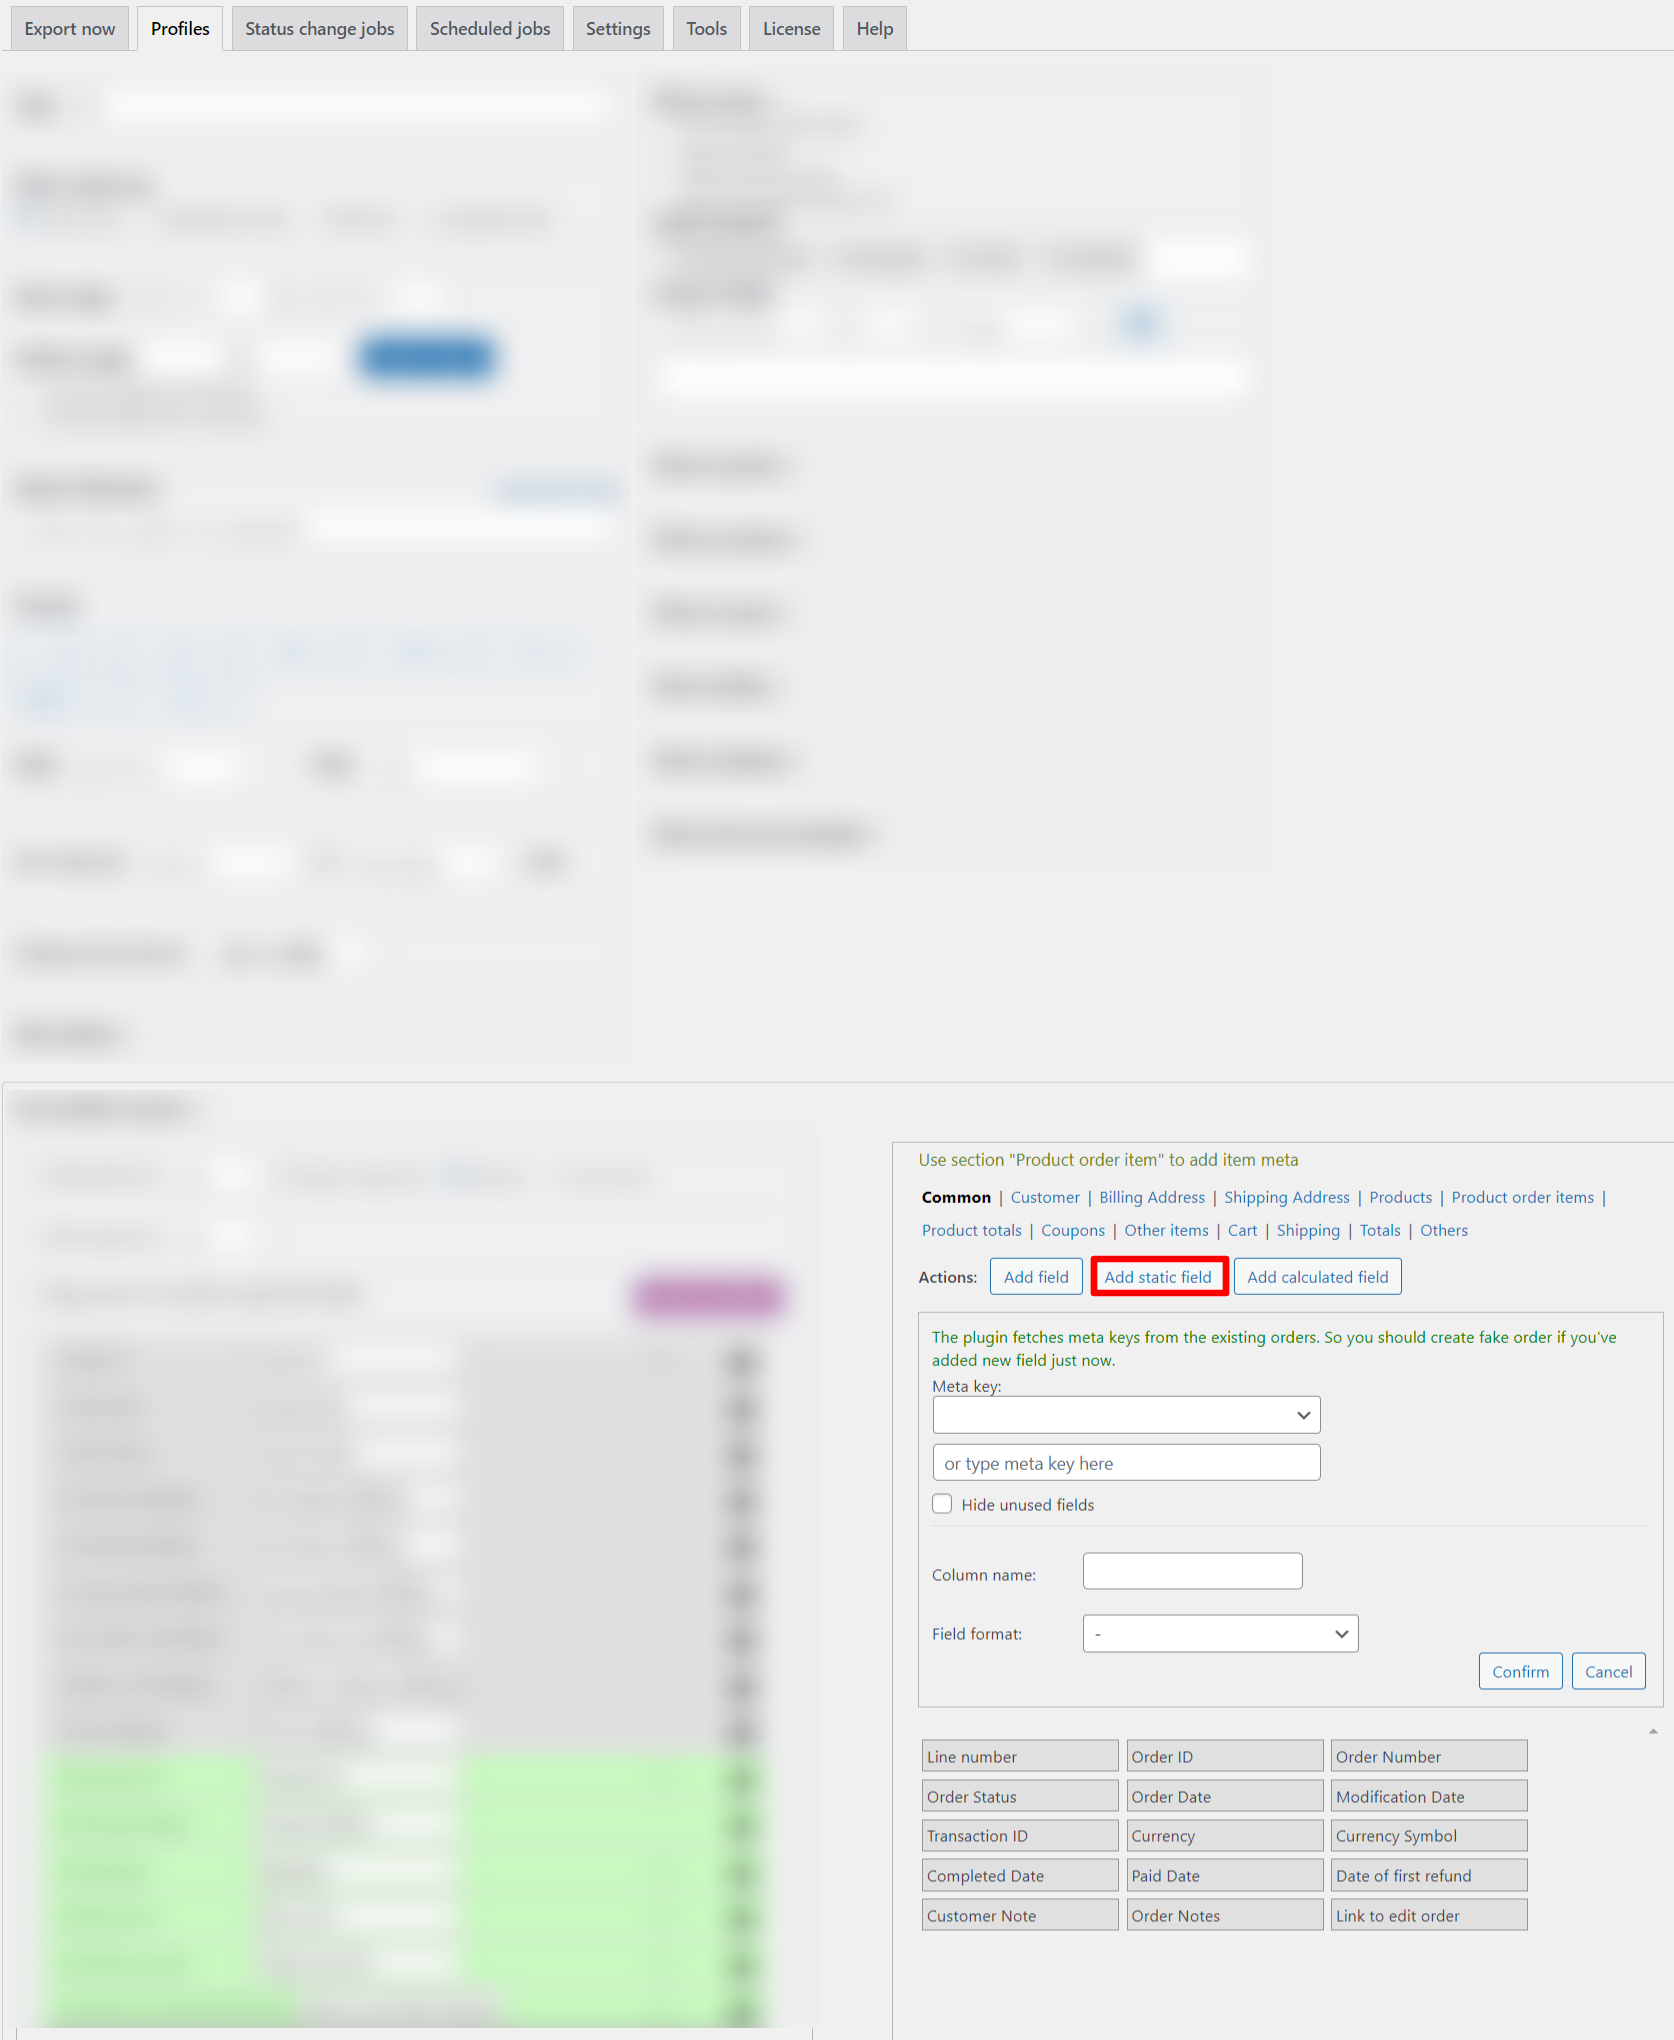
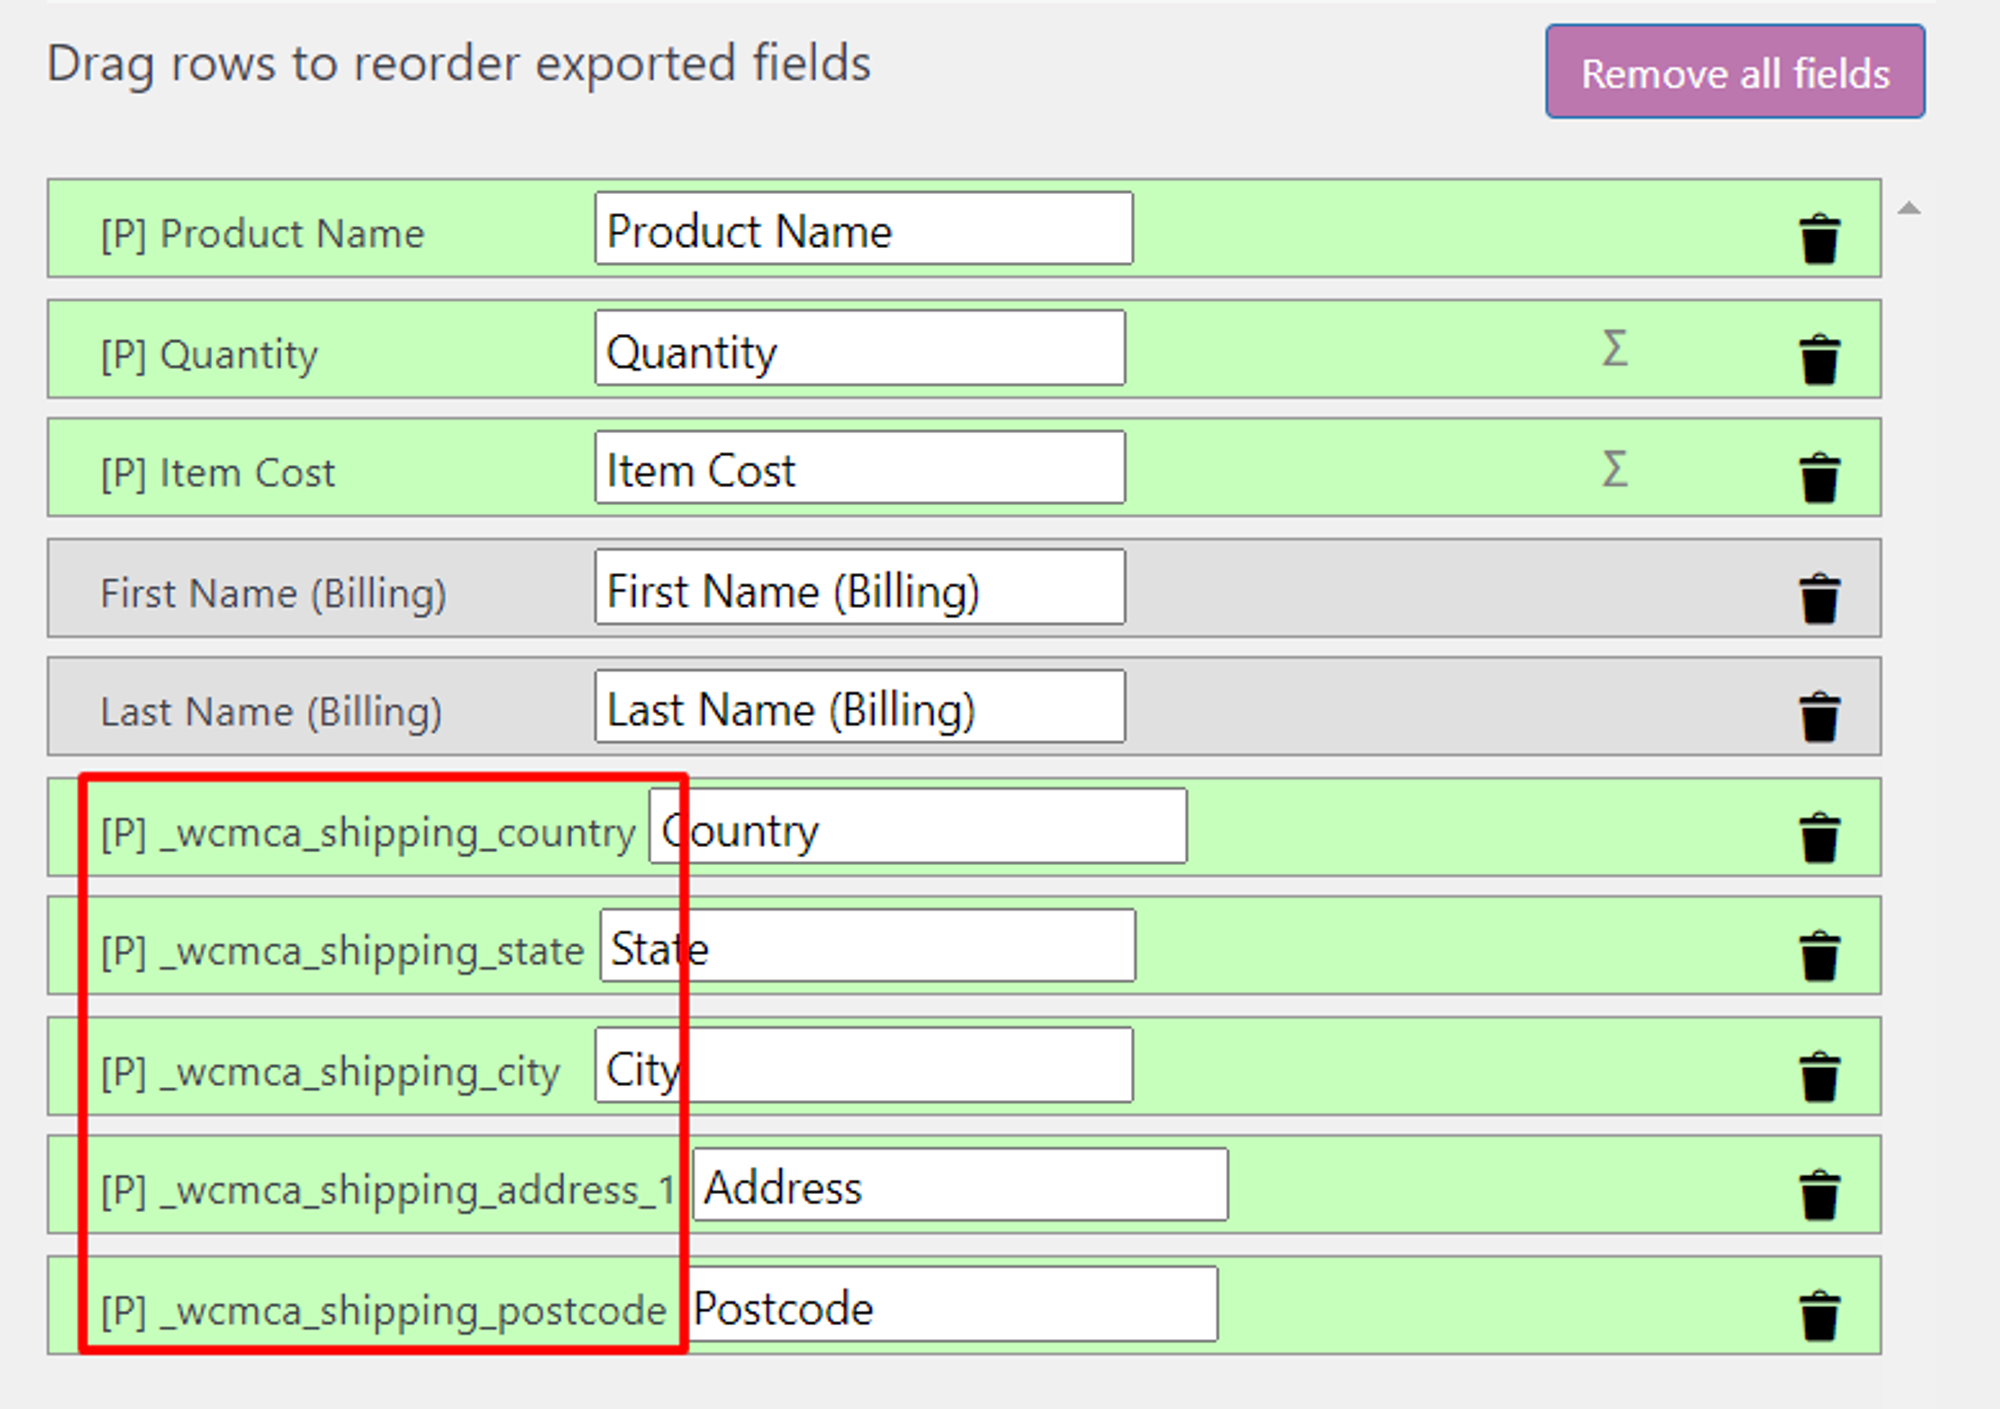
Generating the report will be more difficult this time. You need to create the fields required for the report by clicking on the “Add field” button in the “Product order items” tab in the “Set up fields to export” section. Find and add the following fields as in the screenshot.
Ultimately, integrating of Advanced Order Export for WooCommerce with third-party applications can bring numerous benefits to companies. It saves time, reduces errors, and provides a comprehensive overview of all orders. This not only improves the efficiency of the business but also enhances the overall customer experience, making it a valuable tool for any e-commerce store.
Cash is king in any business, including manufacturing. As we all know, inventory management is vital in lean manufacturing. Therefore, minimizing “working capital”— cash tied up in physical assets— should be a priority for any manufacturer looking to optimize efficiency and cash flow.
It goes without saying that any company must ensure that these inventories do not run out, with the risk of missing an order deadline, unhappy customers and associated reputational damage.
On the other hand, ensuring there is sufficient inventory should not mean that there will be so much of it on site that cash flow will be negatively impacted, or that products will die or become obsolete before they are used. This is especially true for companies seeking to adhere to lean manufacturing principles.
Why Does Inventory Management Matter?
Good inventory management planning is essential for the growth and development of any company. Without a good management system, there may be shortages of products or items that are in stock for a long time. Both cases entail financial losses for the company. Through effective inventory management, a company will always have the materials it needs to produce goods and serve customers. It will also be able to maintain the quality of its products and delivery times.
An inventory management system simplifies and automates company processes. Find out more about the main advantages of this technology:
Sector integration
Process automation allows you to integrate all sectors of the company. This is because the solution records the products supplied by the supplier and indicates that they are already in stock. When there is a problem with a product, this is also recorded by the system, which generates a notification. It helps track sales and also provides data for the financial sector. At the same time, all processes are centralized, which reduces the number of errors when calculating taxes.
Purchase Forecast
Another benefit of having an inventory and storage management system is the ability to forecast purchase needs. The manager can set minimum and maximum inventory limits so that the system can track and notify when you need to be restocked an item. This helps in decision making and tracking the number of sales of each product. An example of a report is a report that identifies the products that are most relevant to a business in terms of sales volume and resulting profitability.
Price Analysis
The monitoring that this technology performs also allows you to analyze production costs. This is because the manager has the information needed to estimate the cost of raw materials, the time they remain in stock, the period required to produce the product, and wastage rates.
The system can have profit estimates for each product, which enhances the ability to make better decisions for business success. In this way, the need to change processes to provide greater flexibility and efficiency can be identified.
Best Inventory Management Practices
The need to manage inventory to save money has led to the emergence of many models and methods. The most famous include the following:
Wilson’s model. It is considered the simplest because it does not involve the presence of uncertainties. The model allows you to determine the optimal level of reserves for the entire assortment, the criteria being the level of demand, placement costs and storage costs. It involves replenishing the warehouse at a certain frequency, in identical batches. The formula is suitable for companies producing products with stable demand, when the risk of unforeseen situations is practically absent.
Just-in-Time model. It implies the delivery of raw materials and materials just in time, that is, exactly at the moment when they are needed on the production line, and in the quantity that is needed at the time of delivery. To reduce costs, the model practically eliminates the presence of a reserve in the warehouse, but when using it, the enterprise’s dependence on suppliers increases. Any supply disruptions can lead to shortages of raw materials and forced equipment downtime.
ABC model. It consists of distributing reserves into three groups based on the method of volume-cost analysis. Category A includes stocks that are necessary for the most expensive products with a long use cycle. They account for the majority of the funds, so strict control is carried out on group A, and the required volume and costs are accurately determined. Group B includes raw materials and supplies for mid-price products. Category C is the cheapest inventory with high turnover and minimal markup.
What makes inventory management so difficult for most people is that there is no one right way to do it. The inventory management model that an enterprise uses must first of all take into account the specifics of a particular production. There is no single universal algorithm for everyone.
Ready-made Solutions in Advanced Order Export for WooCommerce
Fortunately, there are ready-made solutions available that can help companies master their inventory management. Advanced Order Export for WooCommerce is one such solution that can simplify the process and help businesses better manage their inventory.
With Advanced Order Export for WooCommerce, businesses can automatically export orders from their sales channels, such as ecommerce stores, marketplaces, and POS systems, to their inventory management system. This eliminates the need for manual data entry and reduces the risk of errors. It also allows businesses to have real-time visibility into their inventory levels, enabling them to make better decisions about stock levels.
We have prepared 3 ready-made solutions for you that will help you optimize your order management process:
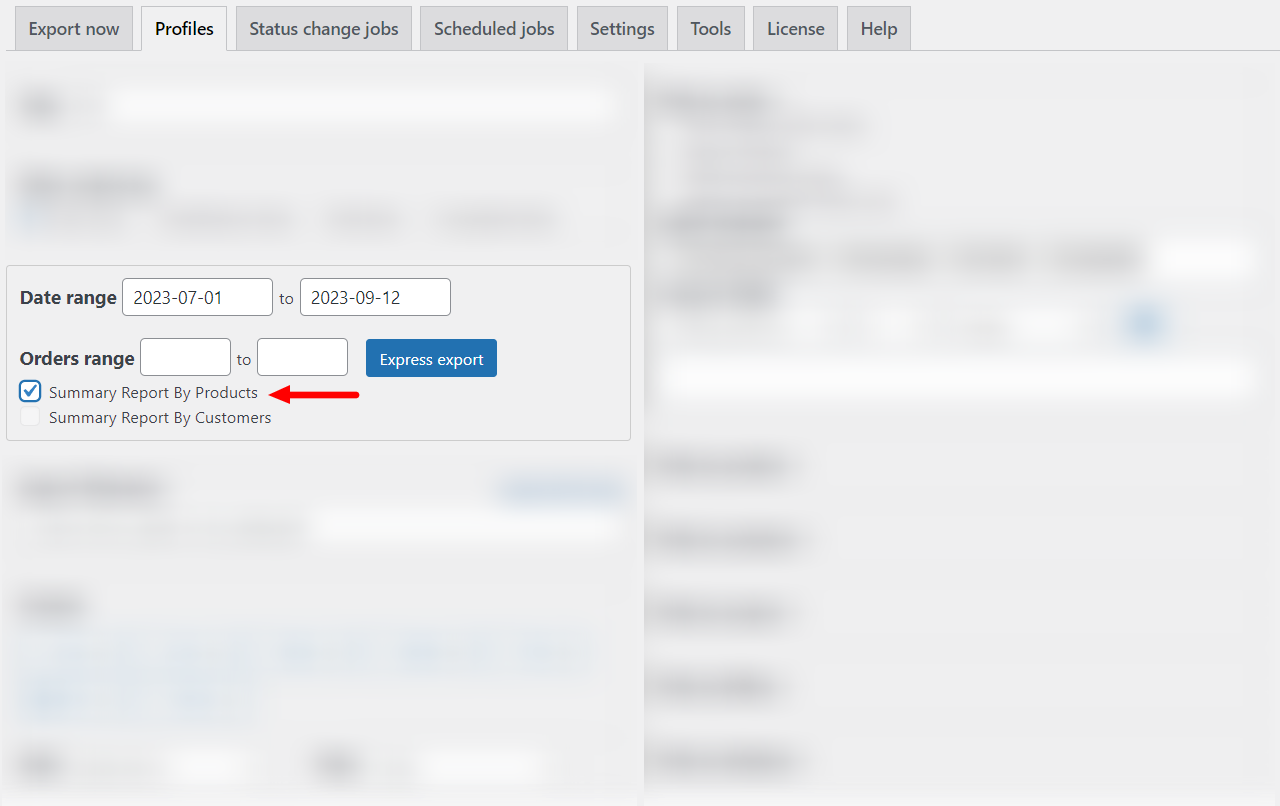
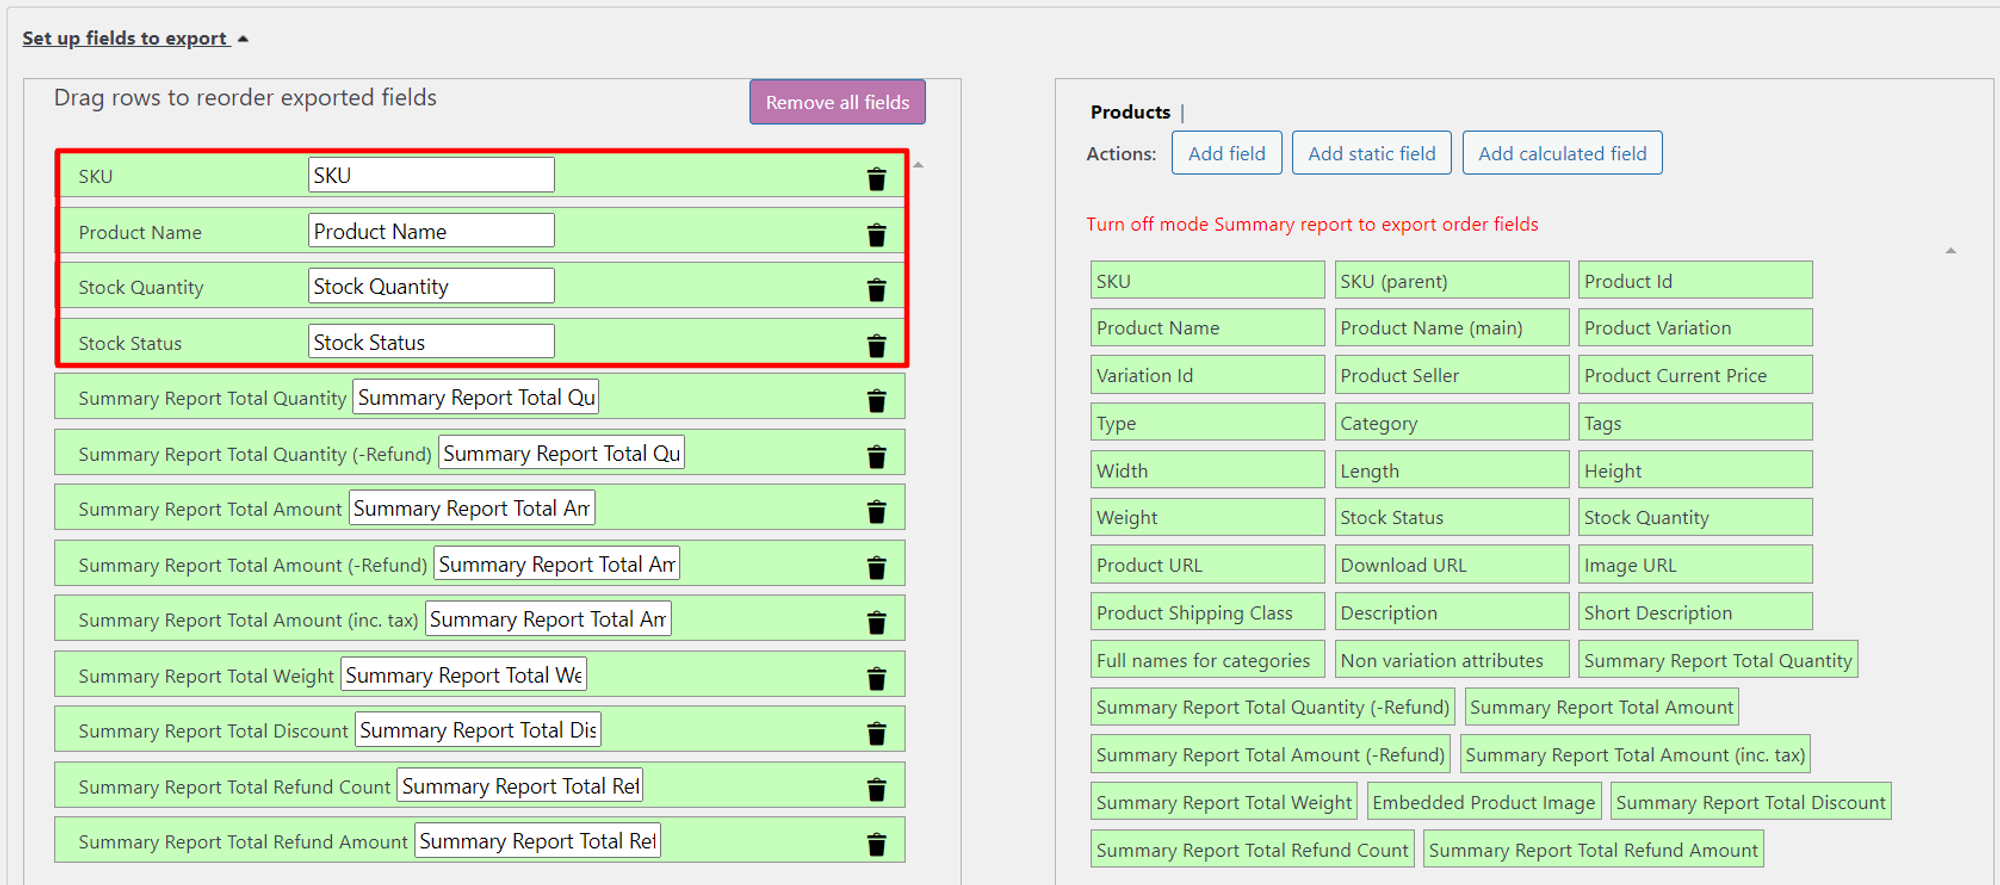
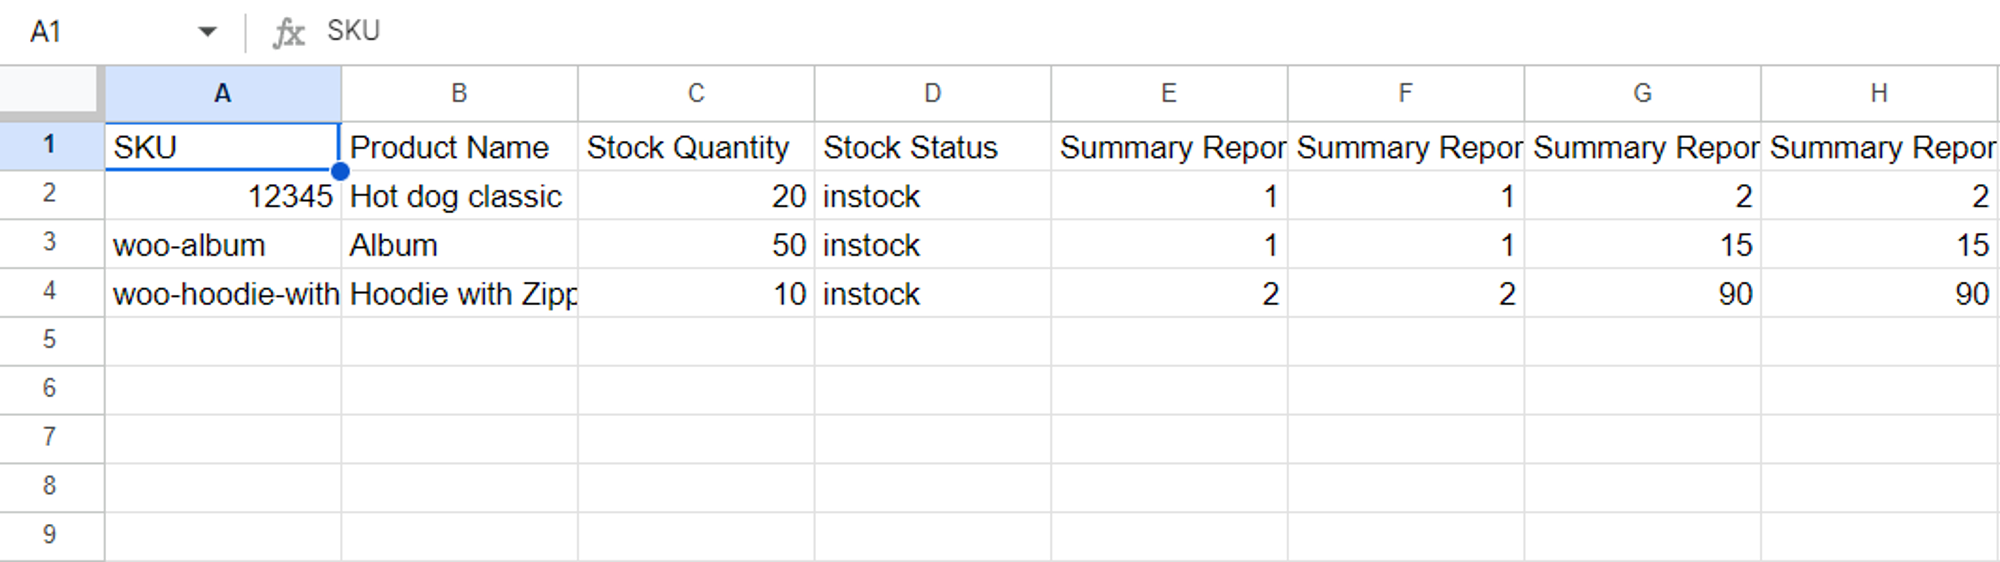
Note: All reports have a checkbox Summary Report By Products. This is an important setting — it allows you to take overall statistics for the product.
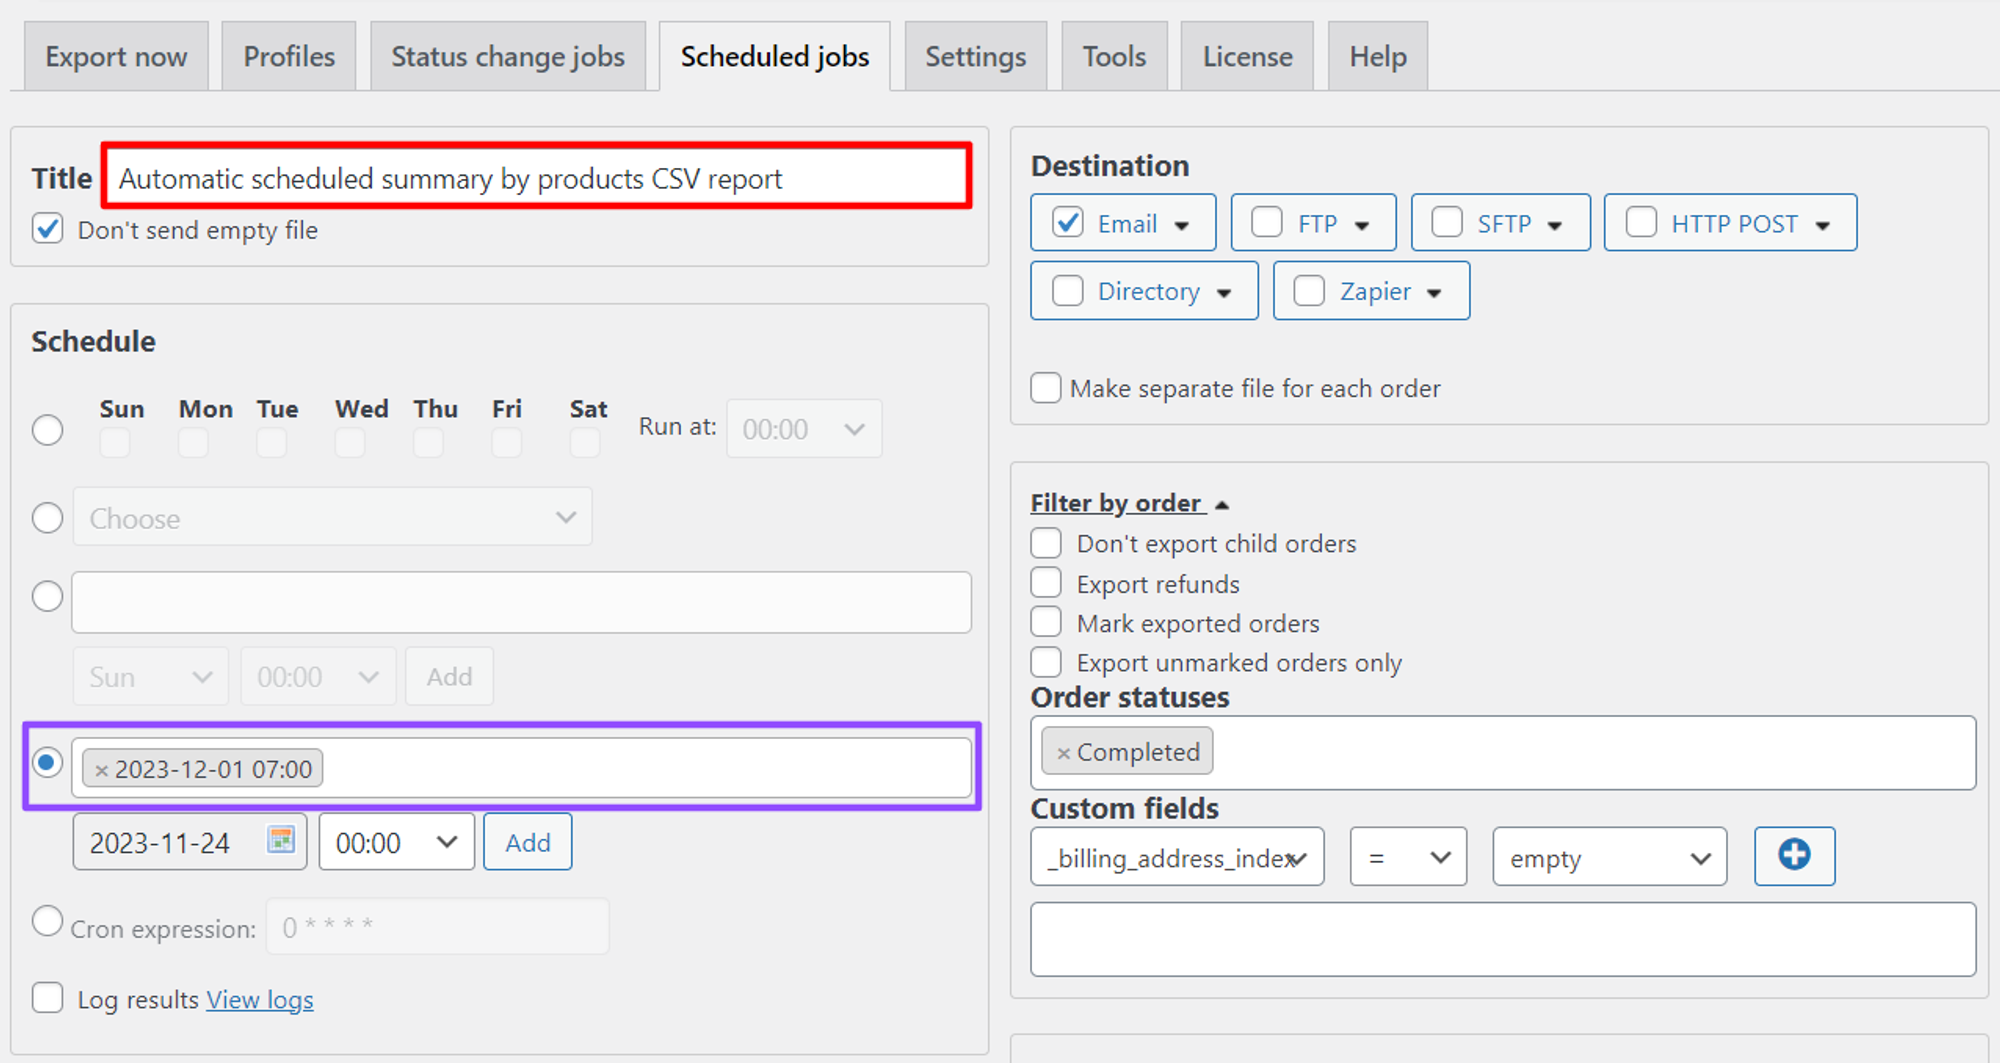
Automatic scheduled summary by products CSV report, the destination of which is email.
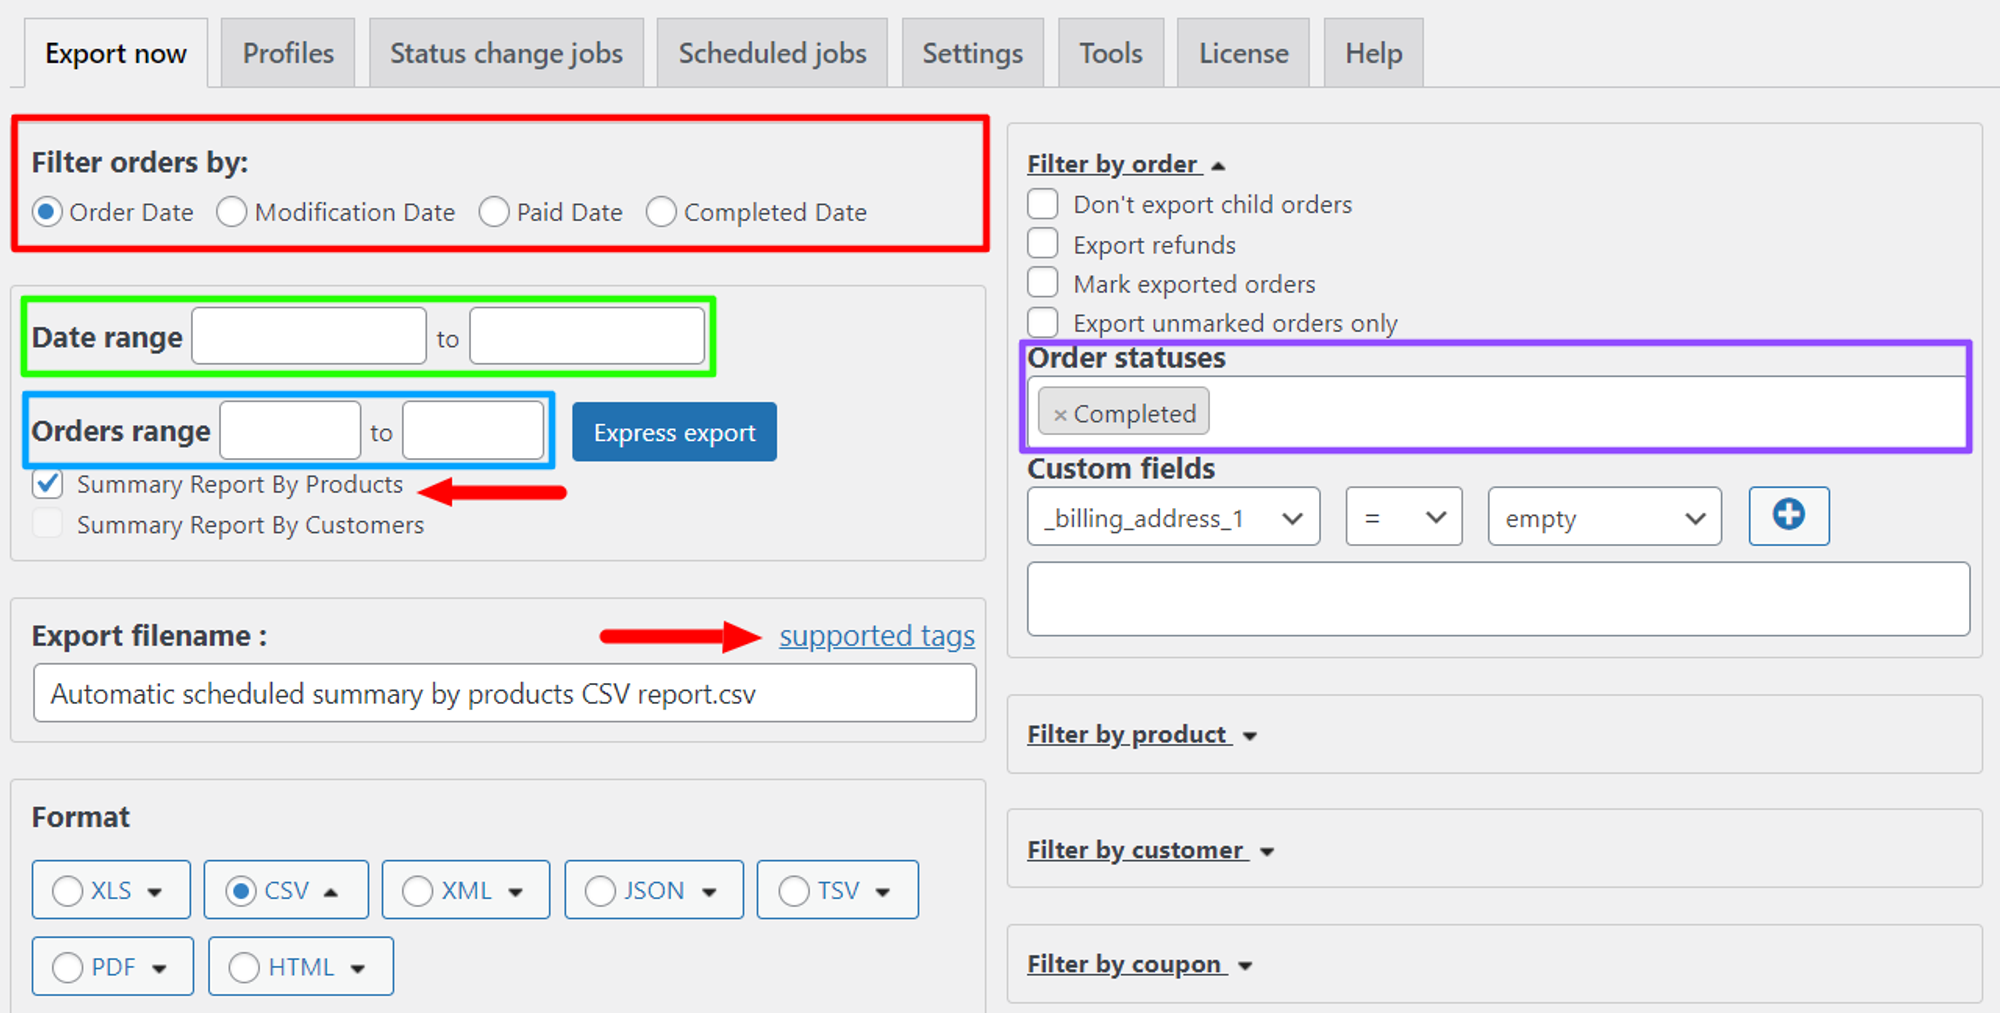
First of all, we set up the Export Now tab. We leave the Filter orders by — Order Date. We leave the date range as default, so data for the entire time will be exported. If you want to export by specific order numbers, then specify a range of orders. The export file name can be customized by tags. Using them, for example, you can get the current date in the name of the report. You can view the tags using the link next to the file name or here. Let’s select the information with what status will be uploaded. Choose Completed.
Let’s select the CSV file format. The settings can be left as default.
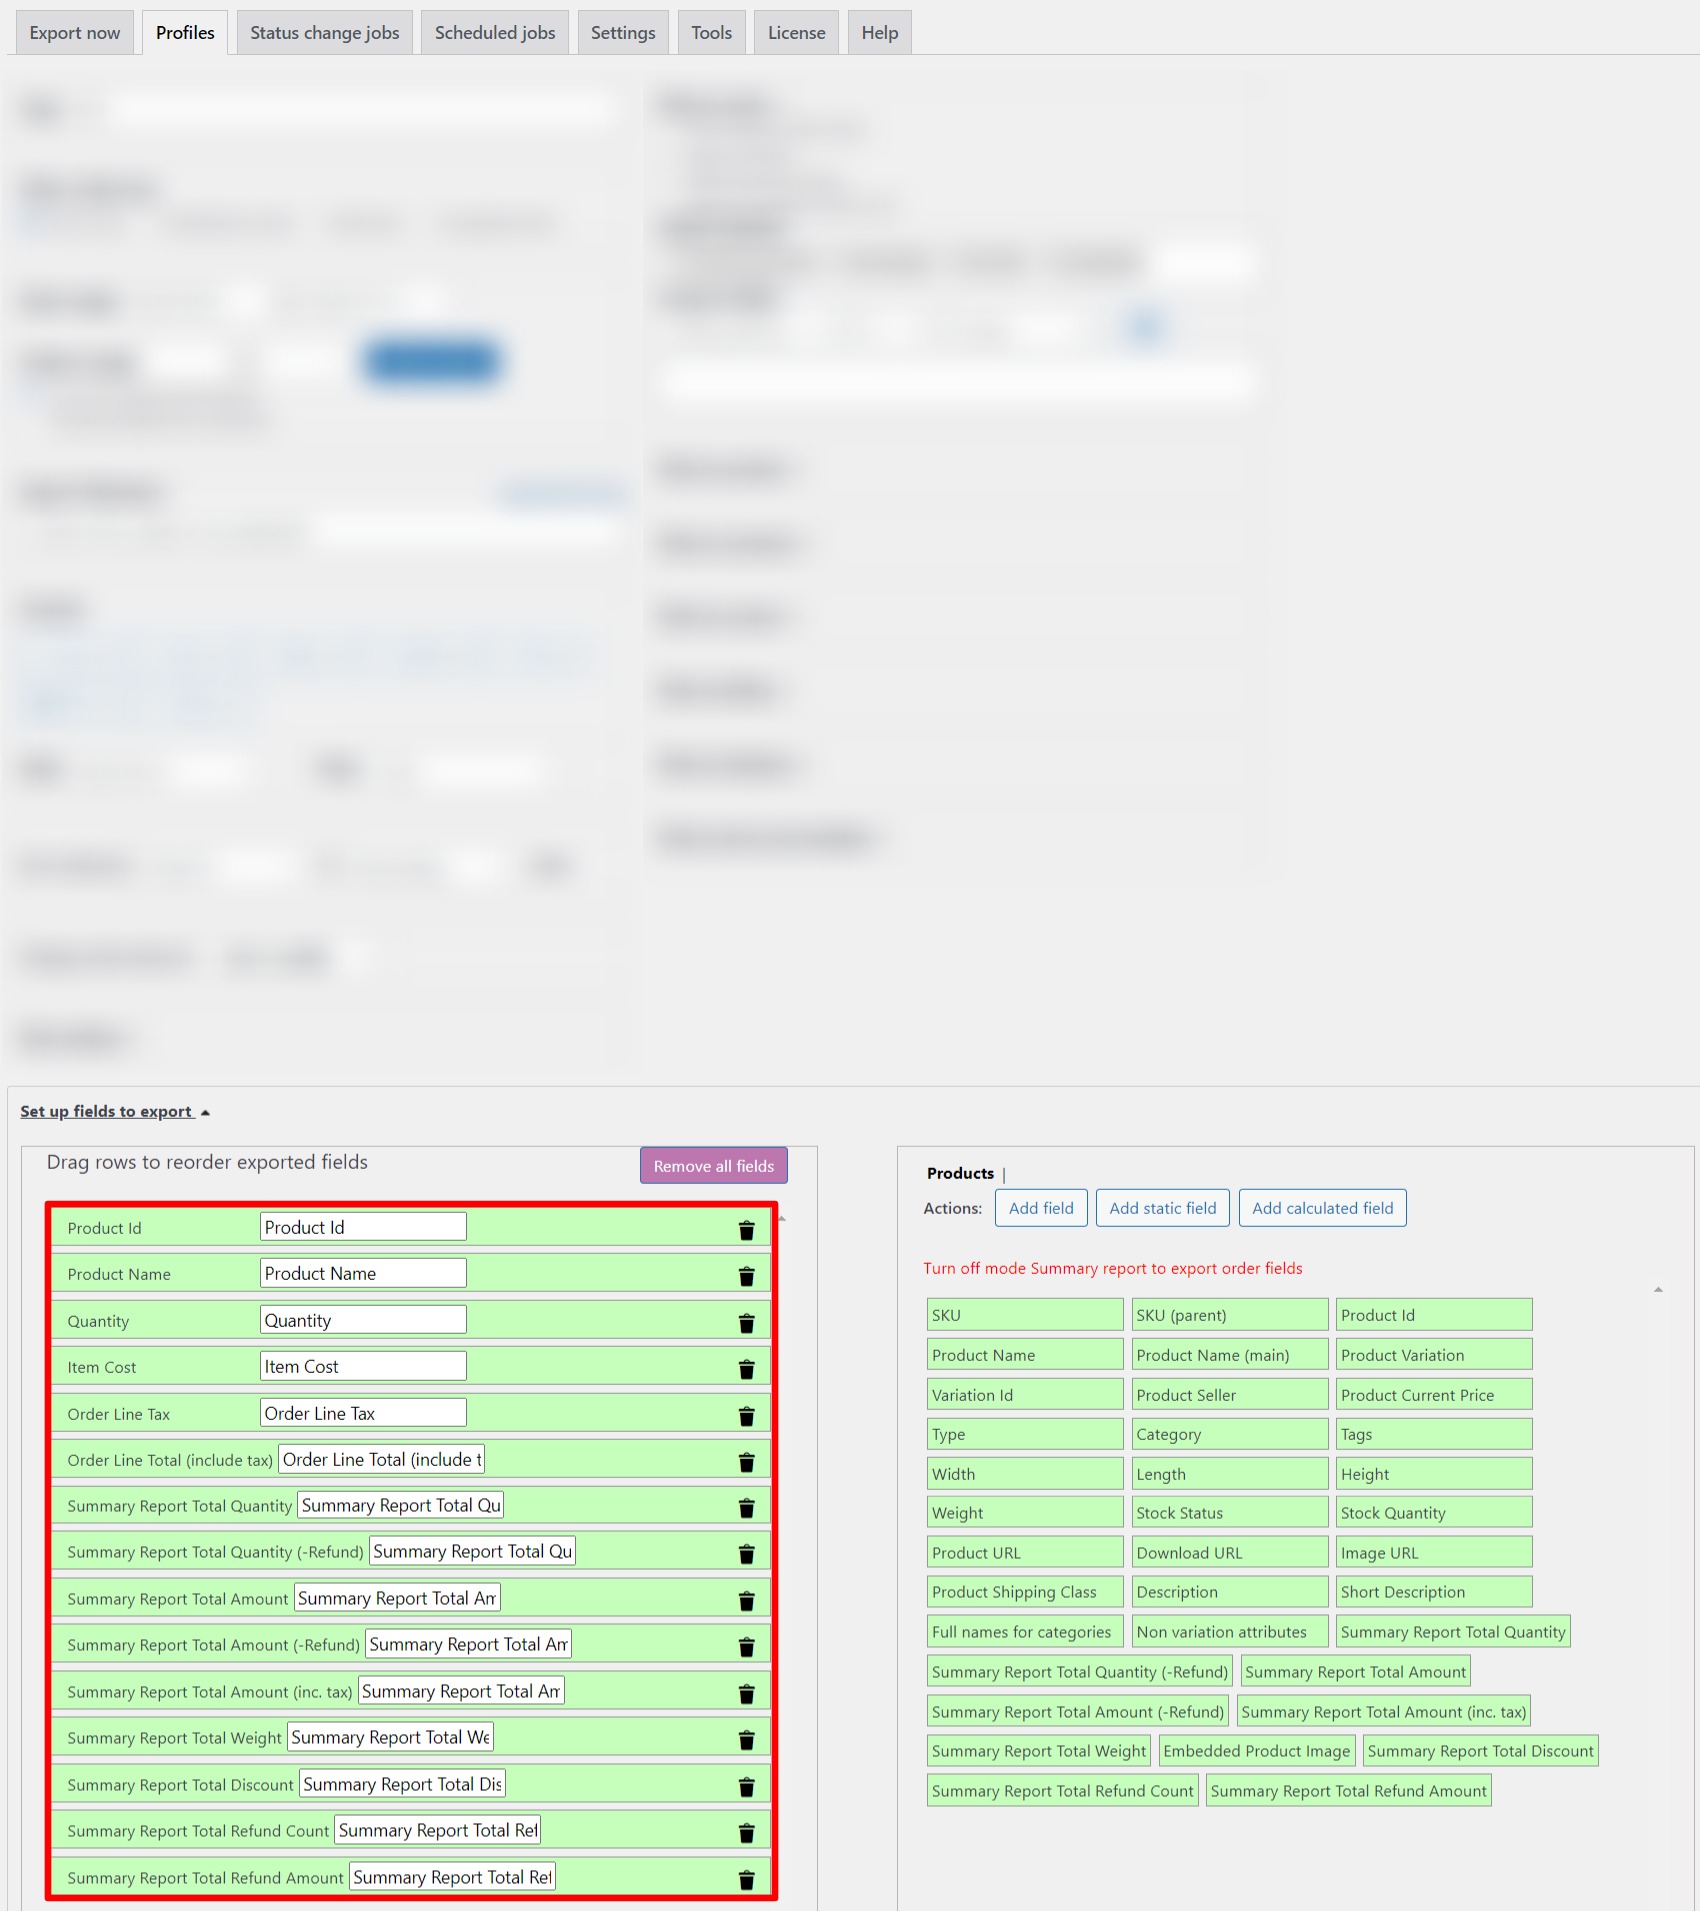
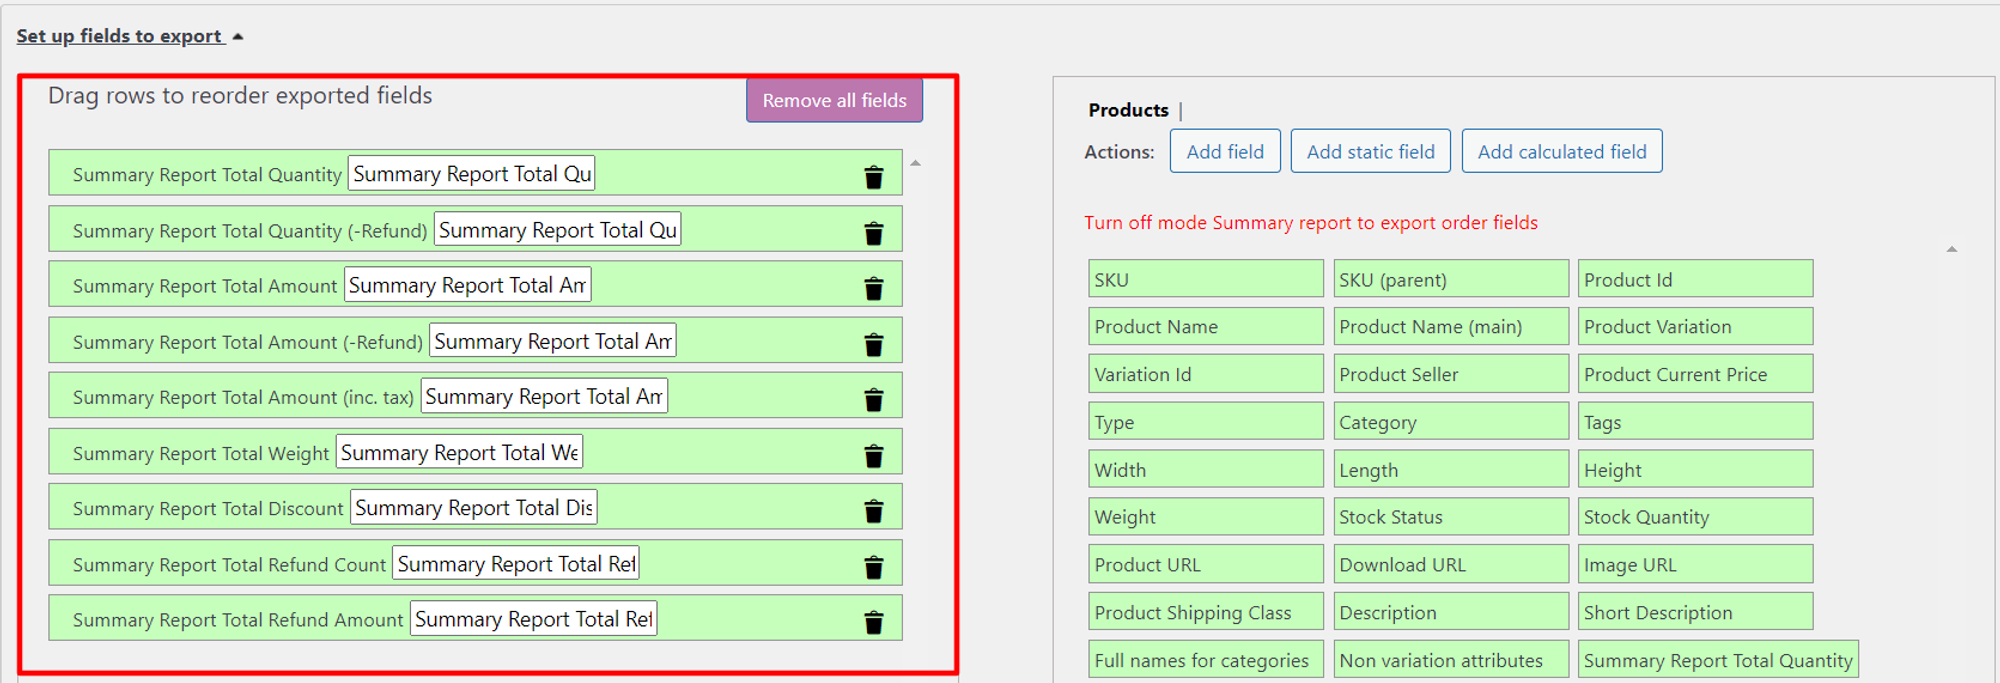
When you clicked the Summary Report By Products checkbox, the report automatically changed the fields to the appropriate ones:
Let’s add other fields to them:
Save your settings and export this report:
Click on the Save as profile button. Go to Profiles. Click on the clock button in the line with this report to add it to your scheduled ones.
Click OK in the pop-up window.
In the new tab, give your profile a name.
Select the exported date of the report. For example:
Every week
Only on Sundays
Once a day
In our case, this is December 1 at 7 am.
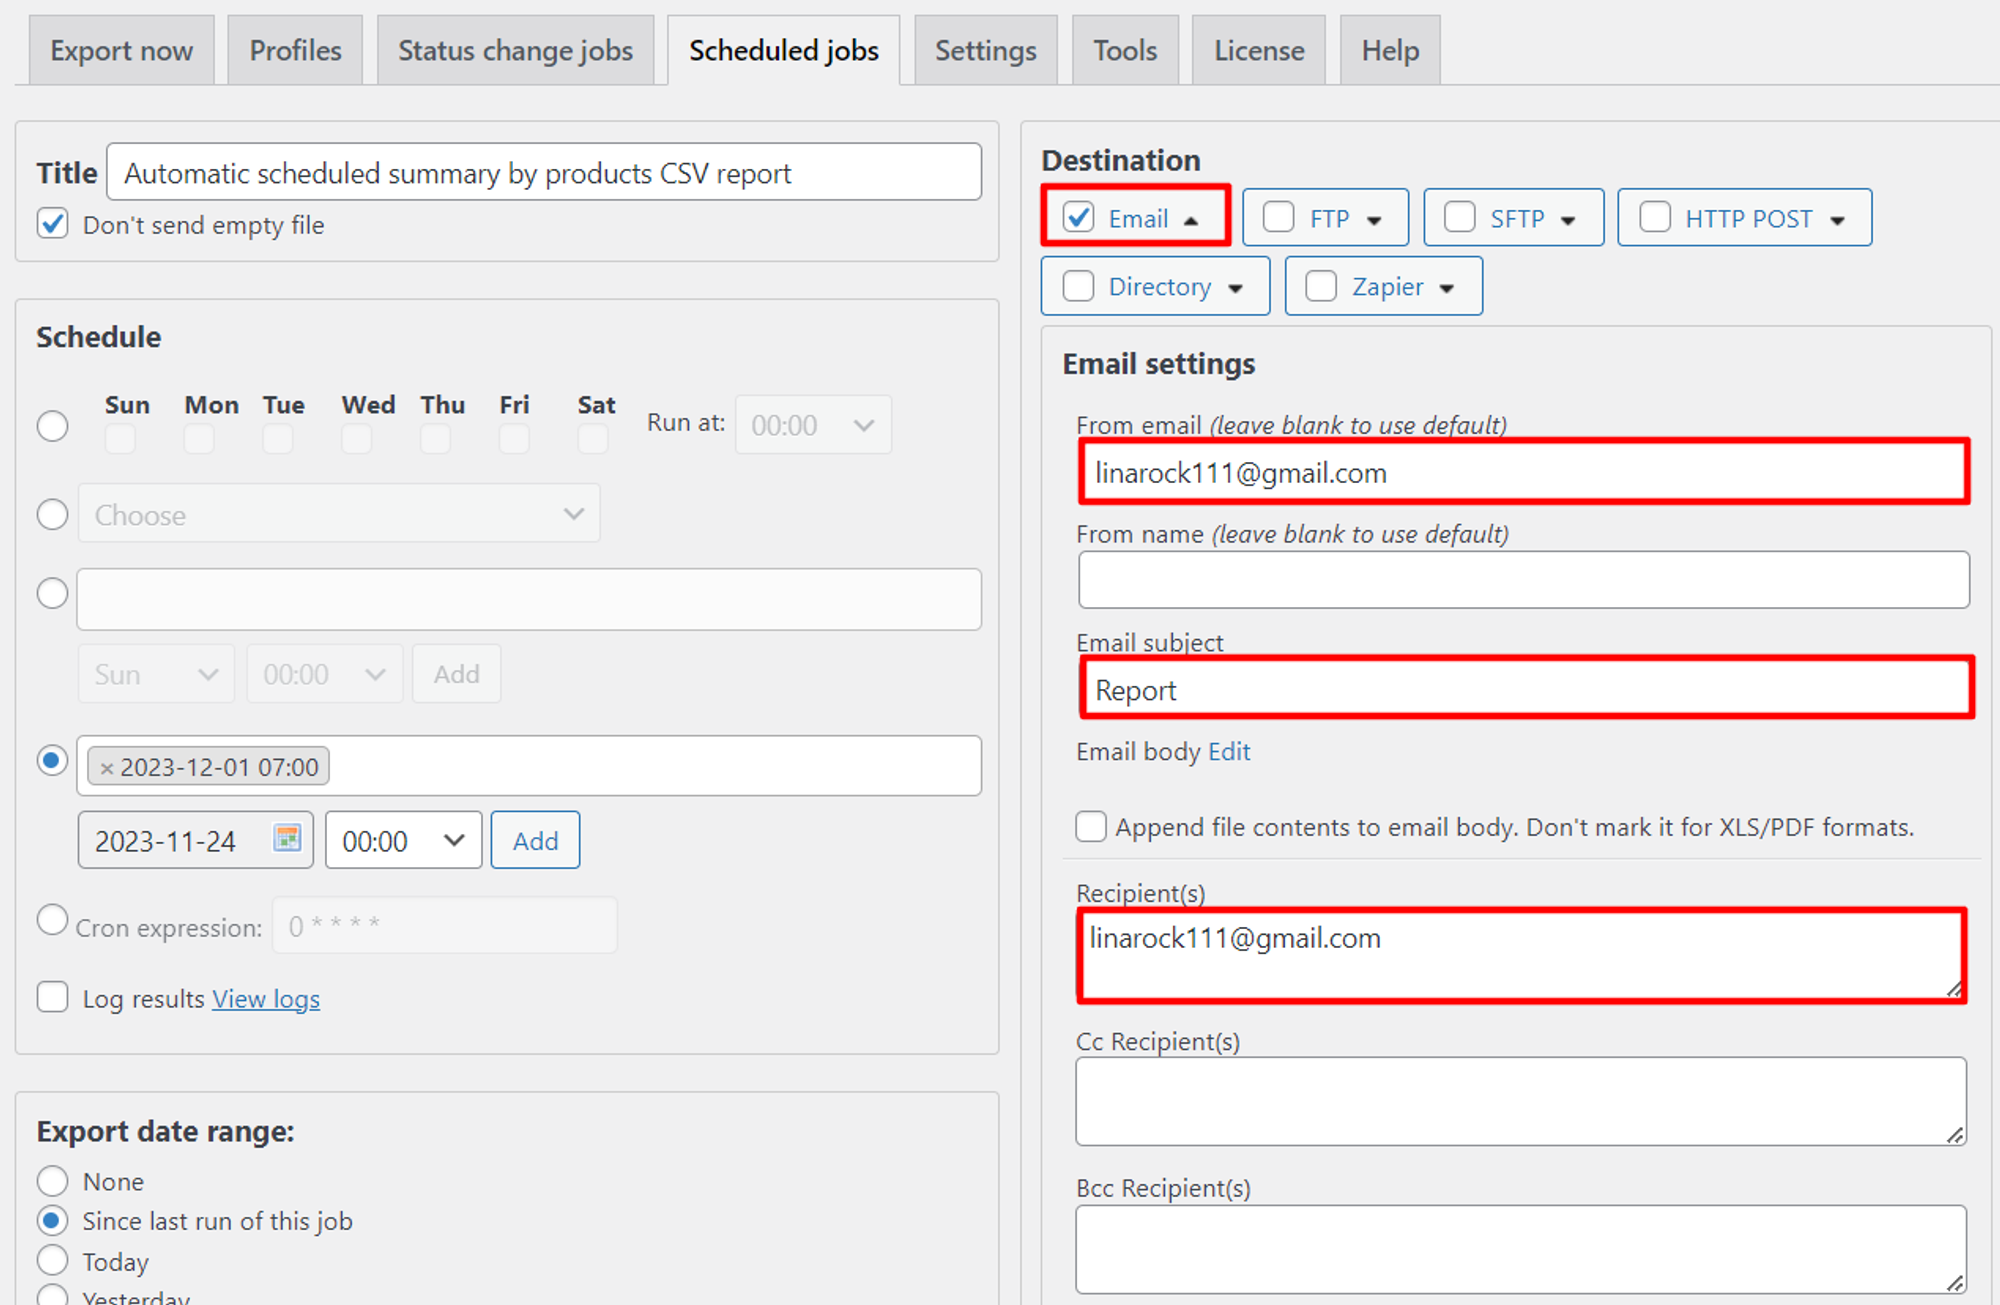
Let’s set up the directory. Select Email. Enter data in the following fields: From email, Email Subject, Recipients.
Click the Test button. If the submission is successful, you will see the following message:
File ‘Automatic scheduled summary by products CSV report.pdf’ has sent to ‘[email protected]’
Save your settings.
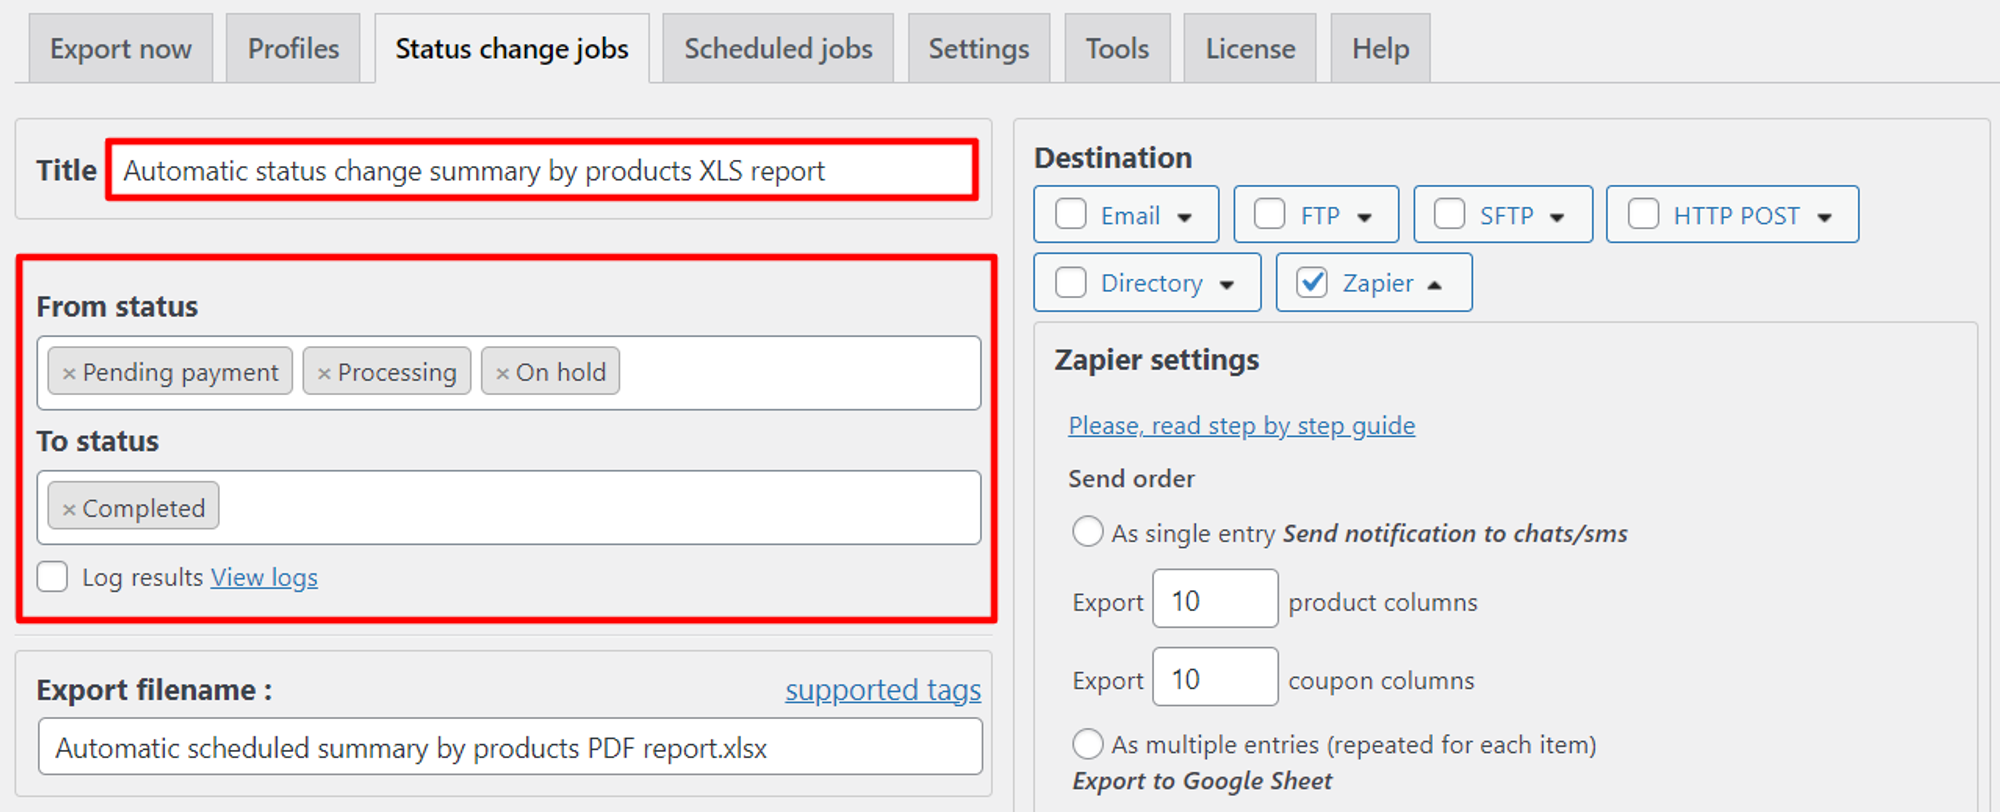
Automatic status change summary by products XLS report, the destination of which is Zapier (Google Docs).
We set up the second report in the same way as the first report. Select XLS format.
All the data is the same, so we won’t export the report.
When the Export Now is ready, save it as a profile. Let’s go to Profiles. Click on the button that looks like an arrow pointing to the right so that the report is uploaded when the status changes.
Click OK in the pop-up window.
In the new tab, give your profile a name.
Set the From status: Pending payment, Processing, On hold.
Status To: Completed.
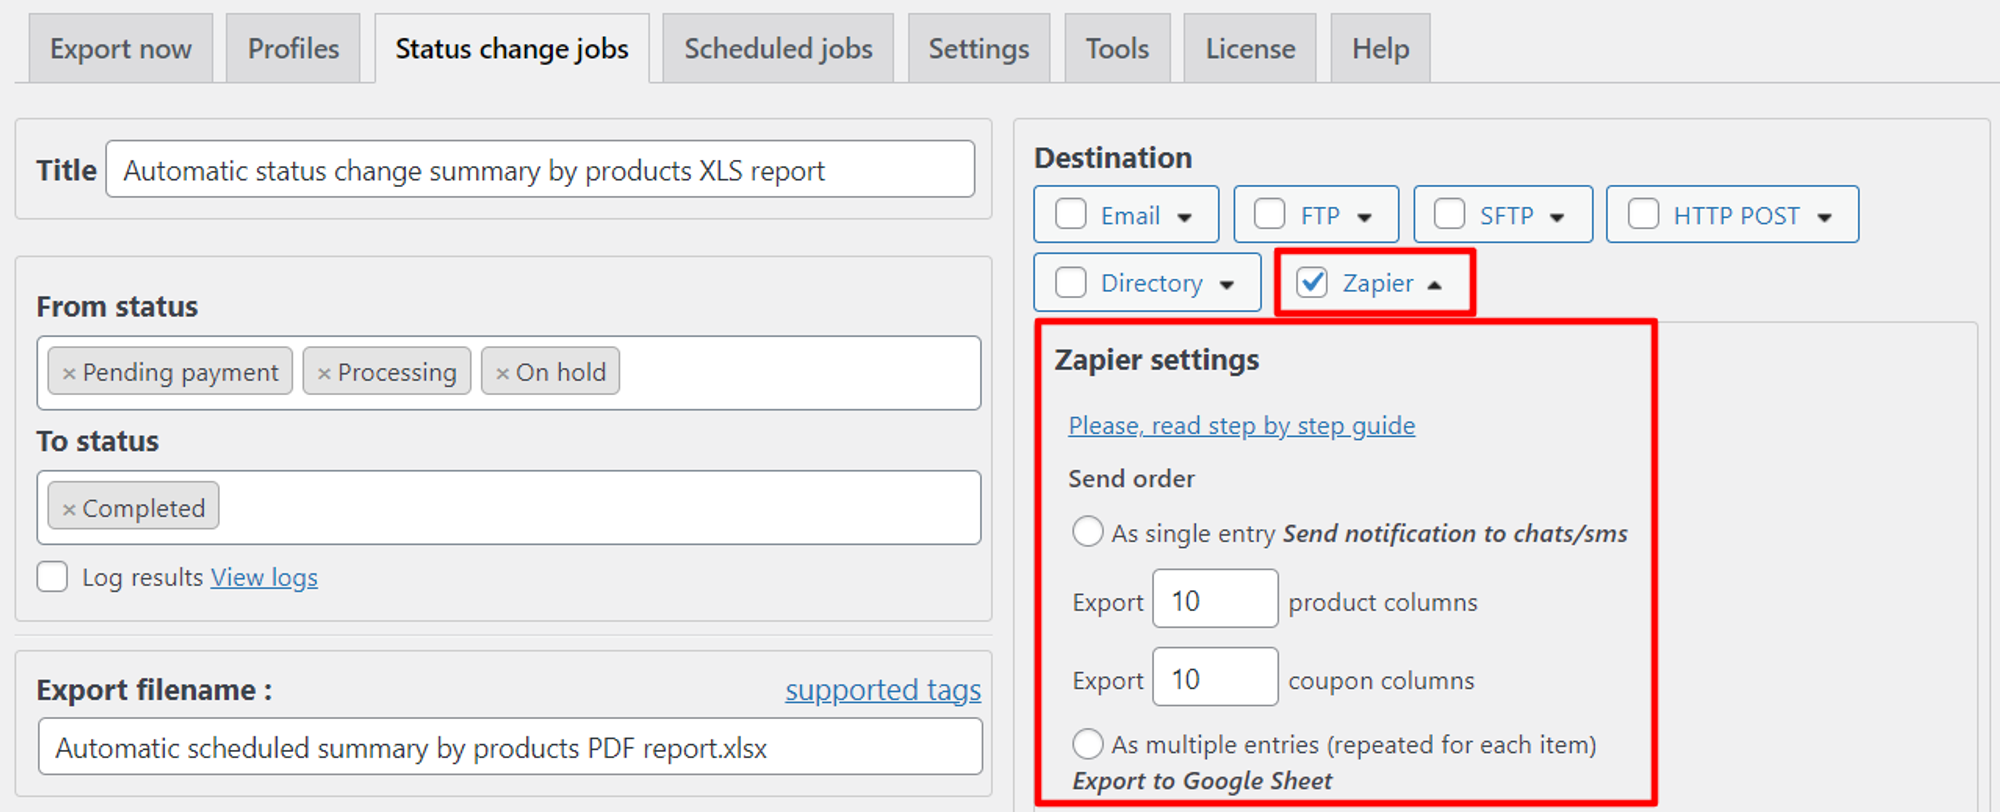
Let’s set up a destination. Select Zapier.
Note: feel free to read about how to connect job with Zapier here.
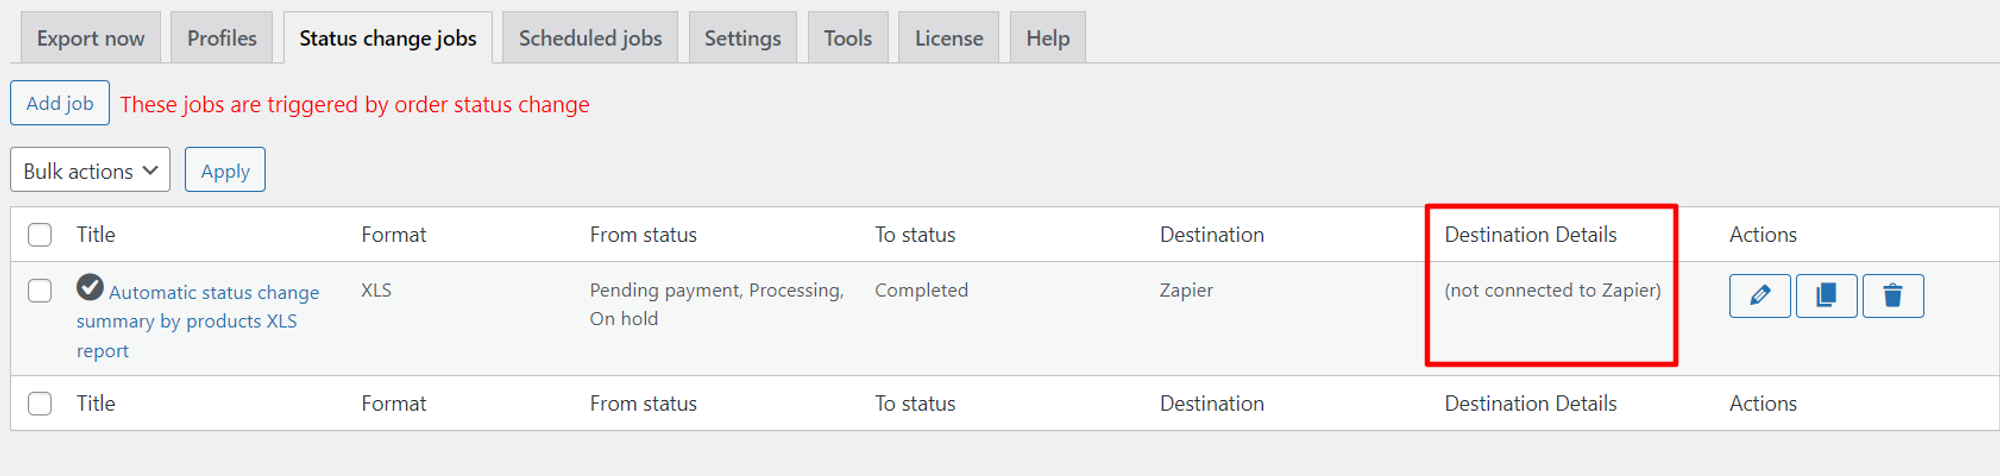
If Zapier is connected, then next to the job you will see the following text:
Connected to Zapier
Save your settings.
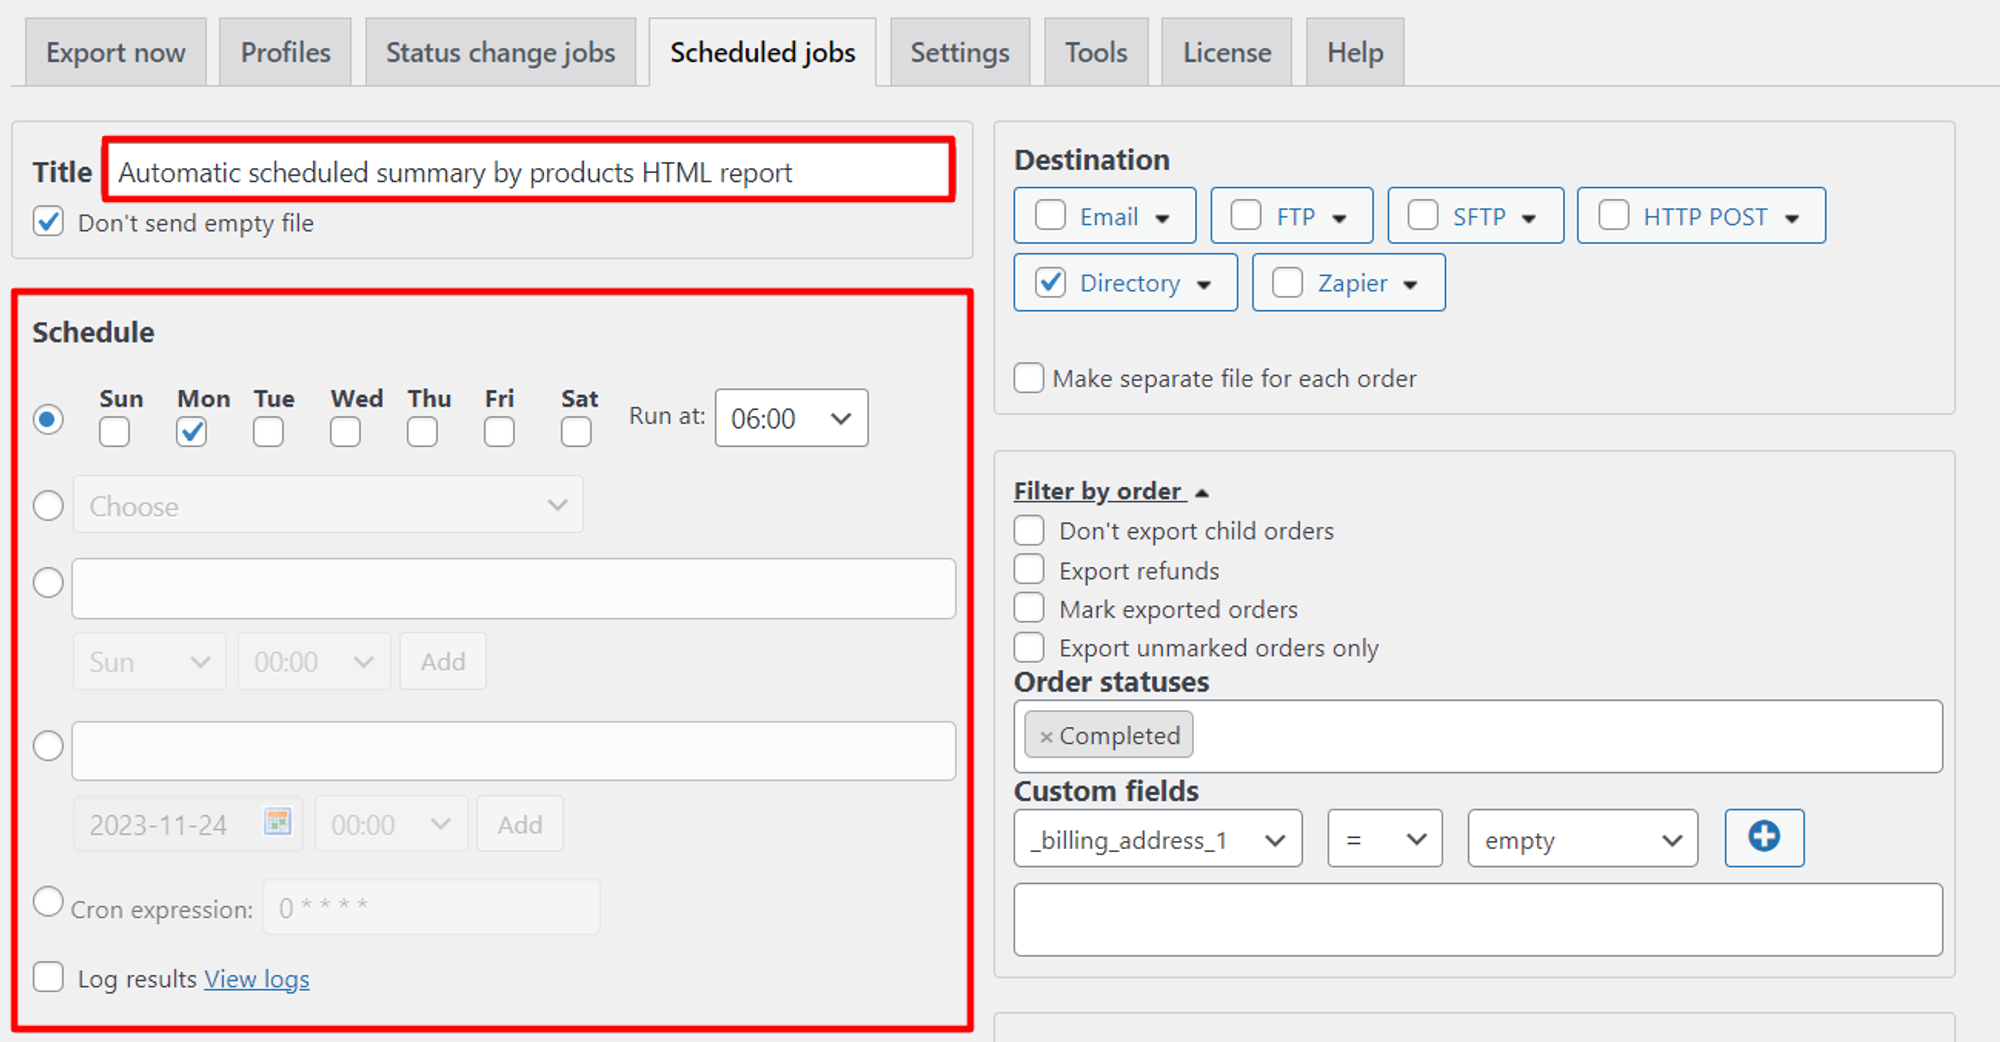
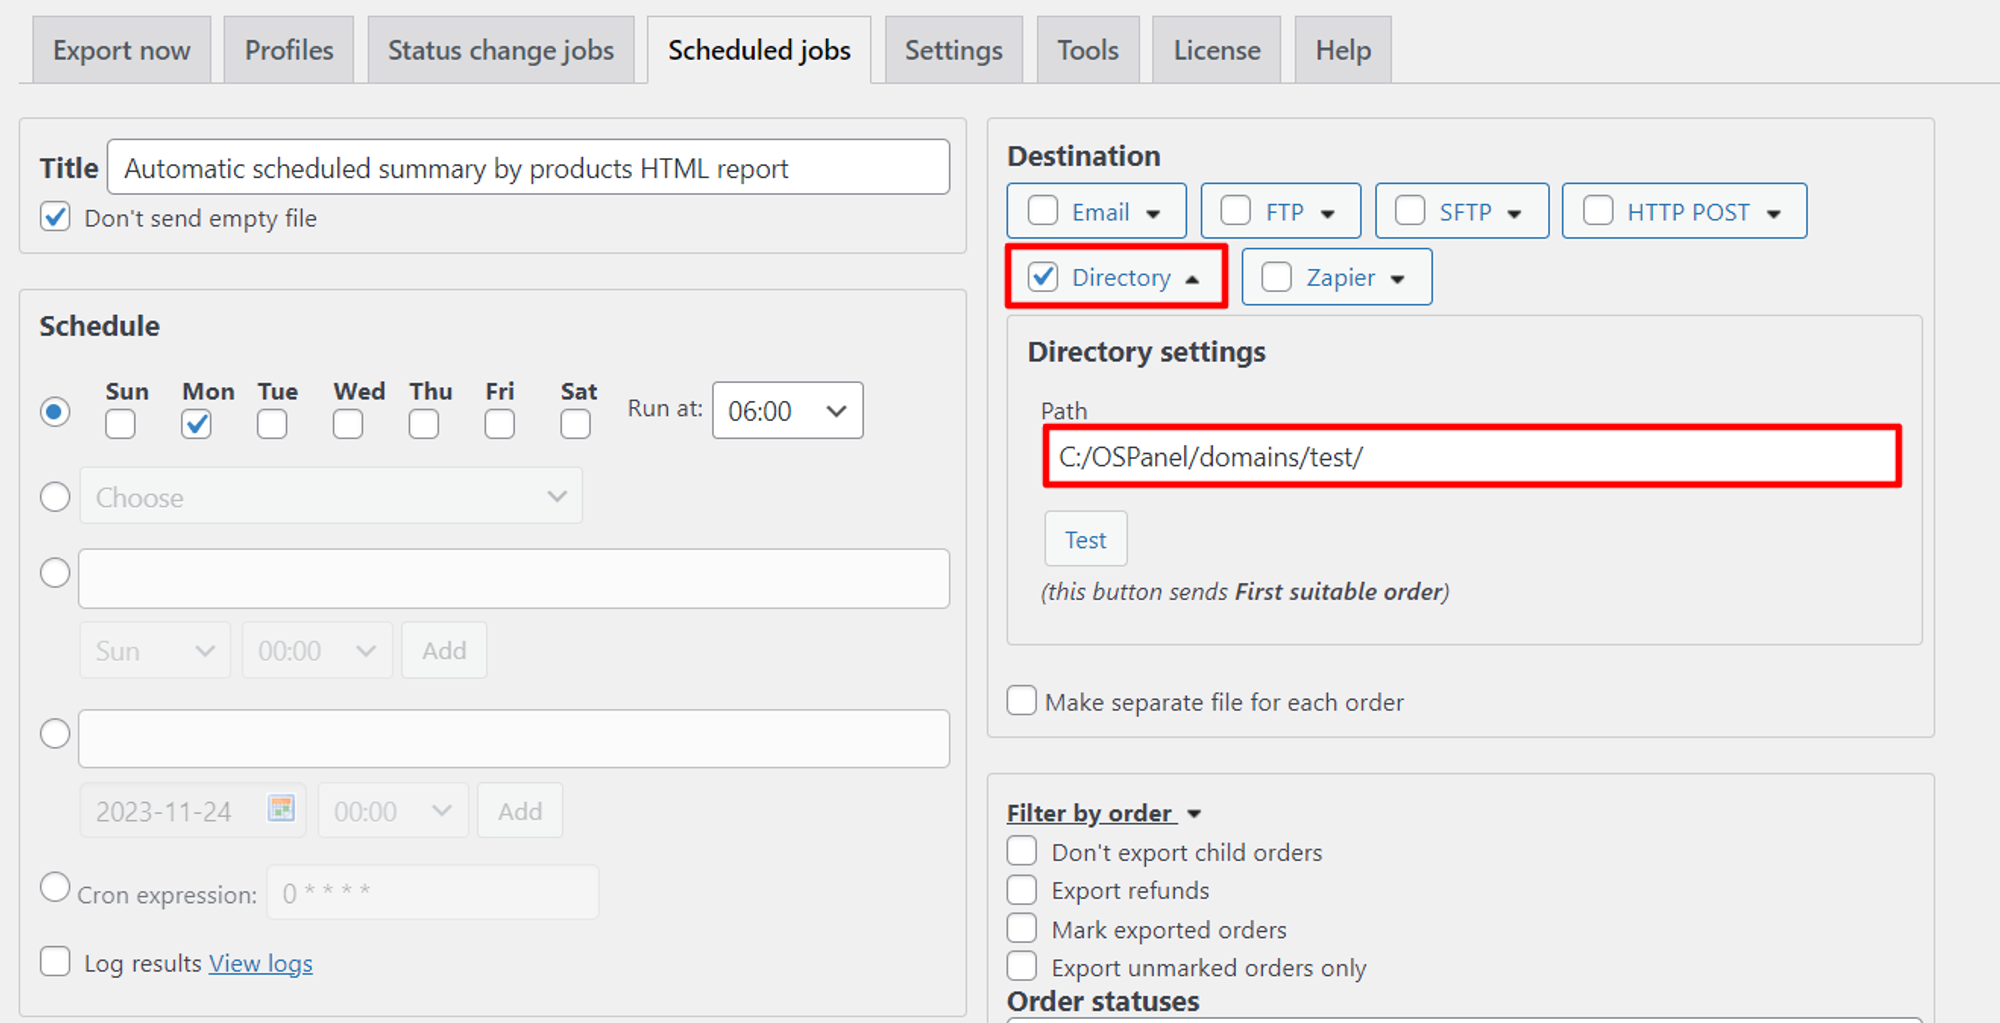
Automatic scheduled summary by products HTML report, the destination of which is directory.
We set up the third report in the same way as the first report. Select HTML format.
All the data is the same, so we won’t export the report.
Click on the Save as profile button. Go to Profiles. Click on the clock button in the line with this report to add it to your scheduled ones.
Click OK in the pop-up window.
In the new tab, give your profile a name.
Select the date of the report. In our case, this is every Monday at 6 am.
The destination this time is the directory. You can leave it as default and find the reports in the folder with your site.
That’s it! Use Advanced Order Export for WooCommerce settings and save your time and effort.
Implementing inventory management isn’t just a good idea – it’s vital to business continuity and profitability, and proven trading technology provides a solution no matter the size of your business or the sector in which it operates.
If you’re looking to simplify the process of exporting or importing data from your WooCommerce store, then you’ll be glad to know there are a number of great plugins available to help make your life easier. From CSV to XML, there is a plugin to help you manage your data without any hassle.
Here’s a list of the top 5 export/import plugins that can help speed up the process and make your life easier.
Advanced Order Export for WooCommerce
Import Products from any XML or CSV to WooCommerce
Product CSV Importer and Exporter
Import Export Suite for WooCommerce
WooCommerce — Store Exporter
Advanced Order Export for WooCommerce
Advanced Order Export is a powerful plugin for WooCommerce that allows merchants to quickly and easily export orders to their internal systems. With Advanced Order Export, merchants can download orders in a variety of formats, such as CSV, PDF, XML and other. Advanced Order Export also allows merchants to customize their exports by specifying which fields and values they want to include. In addition, the plugin gives you to configure a report schedule, save profile settings, and automatically upload reports when the order status changes.
Pros:
Save your setting in Profiles
Create schedule for reports
Set up destination block
Add custom fields
Support status changes job
Free support
Cons:
No
There are free and paid (from $30) versions.
Import Products from any XML or CSV to WooCommerce
WP All Import is a WordPress plugin that allows you to easily import any XML or CSV file into WordPress. It has a drag & drop interface for mapping the data, and the ability to create custom data transformations, allowing you to manipulate data from the file before importing. WP All Import also supports cron-based scheduled imports, giving you the ability to keep your data up-to-date.
Pros:
Import Grouped products
Import files from a URL
Cron Job/Recurring Imports
Execution of Custom PHP Functions on data
Cons:
No option to import in PDF, JSON, TSV and HTML formats
There are free and paid ($299) versions.
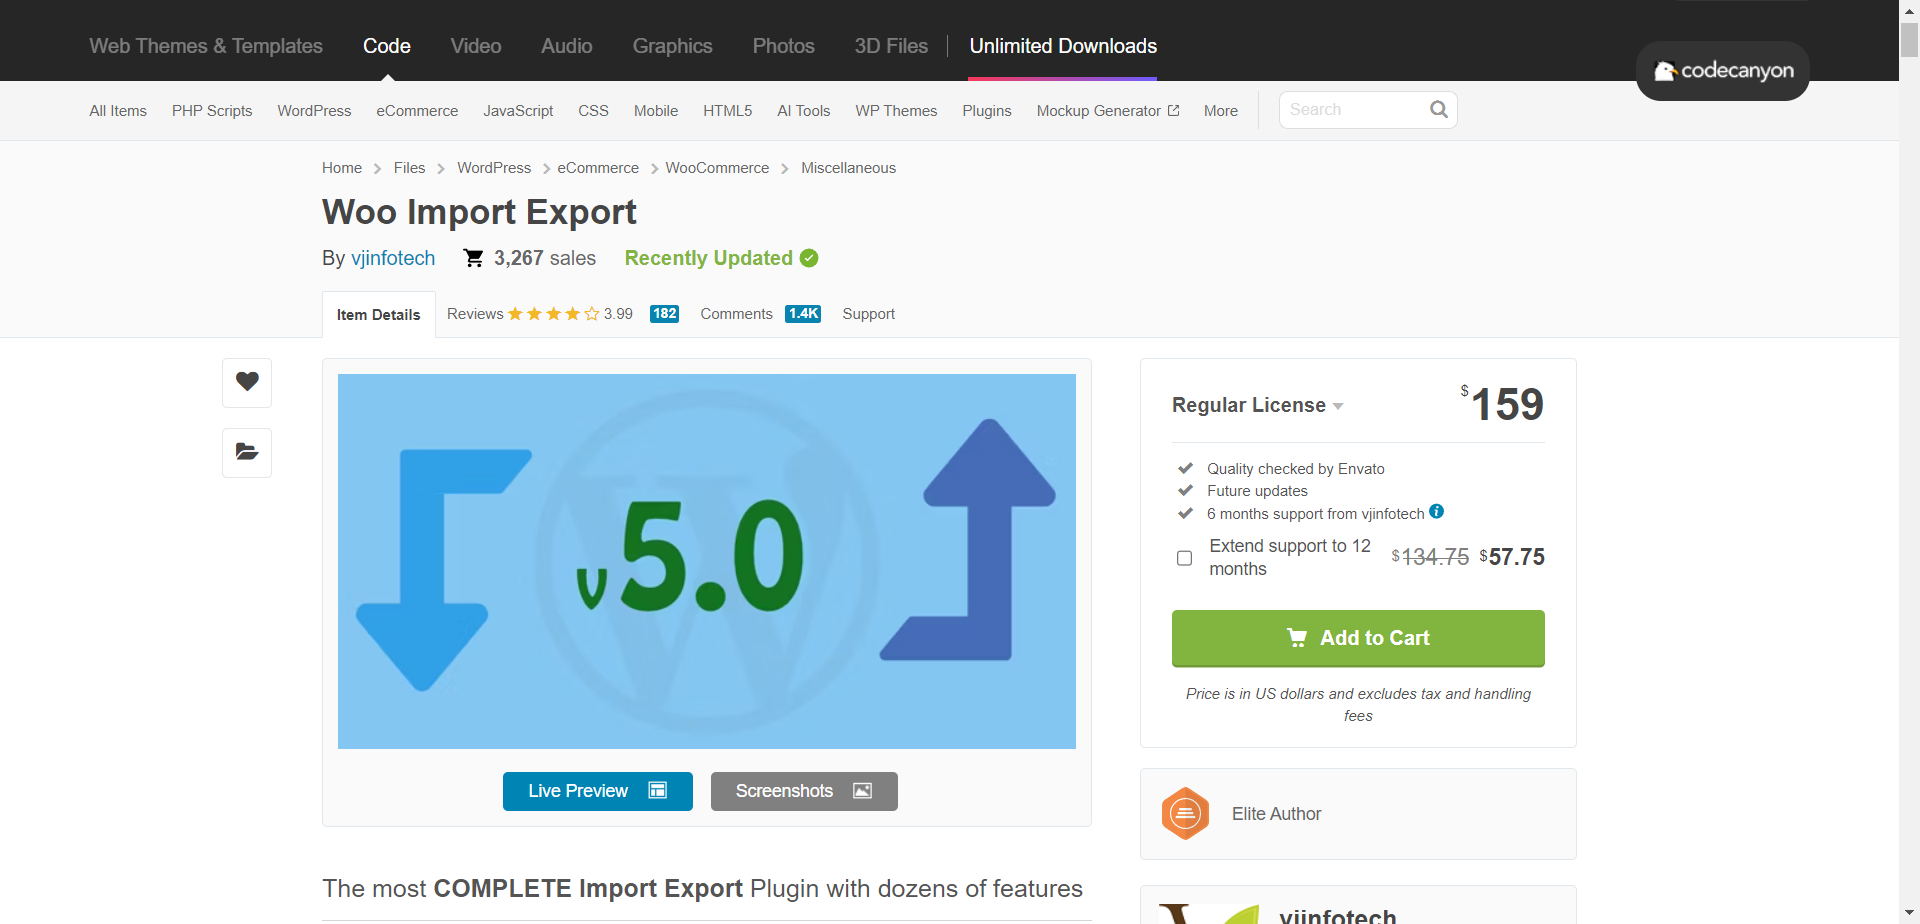
Woo Import Export by vjinfotech
Woo Import Export by vjinfotech is comprehensive and efficient plugin available for WordPress users to import and export data. With this plugin, you can easily customize the output format, such as CSV, Excel, and XML. You can also set up automated export schedules, and select the exact fields you want to export. The plugin also provides advanced features such as mapping fields, auto-matching, and previewing the data before import.
Pros:
Scheduled import & export
Filter available for import & export
Drag & Drop Field mapping
Multiple Format support for import export
Cons:
Paid support
Expensive price
There is a paid ($159) version.
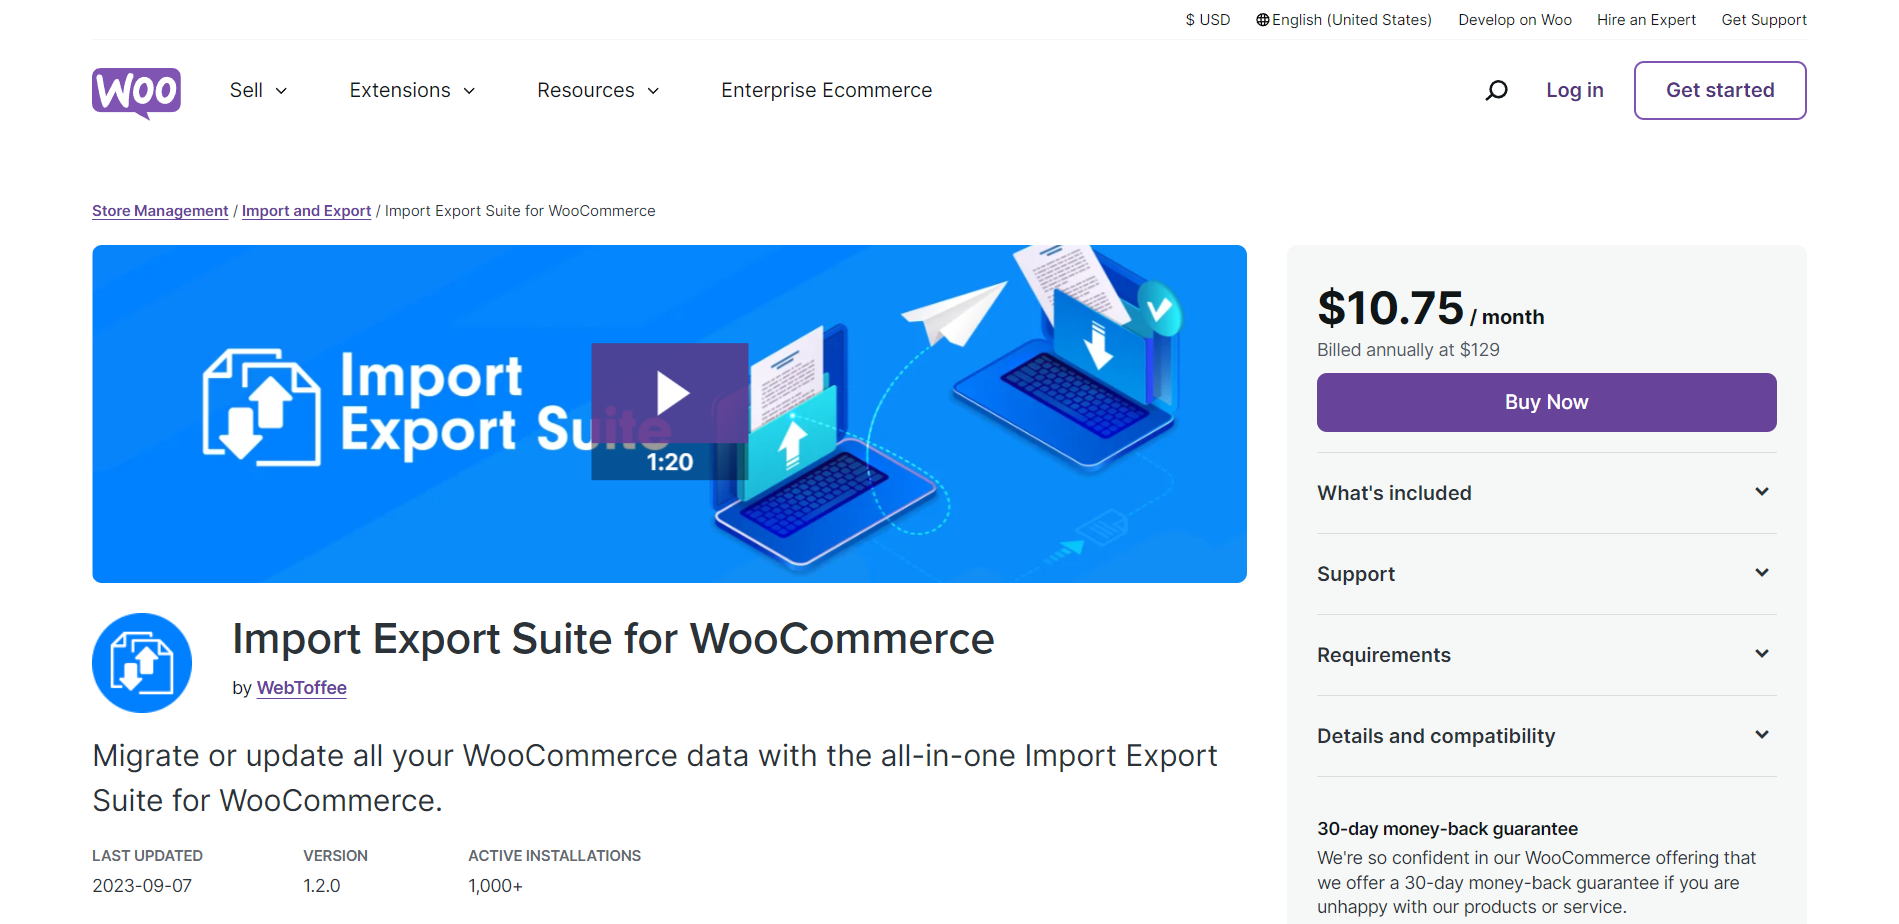
Import Export Suite for WooCommerce
Import Export Suite for WooCommerce is a comprehensive solution for importing and exporting products, orders, and customers to and from WooCommerce. The suite also includes the ability to map data fields, set default values, and use filters to customize the import process. Additionally, the suite includes features for managing product categories and tags, bulk editing of products, and more.
Pros:
Bulk Edit or Modify WooCommerce Data During Import
Schedule Automatic Import/Export Actions
Multiple Methods for Convenient Data Migration
Various filters enable the custom export of data
Cons:
No option to import in PDF, JSON, TSV and HTML formats
There are free and paid ($129) versions.
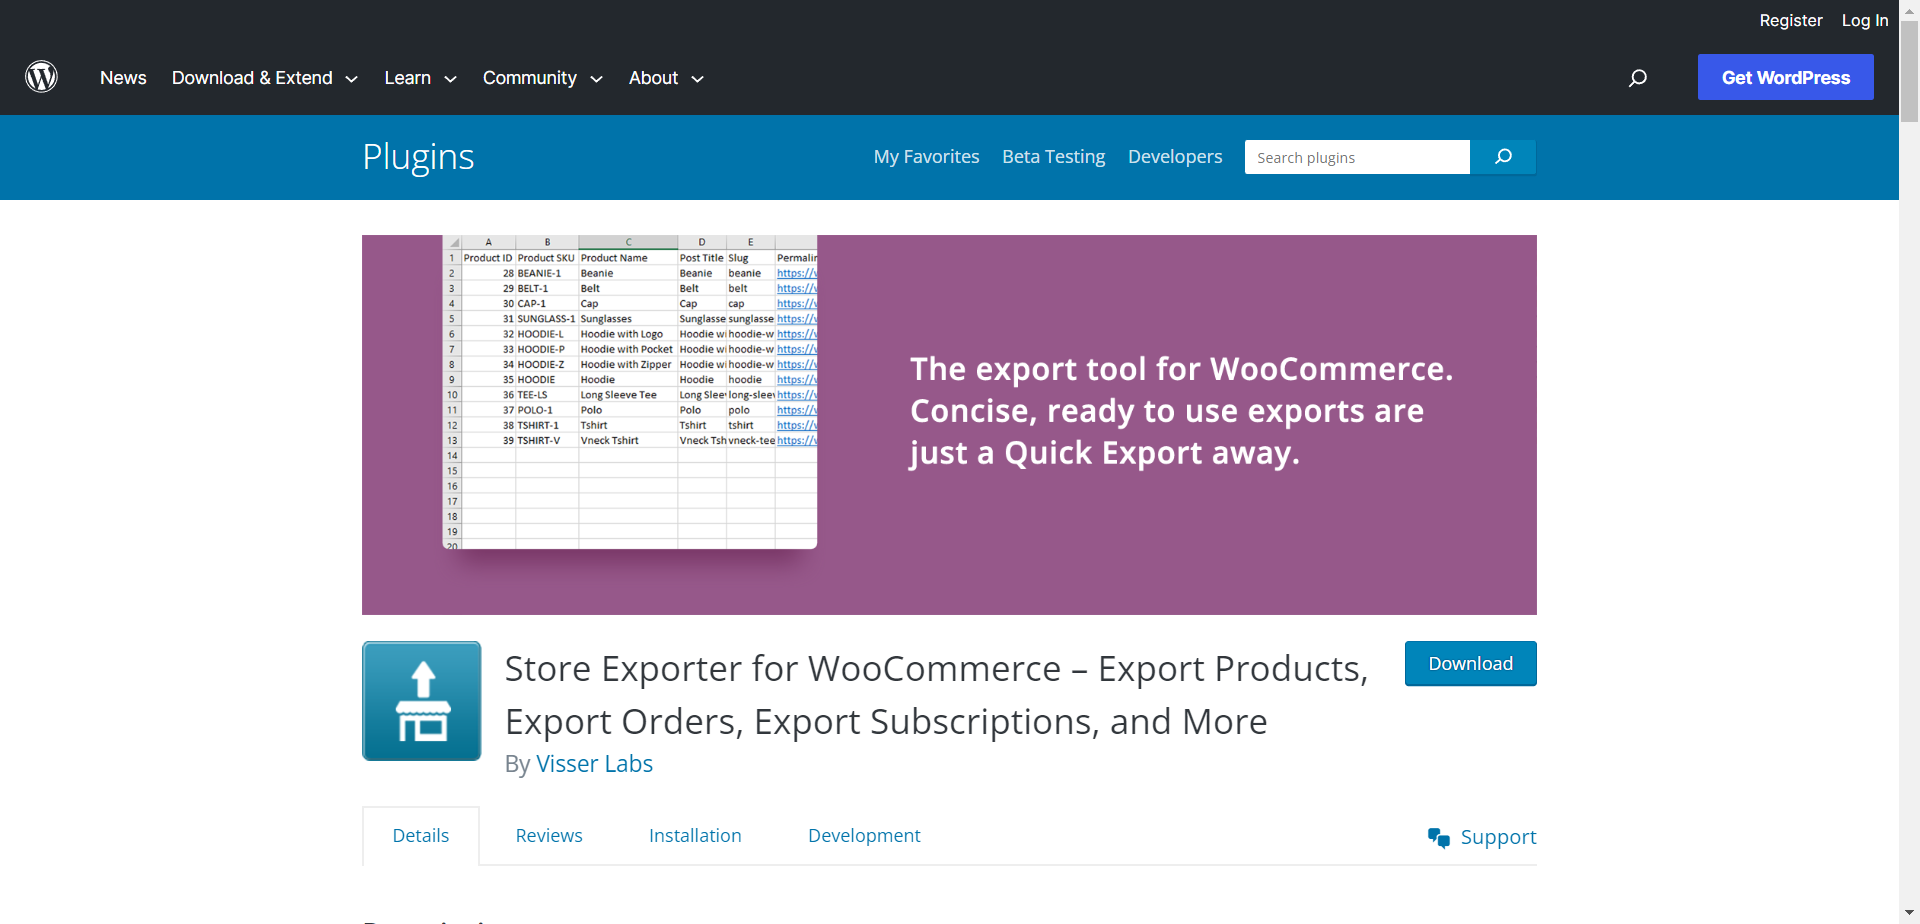
WooCommerce — Store Exporter
WooCommerce — Store Exporter plugin is the perfect tool for anyone who needs to export their WooCommerce store data to a range of different file formats. This plugin allows users to quickly and easily create product, category, customer, and order exports in formats such as CSV, XML, and JSON. This plugin also offers additional features such as the ability to split exports into multiple files and the ability to filter data.
Pros:
Export products, orders, customers, coupons
Provides significant filtration capabilities
Allows flexible output formats including CSV, Excel and XML
Schedule an export
Cons:
Poor support service
Limited functionality of the free version
There are free and paid ($199) versions.
Conclusion
These plugins make it easy to export and import data from and to your website, saving you time and effort. Give them a try and see how they can help you manage your data better.
In today’s digital landscape, understanding user behavior is crucial for businesses to optimize their online presence. With the Advanced Order Export plugin, you can generate comprehensive reports that break down orders by user role, providing valuable insights into how users interact with your website and the actions they take. In this blog post, we will explore the benefits of creating User Role Reports and how they can help improve the overall user experience.
Why User Role Reports Matter
User Role Reports offer a deeper understanding of user interactions on your site. By categorizing orders based on user roles such as admin, customer, wholesaler, and others, you gain insights into how different types of users engage with your products or services. This knowledge allows you to identify potential areas for improvement and make data-driven decisions to enhance the user experience.
By analyzing User Role Reports, you can uncover valuable patterns in user behavior. For example, you may discover that wholesalers tend to place larger orders or that administrators frequently access specific sections of your site. These insights can help you tailor your website’s design, content, and functionality to better serve the needs of each user role, ultimately leading to higher customer satisfaction and increased conversions.
Getting Started with User Role Reports
Note: We wrote about how to set up a report in this article. Watch it before continuing reading.
Creating a User Role Report is straightforward with Advanced Order Export. Simply follow these steps:
Click on Filter by customer.
Choose, for example, Wholesaler Customer.
Set up fields to export.
Generate the report and analyze the data to gain valuable insights into user behavior.
Conclusion
User Role Reports provided by Advanced Order Export offer a powerful tool for understanding user behavior on your website. By breaking down orders by user role, you can gain valuable insights into user interactions, identify areas for improvement, and optimize the user experience. Take advantage of this plugin and unlock the potential of your user data!