10 useful settings Phone Orders for WooCommerce (Pro)

Phone orders are an essential tool for any business that wants to take orders over the phone. With Phone Orders for WooCommerce (Pro) plugin, you can easily set up a system to take phone orders, streamlining the process for both customers and employees. Here are 10 useful settings you can use to get the most out of the plugin:

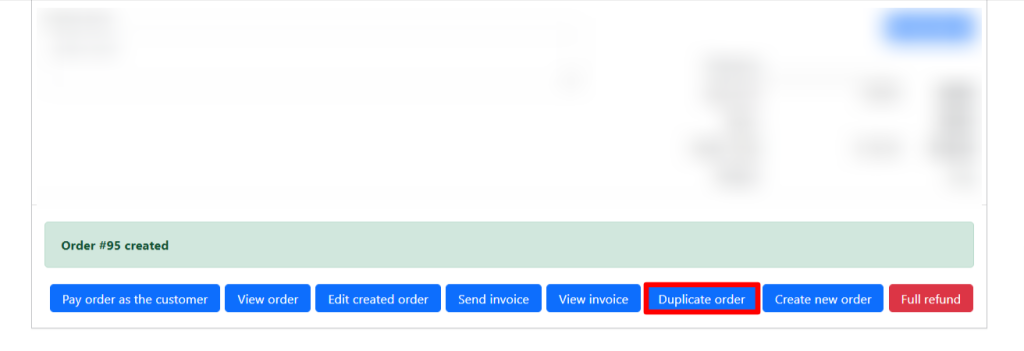
Show “Duplicate Order” button after order creation

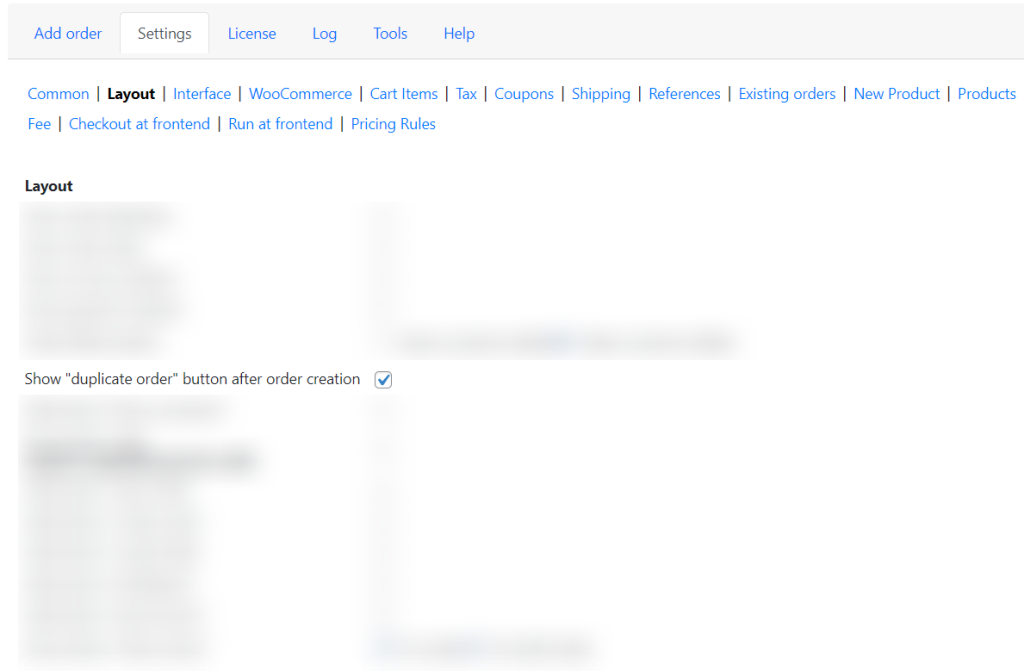
This button allows customers to easily duplicate the order, making it easier for them to make multiple orders with the same information. This is especially useful for customers who want to place orders in bulk, as they can easily clone their order and make changes to the quantity or other details without having to re-enter all of the information.

To activate it, go to Settings>Layout and tick Show “Duplicate Order” button after creation.

Show “Duplicate Order” button after creation

After creation a new order, you have the “Duplicate Order” button.

The “Duplicate Order” button

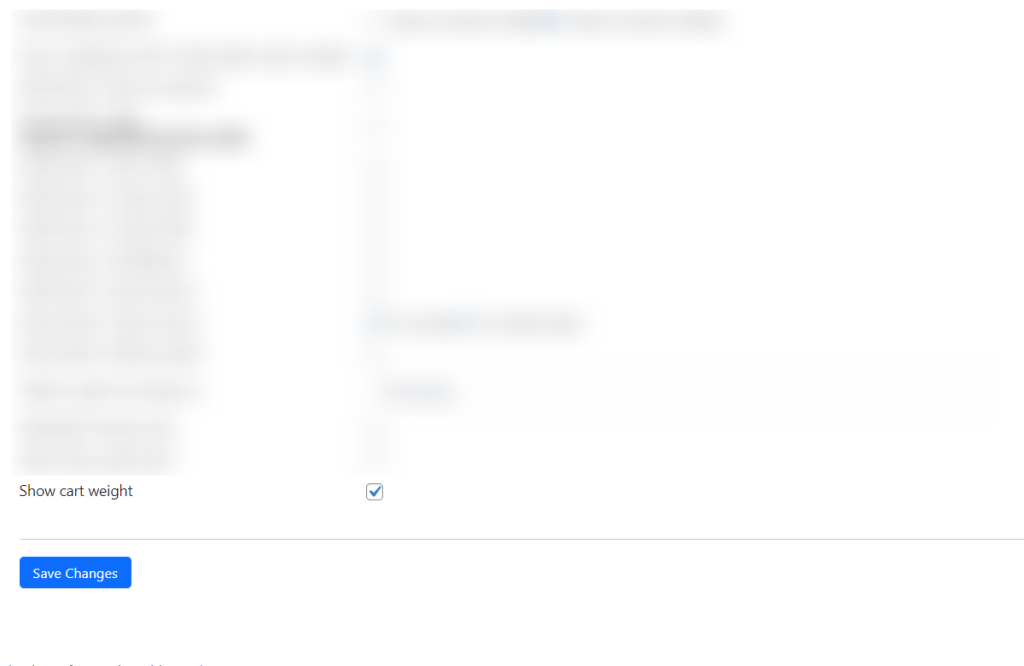
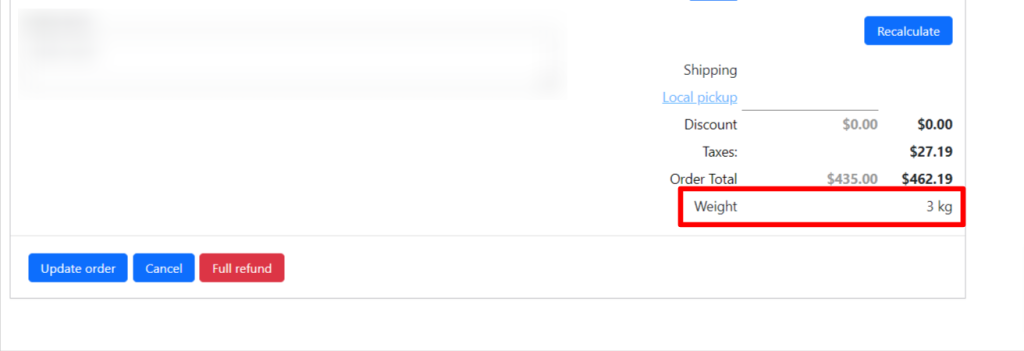
Show cart weight

This feature makes it much easier for customers to get the right products without having to come into the store and weigh them. With phone orders, customers can order quickly and accurately from the comfort of their own home. They can also get the exact weight of their products, so they can make sure they are ordering the right amount. This makes it easier for customers to get the products they need, without the hassle of going to the store.

To activate it, go to Settings>Layout and tick Show cart weight.

Show cart weight

Next to the order details is the order weight.

Order weight

Allow to rename cart items

This feature is beneficial for businesses that take phone orders and need to customize the names of items in the cart to match the customer’s preferences or specifications. By enabling this setting, businesses can provide a more personalized and tailored shopping experience for their customers, enhancing customer satisfaction and potentially increasing sales.

To activate it, go to Settings>Cart Items and tick Allow to rename cart items.

Allow to rename cart items

In the process of creating an order, it becomes possible to rename the product.

Rename the product

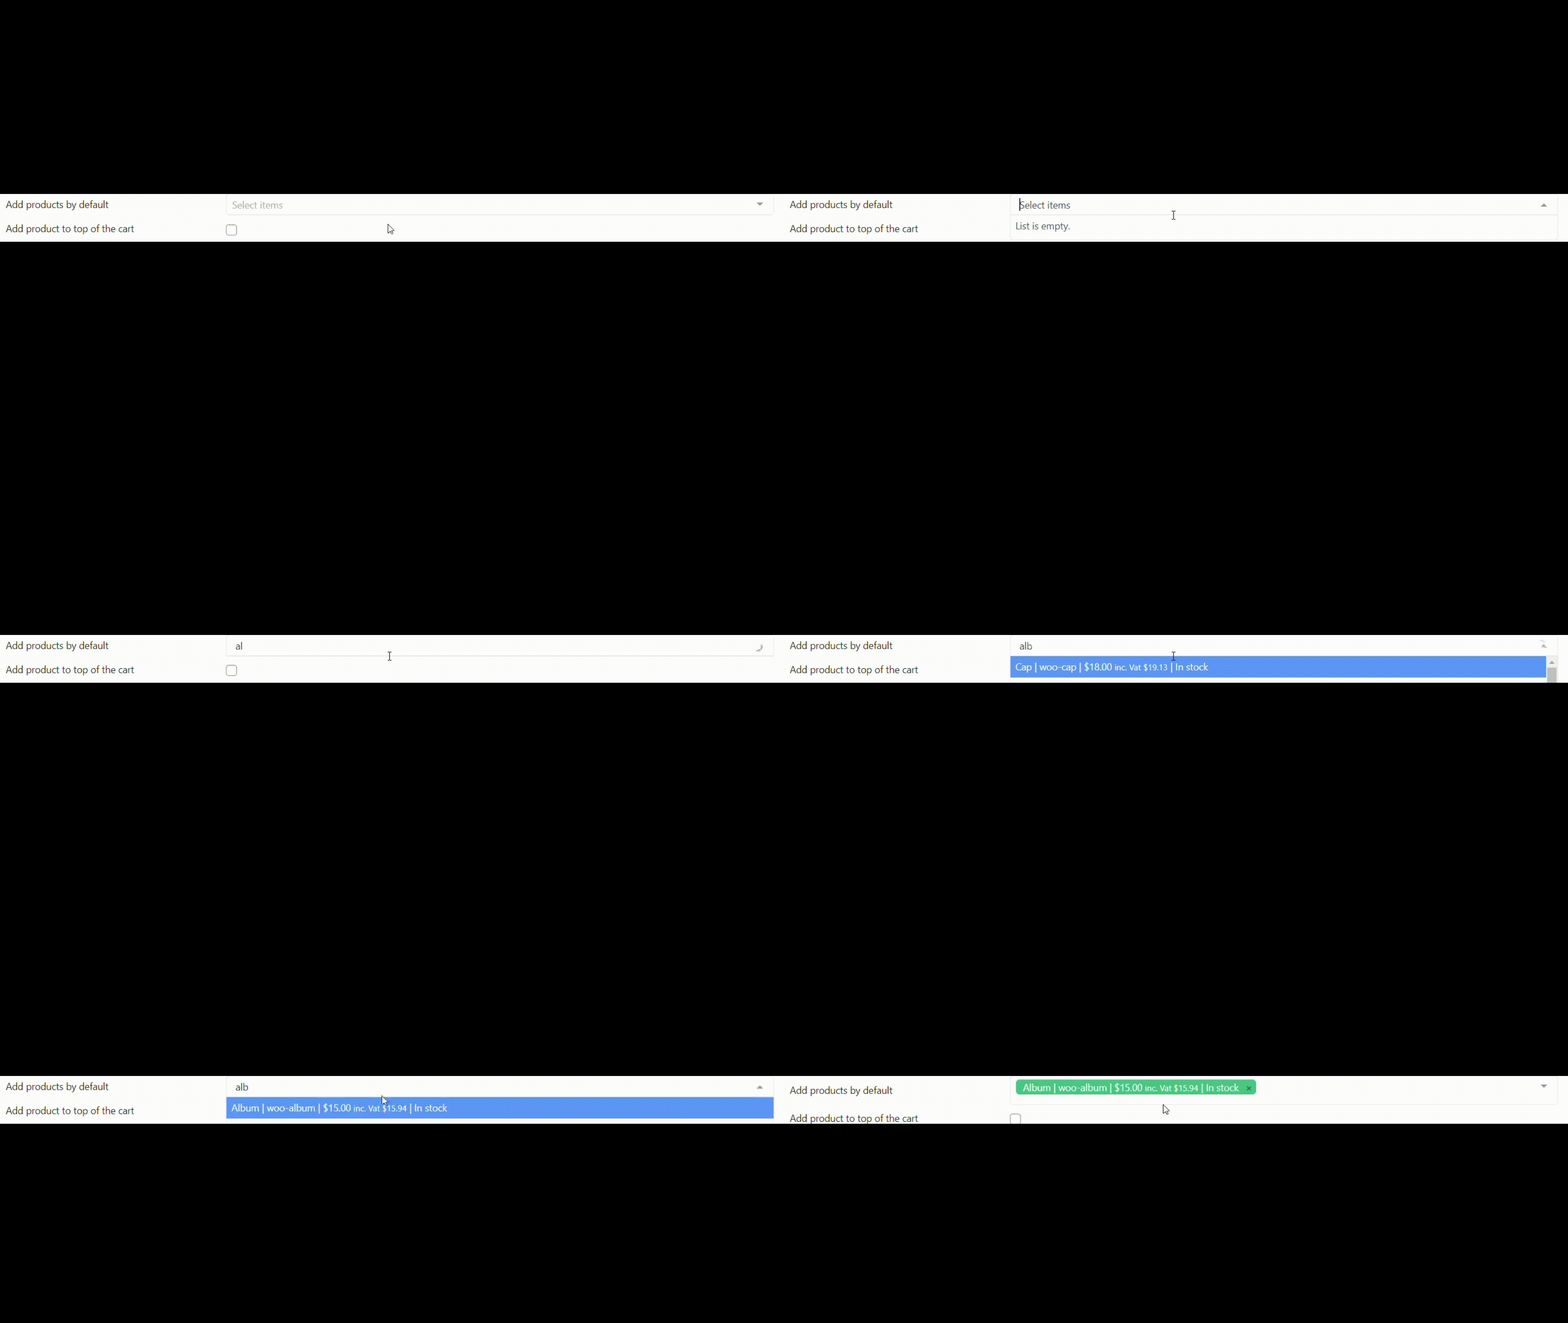
Add products by default

With the Pro version of this plugin, you can even add products to orders by default, so they are automatically selected when you enter a customer’s order. This feature is particularly useful for businesses who have a single product they offer over the phone.

To activate it, go to Settings>Cart Items and write items in the Add products by default line.

Add products by default

When creating an order, the product is added automatically.

Album as a default product

Show all coupons in autocomplete

It allows you to offer discounts to customers through coupons that show up in the autocomplete. This makes it easier for employees to find the coupon customers need and make sure they get the best deal.

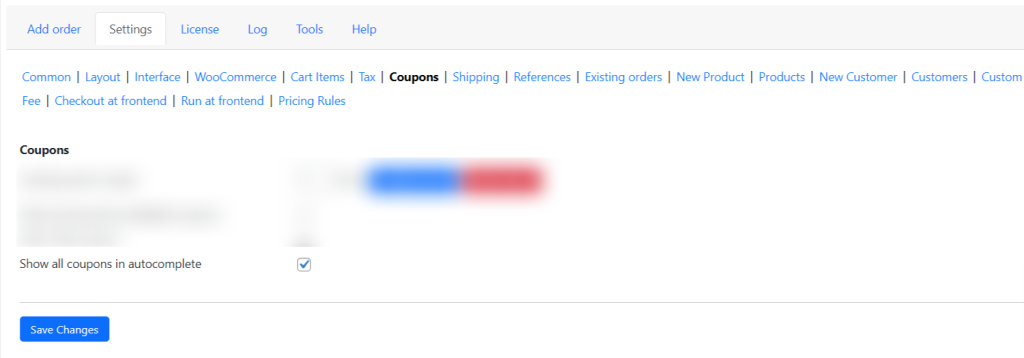
To activate it, go to Settings>Coupons and tick Show all coupons in autocomplete.

Show all coupons in autocomplete

When you click on the search bar, a list of available coupons appears.

All coupons in autocomplete

Select optimal shipping method on each cart update

This setting allows plugin to assign an optimal shipping method to orders placed over the phone. This ensures that customers don’t have to select a shipping method each time they order, saving time for both customers and employees.

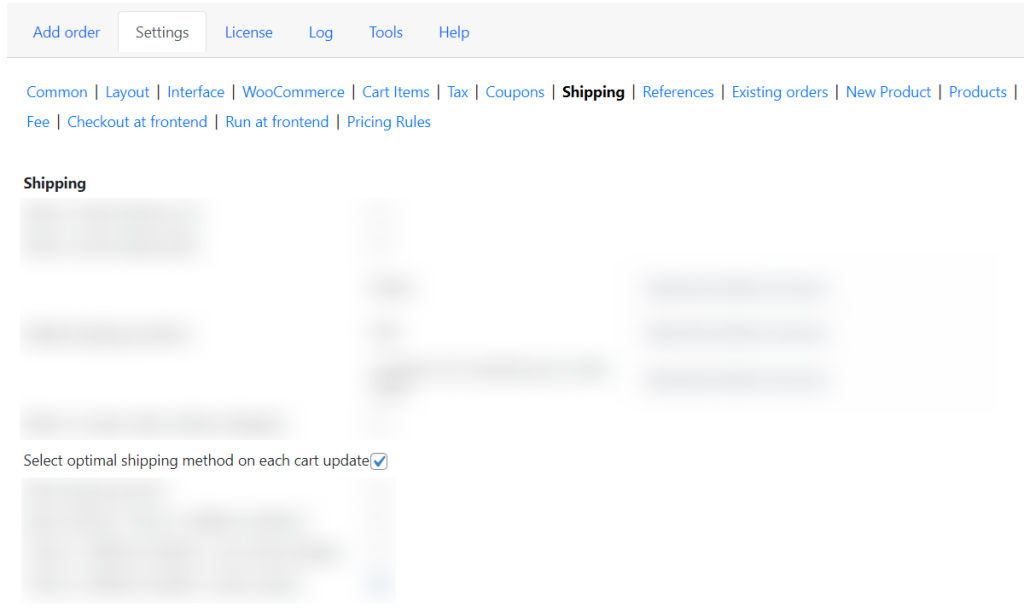
To activate it, go to Settings>Shipping and tick Select optimal shipping method on each cart update.

Select optimal shipping method on each cart update

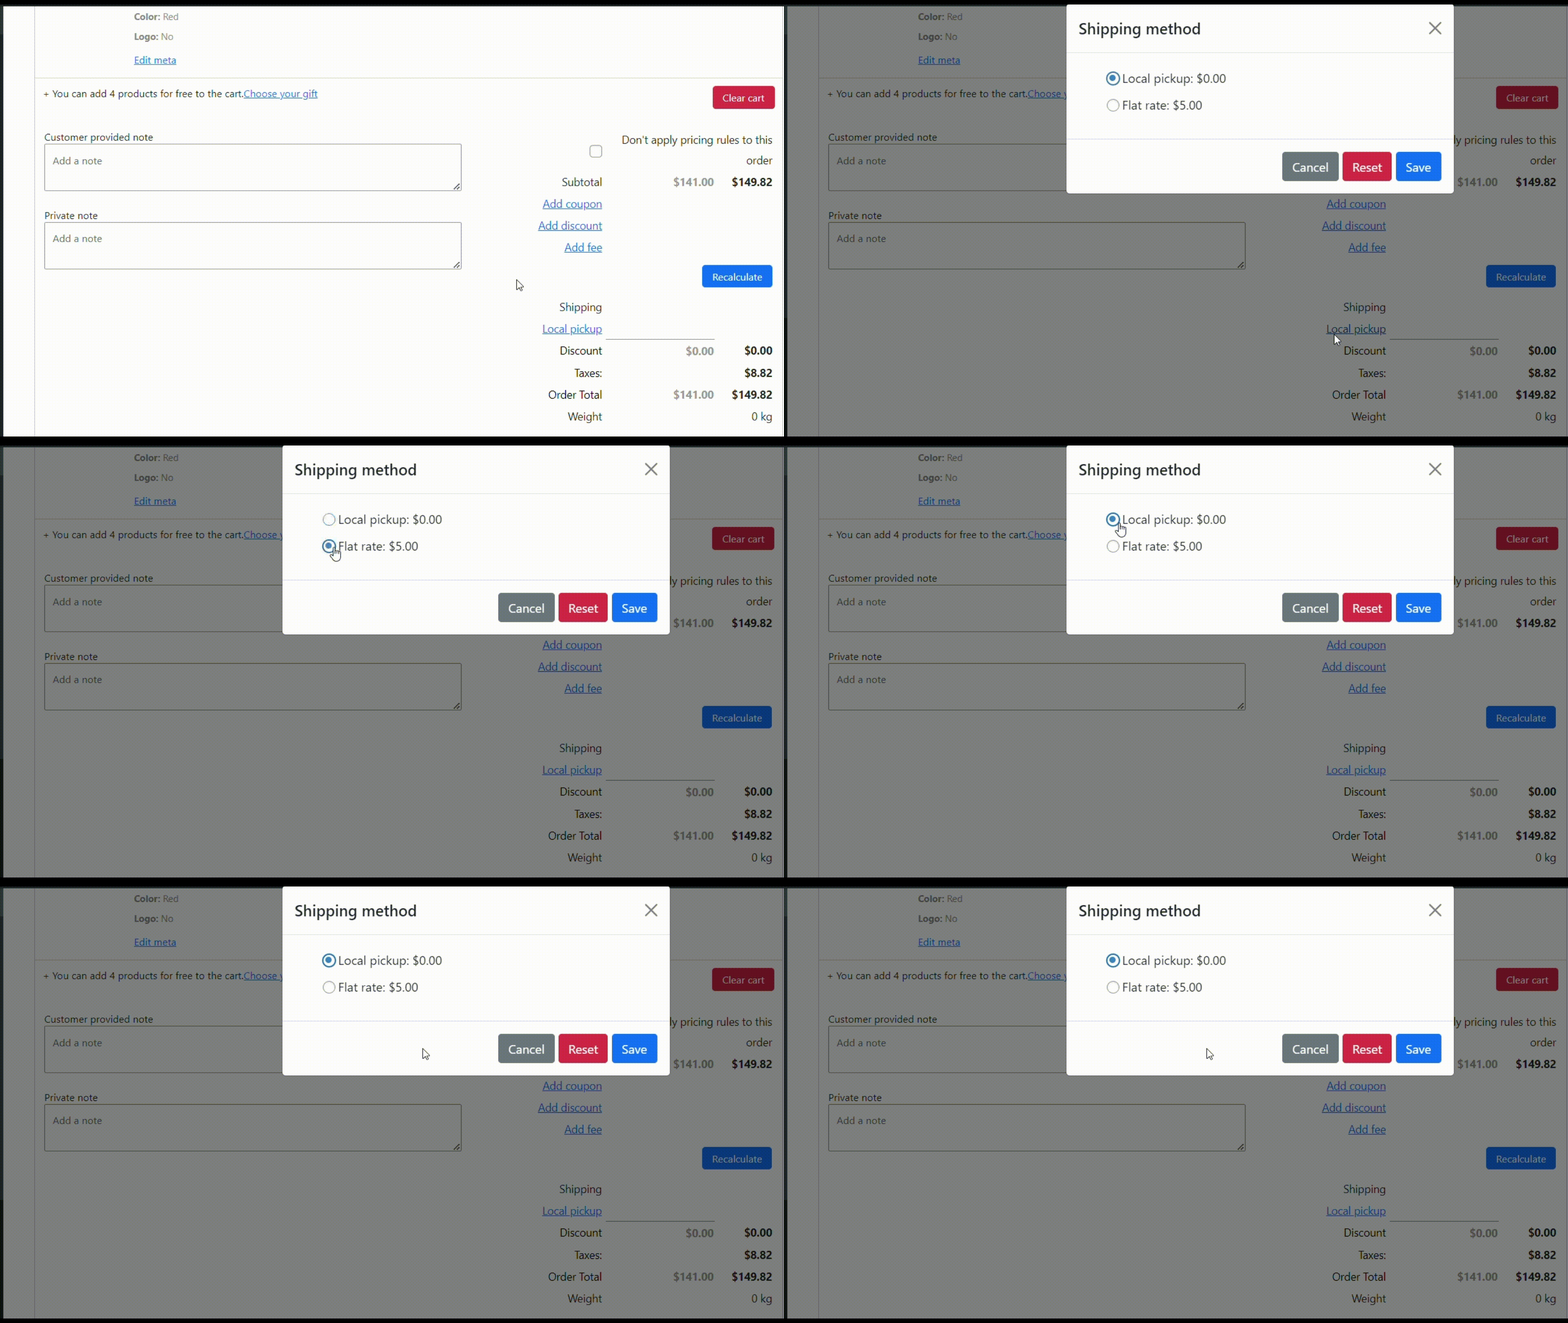
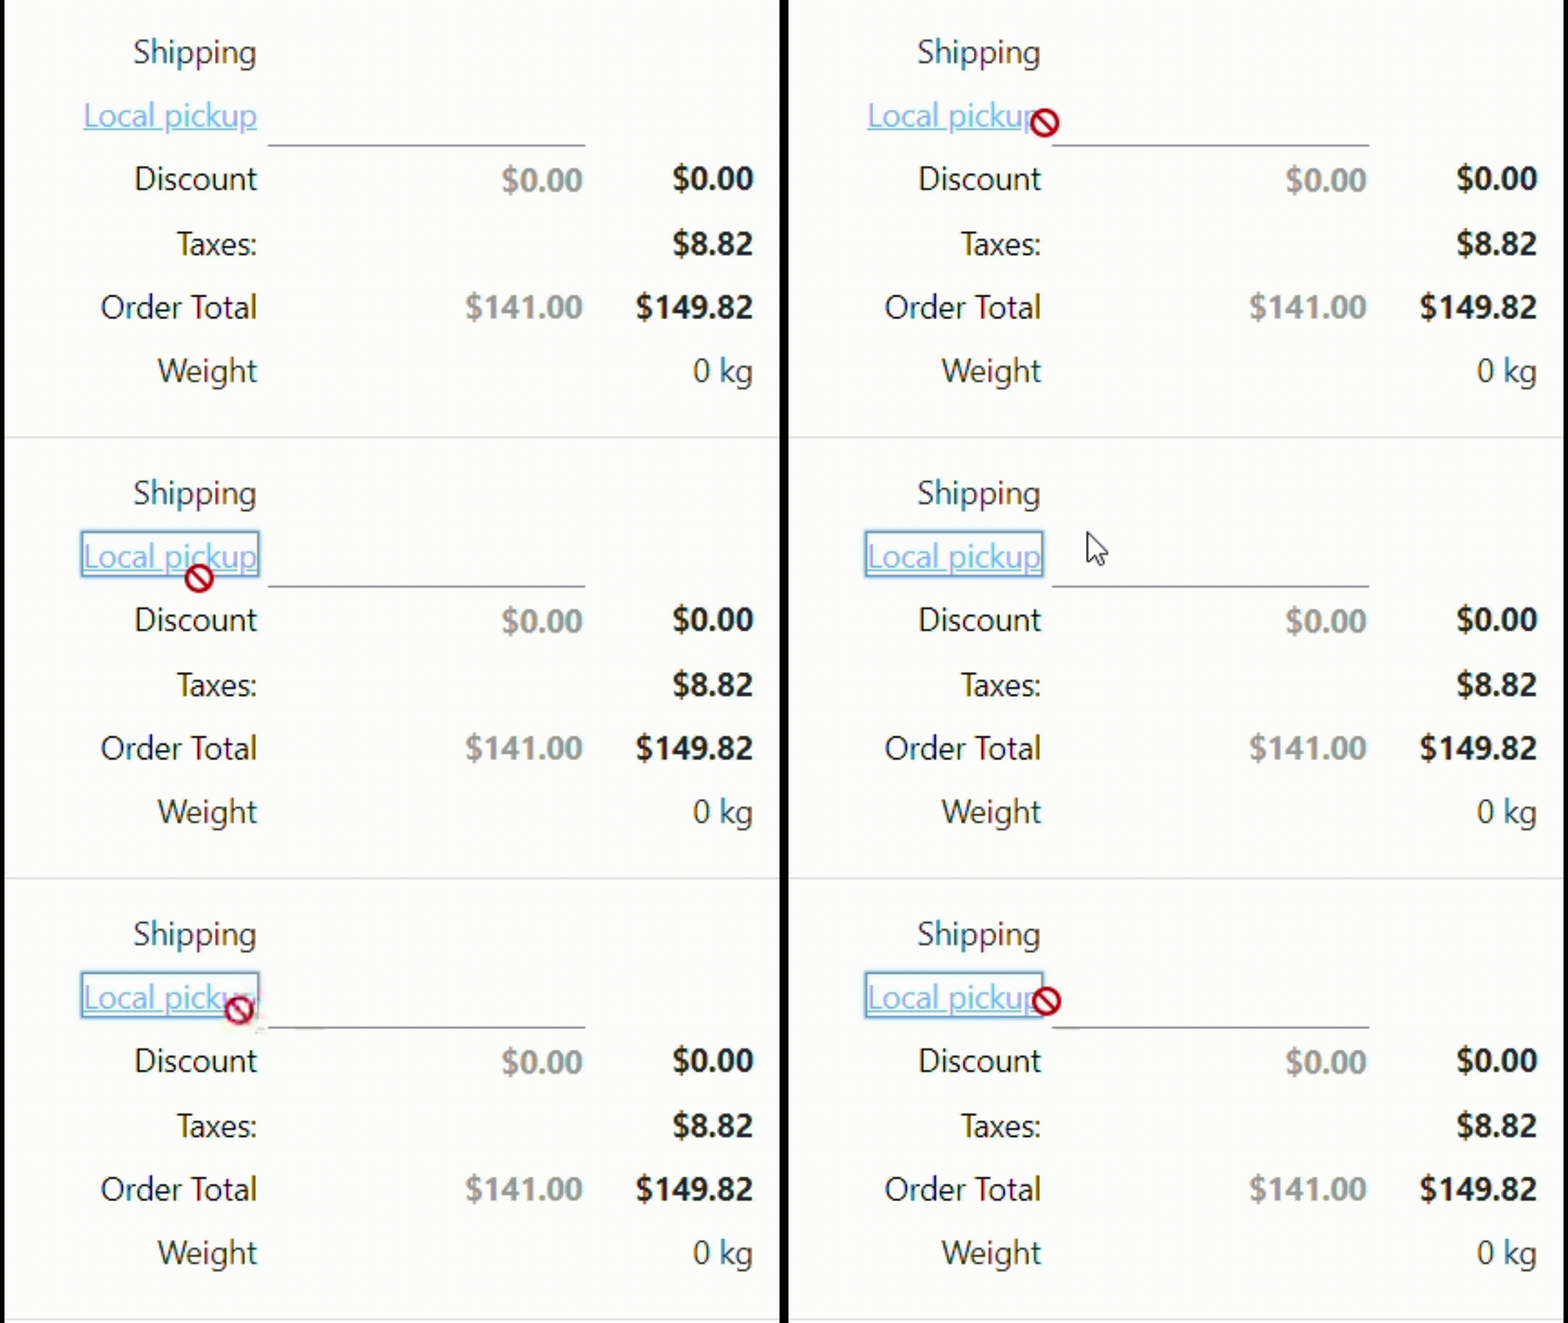
Note: if this option is enabled, you cannot change the delivery method manually.

Change the delivery method manually
Select optimal shipping method

Show products as default search result

By displaying products as default search results, businesses can enhance the user experience and streamline the ordering process, ultimately leading to increased sales and customer satisfaction.

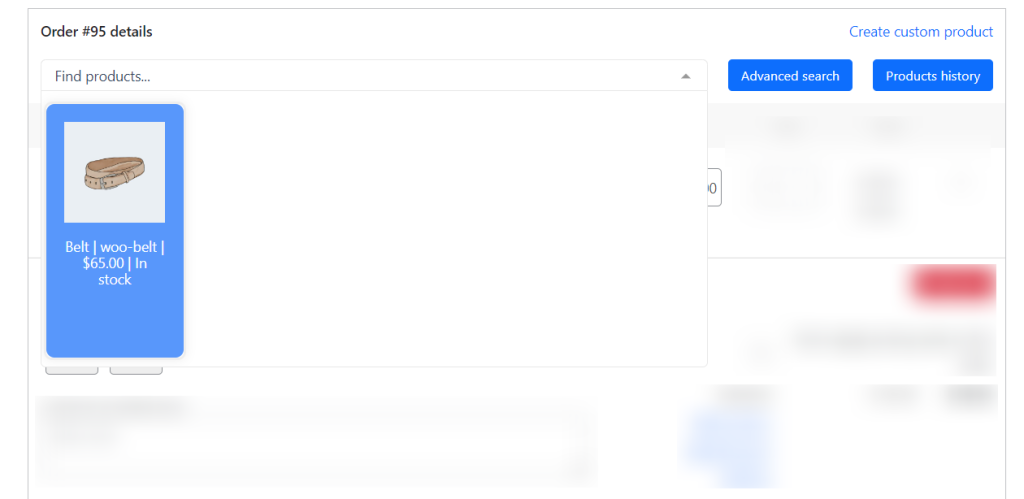
To activate it, go to Settings>Products and write items in the Show products as default search result line.

Show products as default search result

When you click on the search bar, the belt appears as the default product.

Belt as a default search result

Default customer

If you have a customer who frequently places orders over the phone, you can assign them as the default customer for phone orders. This saves time for employees, as they don’t have to enter in the customer’s information each time.

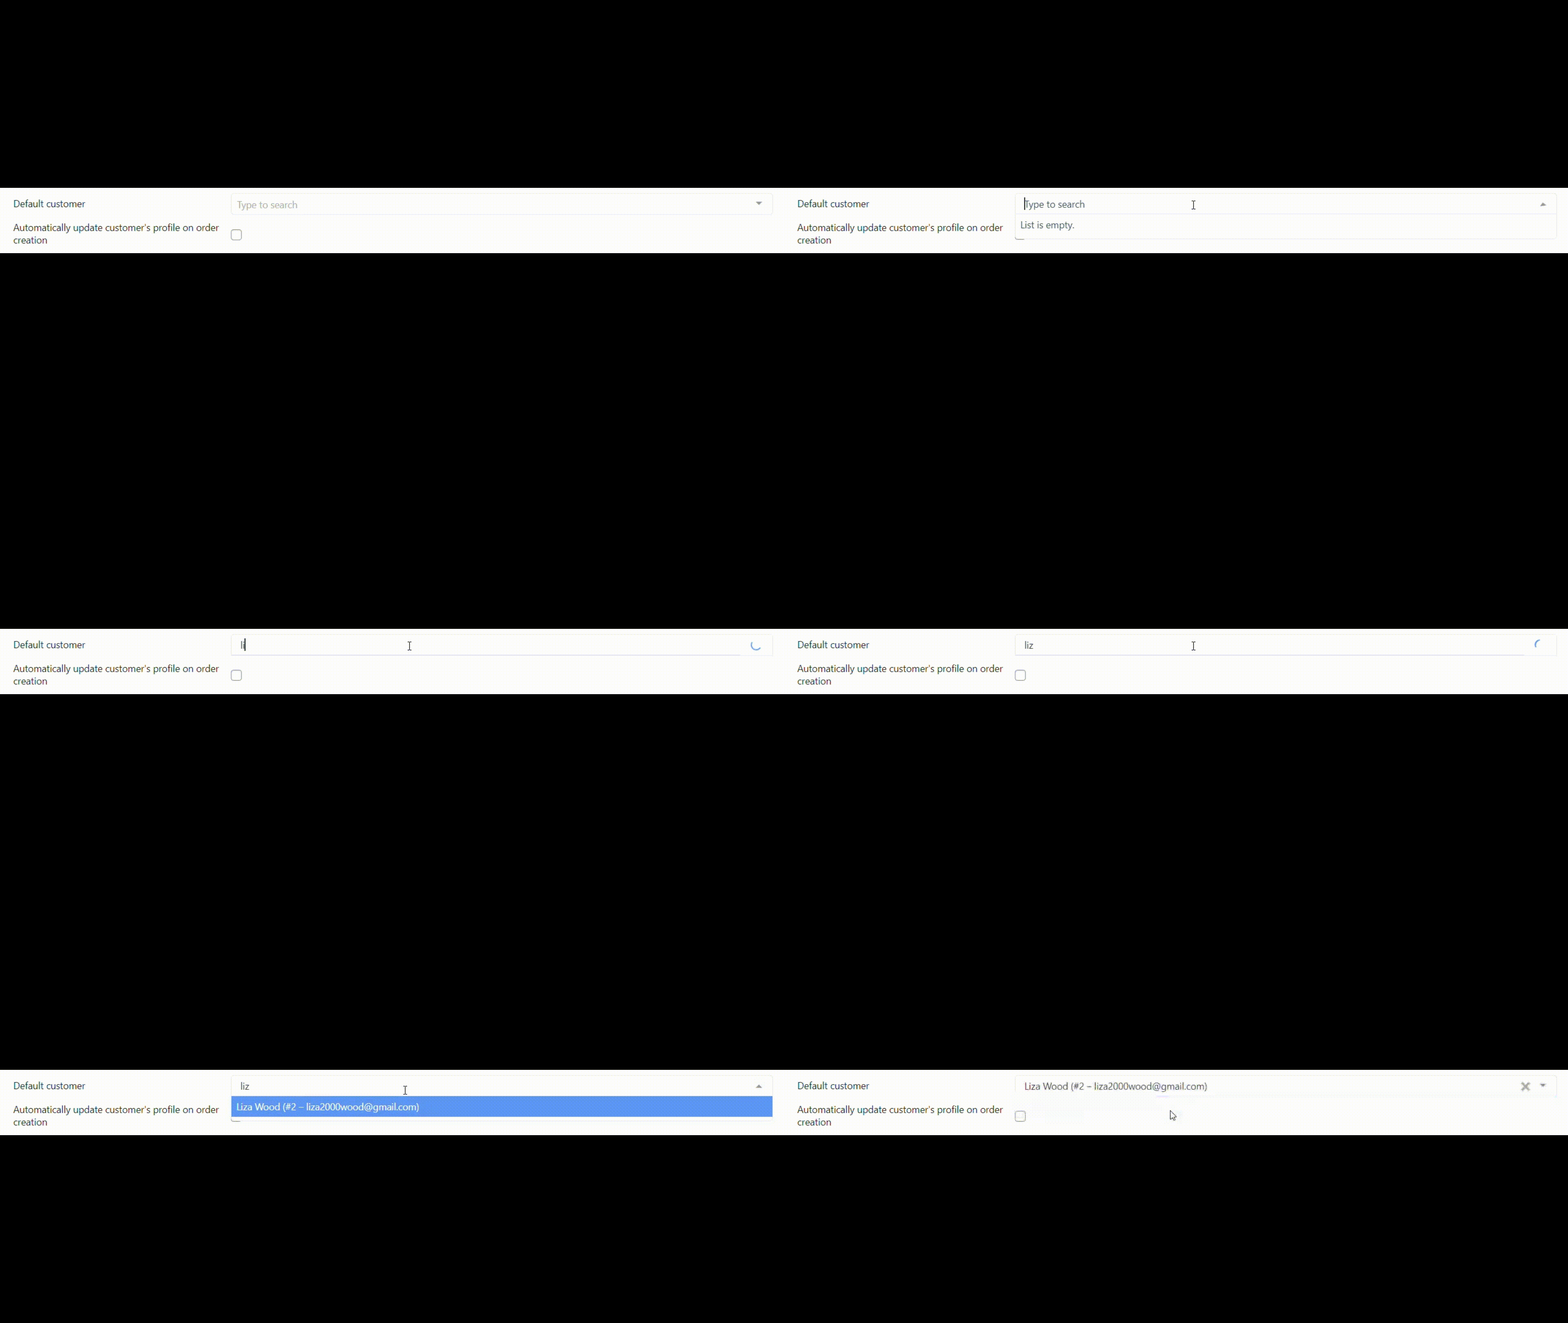
To activate it, go to Settings>Customers and write customers in the Default customer line.

Default customer

When you create an order, a customer is defined by default.

Liza Wood as a default customer

Show order history for the customer

This feature enables businesses to access and view the complete order records of their customers, providing valuable insights and information. This functionality can greatly enhance customer service and support, as businesses can quickly refer to past orders and assist customers more effectively.

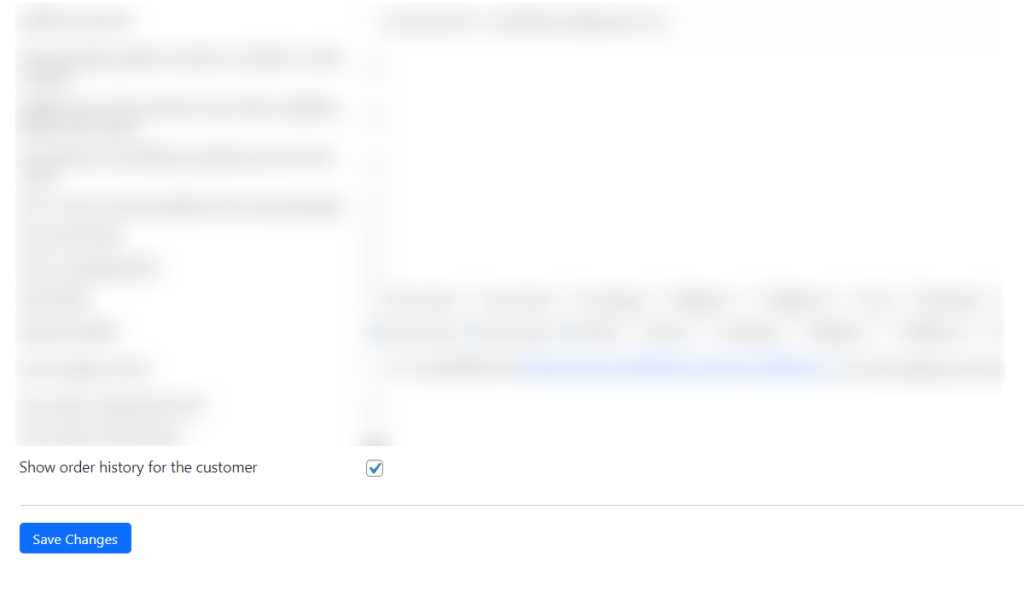
To activate it, go to Settings>Customers and tick Show order history for the customer.

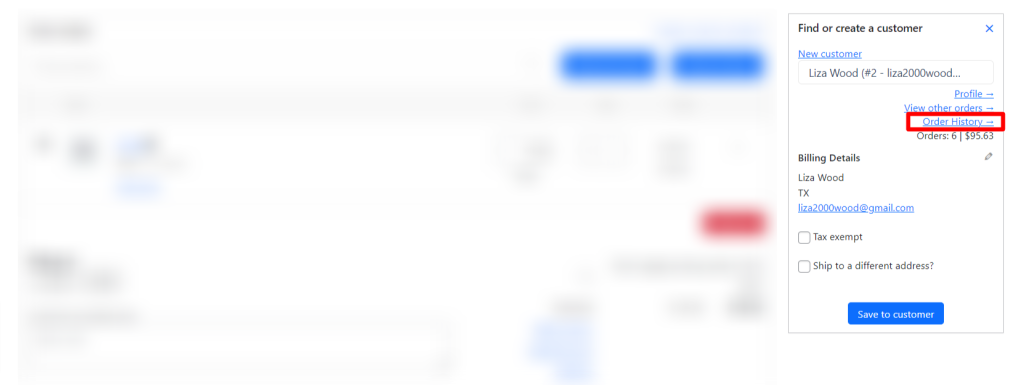
Show order history for the customer

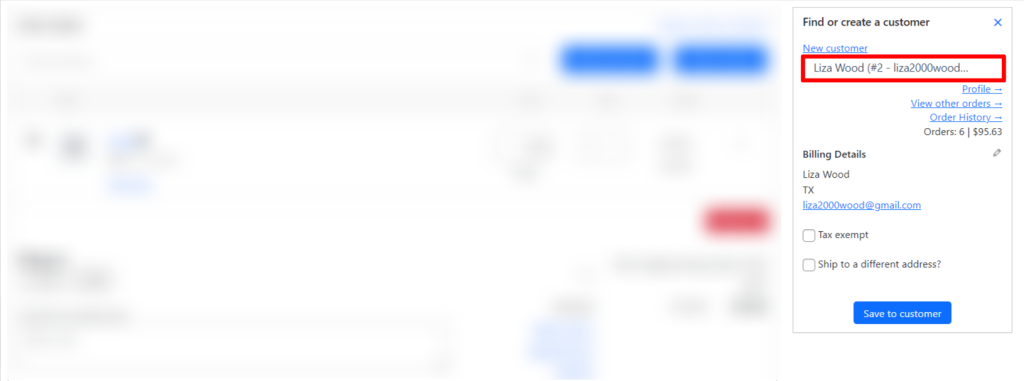
There is a Order History link in the client settings block now.

When you click on it, a list of customer orders is available to you.

List of customer orders

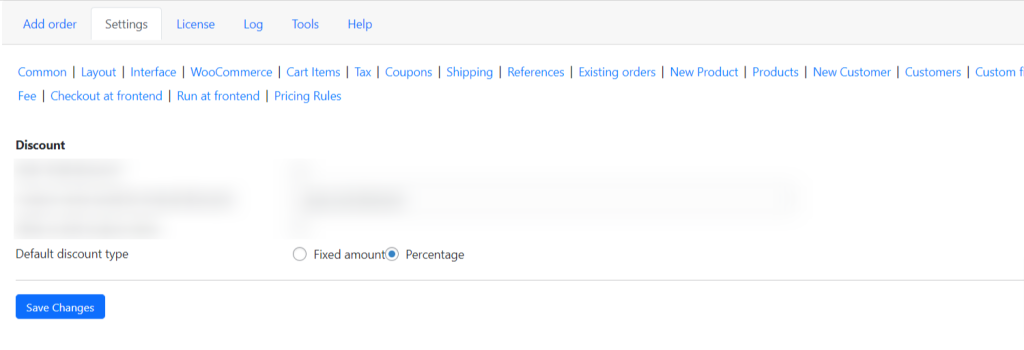
Default discount type

This feature is beneficial for businesses that frequently take phone orders and want to provide discounts to their customers. By setting the default discount type, businesses can streamline the ordering process and ensure that the correct discount is automatically applied to phone orders.

To activate it, go to Settings>Discount>Default discount type and tick Fixed amount or Percentage.

Default discount type

Conclusion on 10 useful settings Phone Orders for WooCommerce (Pro)

In conclusion, the 10 useful settings for Phone Orders for WooCommerce (Pro) offer a range of options that can greatly enhance the user experience and streamline the phone ordering process. With these settings, businesses can effectively manage and track phone orders, ensuring a smooth and efficient ordering process for both customers and staff.

4 Things You May Not Know About Advanced Dynamic Pricing for Woocommerce

Are you looking for a way to stay ahead of the competition in your e-commerce business? Advanced Dynamic Pricing for Woocommerce may be the answer. This powerful tool allows you to set dynamic pricing rules that automatically adjust prices for different customers, products, and even days of week. Here are four things you may not know about Advanced Dynamic Pricing for Woocommerce.

Note: this features availible only in pro version.

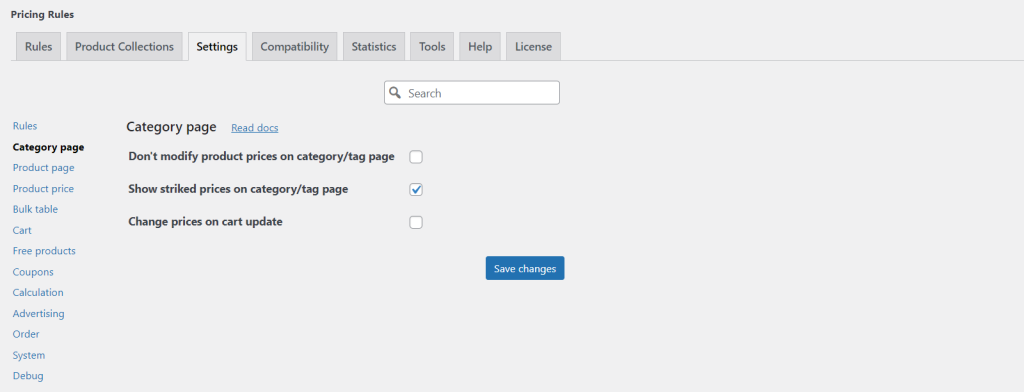
Category Page

You can use Advanced Dynamic Pricing for Woocommerce to customize your category page to make it look more attractive to buyers. For example, show the starting price of a product (without a discount) or change prices when updating the cart.

All you need to do is go to Settings >Category page and enable the required options.

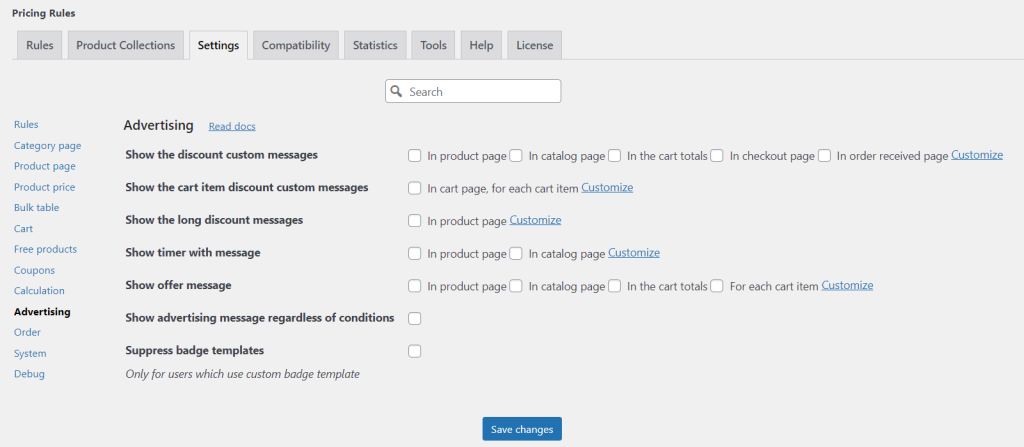
Advertising

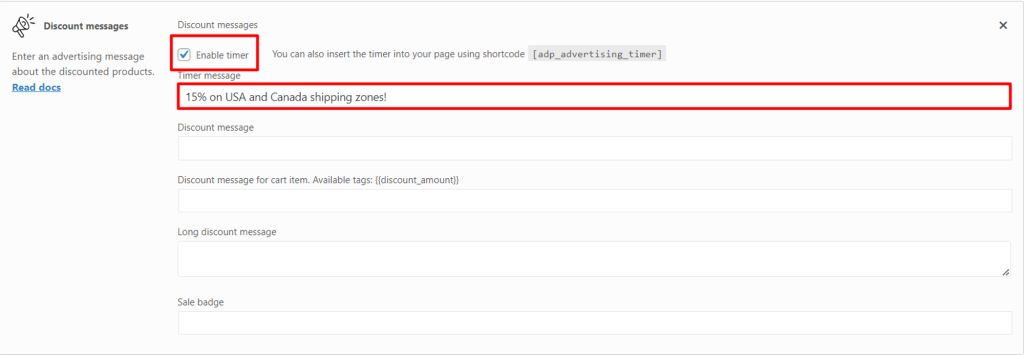
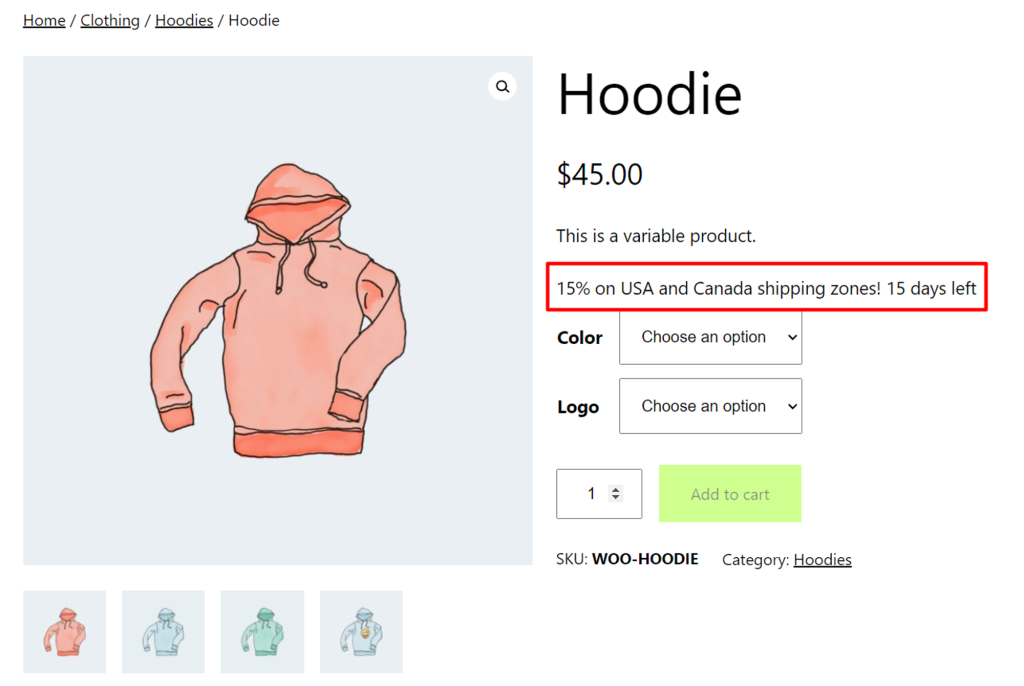
Retailers can use Advanced Dynamic Pricing for Woocommerce to offer discounts and promotions that are tailored to customer preferences. For example, you can create a rule and add a promotional message with a timer. It is also possible to specify where the advertisement will be visible (cart, product or category page).

These options are located in Settings>Advertising.

Calculation

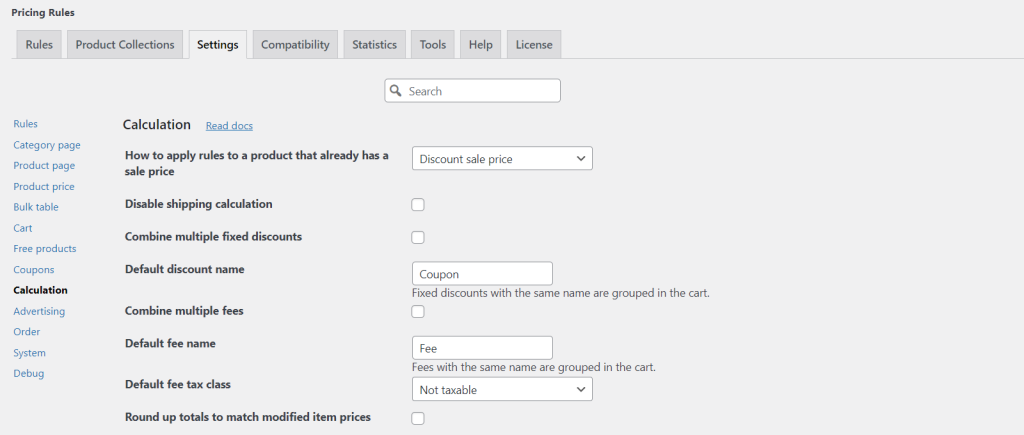
The pro version of the plugin also offers various pricing settings. You can choose how to calculate the shipping cost – apply only the maximum discount (Maximum value), only the minimum discount (Minimum value) or the sum of discounts (Sum of all discounts), or how to calculate the application of a discount to a product. And also combine several discounts or several commissions.

Product Collections

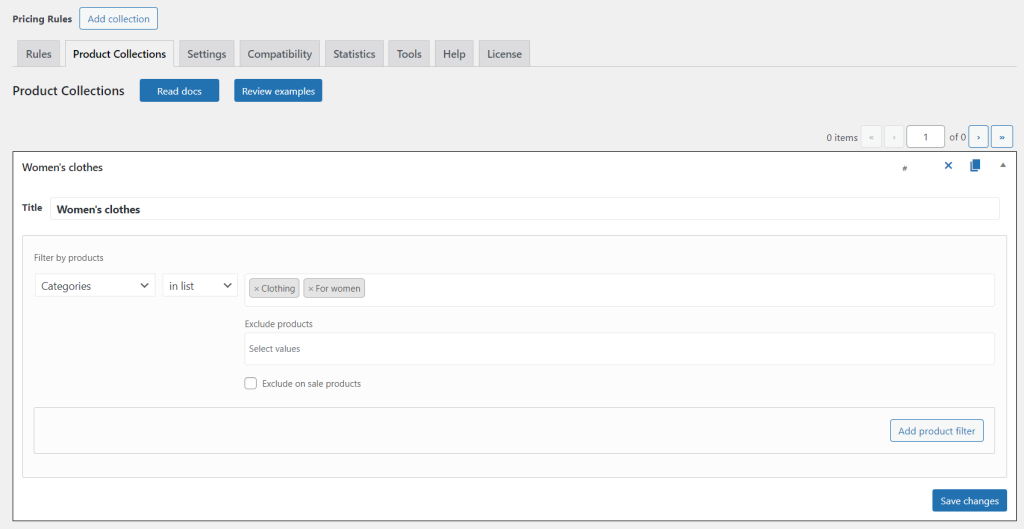
Product collections are not a list of products, as you might think. This is a system of conditions for categories. Thus, when you create a collection, you specify that the product must belong to all categories within it in order for it to be subject to the pricing rules. Let’s imagine a situation – you want the discount to apply only to women’s clothing. If you set such a condition in the usual way (in the product filter specify the categories For women and Clothing), then the rule will apply to all products for women and all clothing. However, by setting these categories in the product collection, you only have a discount on women’s clothing.

These are just a few of Advanced Dynamic Pricing for Woocommerce advantages available. By taking the time to understand this tool and how to use it, you can optimize your pricing strategies and maximize your profits. If you’re a Woocommerce store owner, it’s worth considering this plugin to get the most out of your store.

9 Secrets About Advanced Order Export for WooCommerce

WooCommerce is an extremely versatile eCommerce platform that allows you to customize and increase the functionality of your online store. One of the most useful tools offered by WooCommerce is the Advanced Order Export foe WooCommerce plugin. The plugin allows you to easily export orders from your WooCommerce store to different formats, giving you the ability to manage your orders, generate custom reports, and more. However, there are many more features and benefits to this amazing plugin that you may not be aware of. In this blog post, I’m going to share with you 9 secrets about Advanced Order Export for WooCommerce that you may not know.

Various Formats

It allows you to export orders in various formats. You can export orders in CSV, XML, and JSON format, and you can also export orders as PDFs. This makes it easy to work with your orders in any system.

Custom Fields

You can create custom fields for order exporting. You can customize your order exporting process to include fields such as customer name, email address, order date, and more. This gives you the freedom to export the exact data you need.

Bulk Export

You can use the plugin to export orders in bulk. You can select orders based on date ranges, order statuses, or other filters and then export them all at once. This is especially useful for businesses with large order volumes.

Filter Orders

You can use the plugin to filter orders. You can create custom filters and then use them to export orders that match specific criteria. This makes it easy to find the orders you need without having to manually search through them.

Integrate with Zapier

You can integrate with Zapier. Advanced Order Export for WooCommerce also integrates with Zapier, allowing you to easily import your orders into other applications or systems. This can be especially useful if you’re looking to use the data from your orders in another system.

Profiles

You can include export profiles for different order types. You can create profiles for different order types, such as wholesale orders or international orders. This makes it easy to quickly export orders based on their type.

Export Different Data

You can use the plugin to export different data. In addition to exporting orders, you can also export customer data. This includes customer name, email address, billing address, and more.

Email Notifications

You can also configure the plugin to automatically send email notifications to customers when their order is exported. This feature can be very useful in ensuring that customers are kept up to date with the progress of their orders.

Automated Export

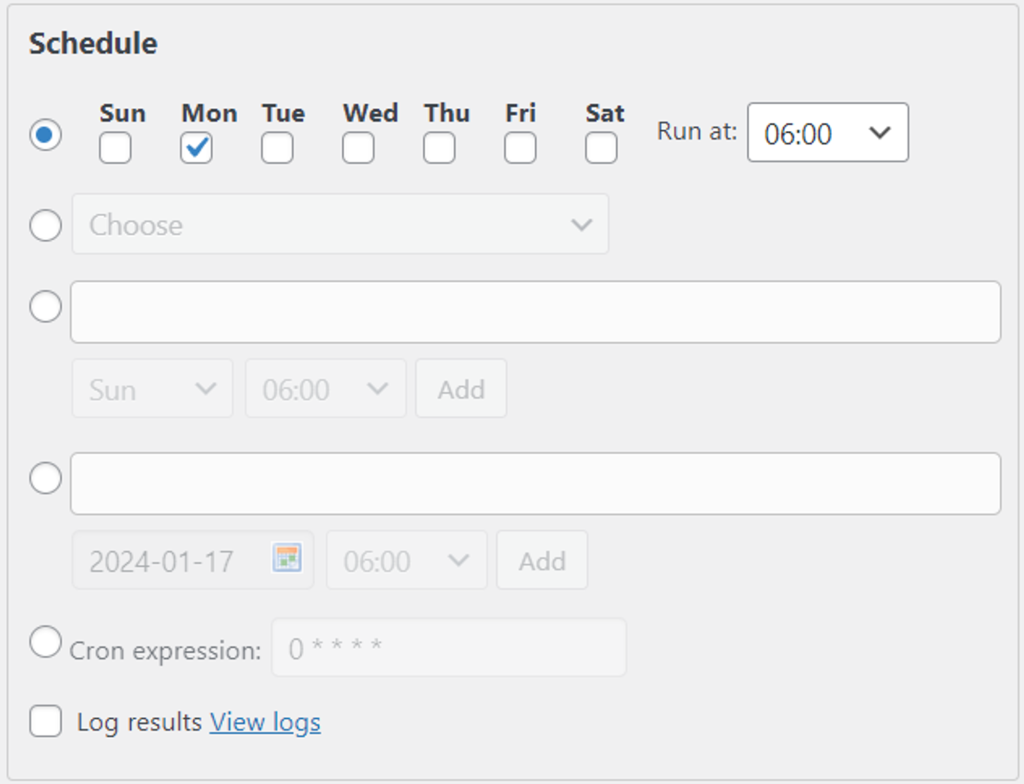
You can schedule automated exports. You can set up automated exports to run on a daily, weekly, or monthly basis. This makes it easy to keep your order data up-to-date without having to manually export it.

These are just a few of the secrets about Advanced Order Export for WooCommerce. This plugin is a great way to make managing orders from your WooCommerce store easier and more efficient. With its powerful features and customization options, it’s a must-have for any business.

Advanced Order Export: Free vs Pro

Introduction

Advanced Order Export is a powerful and versatile tool that makes it easy to export orders from your online store in a variety of formats. With the free version of Advanced Order Export, you can export orders to CSV, XML, and PDF formats, as well as to various platforms. You can also filter orders by date range, order status, and other criteria. The free version also includes basic mapping options, allowing you to map the exported data to your own custom fields. However, the free version does not offer support any of the more advanced features.

Features of Pro

Advanced Order Export Pro is an invaluable plugin for any store owner looking to make the most out of their WooCommerce store. The automation that the pro version has can save you time and money in the long run, allowing you to focus on other aspects of your business.

All key functions of the pro version are presented in the table:

Features Free Pro
Profiles +
Status Change Jobs +
Scheduled jobs +
Destination Block +
Advanced settings +

Profiles

Profiles are a block containing saved export settings. With it, you can easily create different profiles to export your WooCommerce orders into various formats.

Status Change Jobs

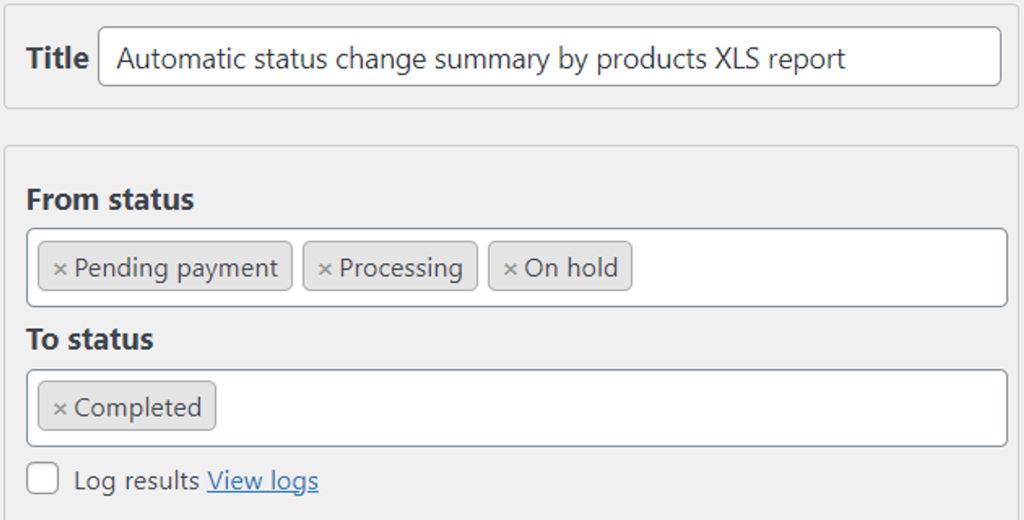
The plugin also has a feature that allows you to export orders based on their status, such as processing, refunded, or completed.

Scheduled jobs

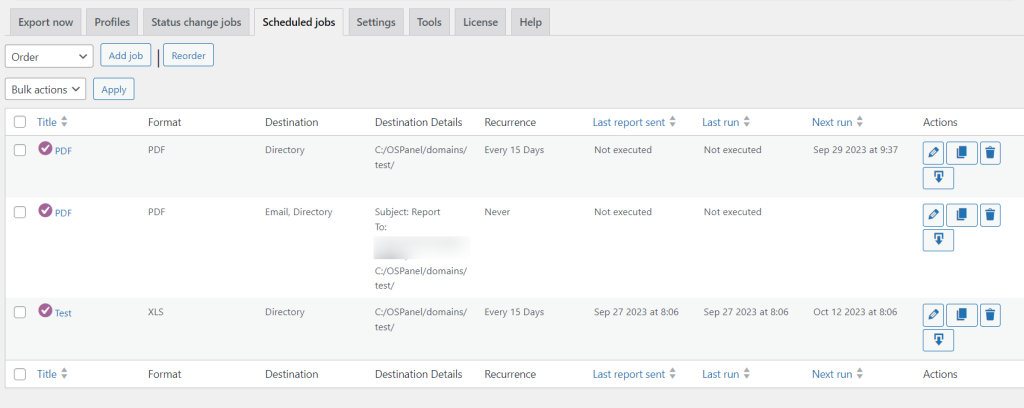
With the advanced order export scheduled jobs, store owners can easily automate the process, saving them time and resources. This allows them to focus on other aspects of their business, such as marketing and customer service.

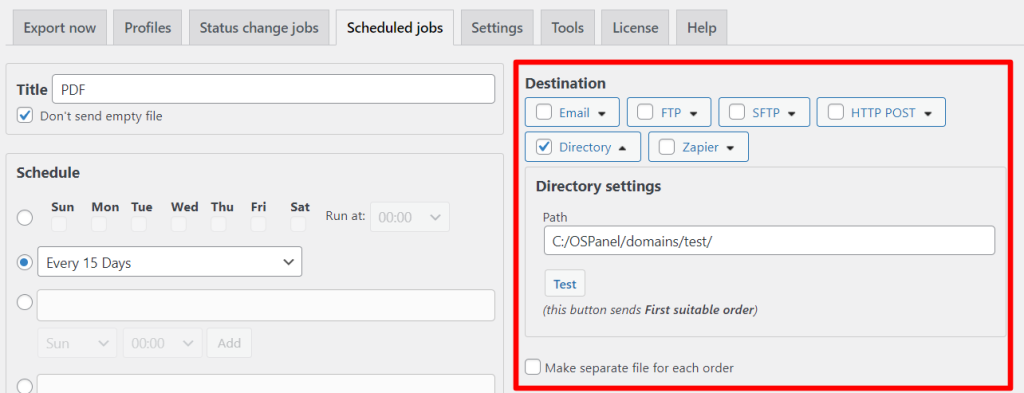
Destination Block

This feature is ideal for businesses that need to quickly and accurately transfer order data from one platform to another. It allows for the export of orders to a wide variety of destinations, including HTTP, XML, FTP, and even direct to a web service.

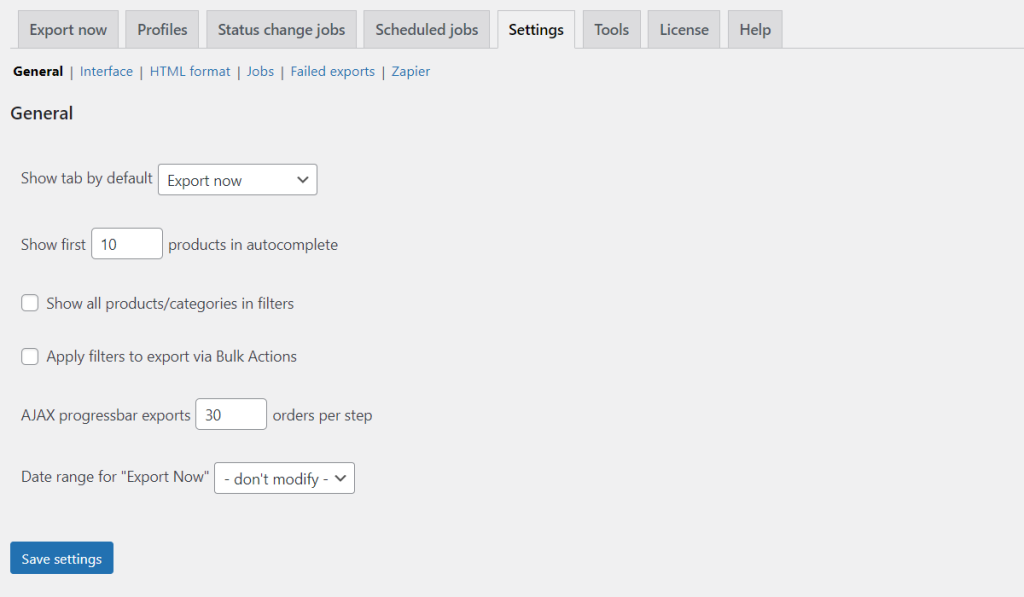
Advanced settings

With its advanced settings, you can customize your order export process in detail. It allows you to configure General, Interface, Jobs, Failed Export, Zapier and HTML.

Conclusion

The Advanced Order Export plugin for WooCommerce is a great way to keep track of orders and export data quickly and easily from the store. While the free version is a great starter tool for basic data export needs, the pro version offers more features and options for more advanced data export tasks. In the professional version, you can configure and save multiple export settings, schedule automatic exports, and even export orders to different destination blocks. For those with more complex export needs, the pro version is the best choice. It offers more features and options for faster and more efficient order export tasks.

Barcode scanning in Phone Orders

Introduction

Black Friday is a quite busy time! To serve your phone orders even faster on this hot day, use bar code scanner mode. This mode allows you to scan the bar code of any item you wish to purchase, and it automatically adds the item to the customer’s order. The ability to connect a scanning device helps to optimize and reduce service time for each client.

Prepare in advance for the holiday and enable this mode!

Note: this feature is available in the pro version.

How to activate bar code scanner mode

All you have to do is buy a scanner, connect it to your computer and activate the bar code scanner mode:

  1. You simply need to go to the Phone Orders tab in the WooCommerce settings.
  1. Next go to the Settings>Products.
  1. Tick the barcode scanner mode.

How to use bar code scanner mode

After you have activated the mode, the following message will appear on the order creation page:

Barcode mode enabled! Product search works only after pressing the Enter key

Let’s try to find a product.

  1. Scan the barcode. The product will immediately appear in the drop-down list.
  1. Let’s click on it. The product is added to the order.

Can’t scan barcode: reasons

If you are unable to scan an item, it may be due to the following common reasons:

  • Unsuitable conditions: insufficient lighting, too far from the scanning module to the barcode, incorrect position of the reader relative to the graphic image.
  • Device malfunction: phone camera or scanner. You need to make sure there are no scratches or other damage to the glass of the module. Dirt such as stains and fingerprints can be removed with a degreaser. If you cannot solve the problem yourself, you need to contact a service center.
  • The problem with the barcode. Low-quality images (insufficient contrast, blurred, with printing defects) are not read by all devices. Much depends on the type of scanning module. For example, some are “tailored” to reading small identifiers, while others cannot recognize even large ones if they are poorly printed.

If the problem still persists, then write to our support. We will resolve the situation.

Conclusion

Now you can activate the scanner, bring it to the barcode and in a second it will determine what product it is, its price, and then it will all go to the receipt. Adding products to an order will no longer take much time. This Halloween, no one will be left without good service!

Customized Exports Made Easy: Exploring the Flexibility of Advanced Order Export for Woocommerce

The Relevance of Customizing Reports

Customizing reports is an important part of any business, whether it be a small business or a large corporation. Reports are an effective way to track progress, analyze data, and identify areas for improvement. For businesses, customizing reports can help ensure that the right information is available to decision makers, leading to better decisions and improved performance.

Customizing reports can also help improve the accuracy of the data. By taking into account the specific variables and conditions of the business, the report can be tailored to provide more accurate and reliable results. This is especially important when dealing with complex data sets.

In addition to improving accuracy, customizing reports can also help save time. Since the reports are tailored to the specific needs of the business, they can be quickly generated. This can help save time and resources that would otherwise be spent on manually creating reports.

Do Your Customized Export

When it comes to exporting data, creating a customized export report can be a daunting task. The good news is that there are several steps you can follow to make the process easier. This little guide will provide an overview of how to create a customized export report.

  1. Give the report a title.

  1. Set a date range.

  1. Select the desired export format and configure it. You can choose, for example, the XLS format and adjust the direction from right to left, remove emojis, or give a different name to the sheet.

  1. Specify the status with which the exported orders should be. In our case, these are all completed orders.

  1. Let’s add a filter by customer. We export all Lisa Wood’s orders.

  1. In the Misc Settings field, check Export all order notes and Shipping fields use billing details (if shipping address is empty).

  1. In the Set up fields to export section, remove unnecessary fields, for example, all coupon’s information and billing details.

  1. Add your custom field. Click Add field and select meta key pickup_time. Let’s name the field Pickup time and select the date format. Let’s drag it to the left column using the drag-and-drop method.

Note: This field was previously created as part of this article.

  1. Let’s create a calculated field. Click Add calculated field and fill in the custom meta key custom_address. Let’s specify the column name and its format. Also drag it to the left column using the drag-and-drop method.

Next, let’s create a calculation function. In the Misc Settings section, check the “Custom PHP code to modify output” checkbox and paste the following rough function into the text field:

add_filter('woe_get_order_value_{FIELD}',function ($value, $order,$fieldname) { $value = "text"; return $value; },10,3);

Let’s replace {FIELD} with the previously created metakey and replace $value = “text”; with the following code (this code combines state and postcode):

$value = $order->get_shipping_state() . '-' .$order->get_shipping_postcode();

  1. Click on the “Preview” button and check the results.

Note: there is not any postcode in Liza Wood’s orders, so report has only state in Custom address field.

Once the export is complete, you can then use the data to analyze your spending and income trends, create budget plans, and predict your financial future.
Avoid These Common Mistakes

As a business owner, it is important to customize reports to get the most accurate information about your business. However, customizing reports can be a tricky process. To get the most accurate information, you must avoid common mistakes that can lead to inaccurate or unreliable reports.

First, you must choose the right data fields to include in your report. Too often, business owners choose data fields that are not relevant to their goals. For example, if you are trying to analyze customer spending, it would not make sense to include data fields related to employee productivity. To get the most accurate information, you must select data fields that are directly related to the goals of your report.

Second, you must ensure that you are using the most up-to-date data. Reports can quickly become outdated if you are not regularly updating the data. To get the most accurate information, you must regularly review the data and update it as necessary.

Third, you must make sure that your report is free of errors. Mistakes in data entry or calculations can lead to inaccurate information. To ensure that your report is accurate, you must double-check all the data and calculations.

In conclusion, customizing reports is an important and necessary part of any work environment. Provide more detailed insight into performance and identify potential areas for improvement with Advanced Order Export for WooCommerce!

Discount for the wholesalers with Advanced Dynamic Pricing for WooCommerce

Introduction

One of the most demanded type of the discount is a discount for the wholesalers. Most of the e-shops has a special wholesale price or discount for those who buy in large quantities. The shop owner can give a special price as a coupon or just when the purchase starts from the reasonable quantities.

By offering exclusive discounts to your wholesalers, you can incentivize them to make larger purchases and establish long-term partnerships. Advanced Dynamic Pricing for WooCommerce allows you to customize discounts based on factors such as order volume, product categories, or specific customers. This flexibility ensures that your wholesale pricing strategy is optimized for maximum profitability and customer satisfaction.

With the Role discount function you can set up wholesaler’s discounts. Read on to find out how to do this.

Role discount for a wholesaler

Role discount in Advanced Dynamic Pricing for WooCommerce is a powerful tool that can help retailers manage their pricing in a more efficient and effective way. It allows retailers to apply discounts to certain groups of customers as a guests, wholesalers or internal discount of the company for the staff.

To apply Role discount to a wholesaler, you must first create a rule.

We will set up 4 rules for different situations:

  • Discount for the entire store.
  • Discount for the required amount in the cart.
  • Discount for specific product.
  • Discount for bulk purchases.

Discount for the entire store

Click on the “Add rule” button and select “Role discount”.

Specify Wholesaler as the role.

Select the discount type and amount.

There is the discount for the entire store.

Discount for the required amount in the cart

Click on the “Add rule” button and select “Role discount”.

Specify Wholesaler as the role.

Select the discount type and amount.

Click on the “Cart Conditions” button.

Specify amount of cart.

The discount is applied once the cart total reaches $100.

Discount for specific product

Click on the “Add rule” button and select “Role discount”.

Specify Wholesaler as the role.

Select the discount type and amount.

Click on the “Product filters” button.

Choose an item.

Only hoodie with logo has the discount.

Discount for bulk purchases

Click on the “Add rule” button and select “Role bulk”.

Specify Wholesaler as the role.

Specify ranges and discounts.

Product quantities from 3 to 9 receive a 5% discount, and quantities from 10 receive a 10% discount.

Conclusion

Look how easy you can make a discount for the wholesalers with Advanced Dynamic Pricing for WooCommerce.

But you can make your shop more powerful for the wholesalers with the analytics: use Advanced Order Export for WooCommerce to export the report about the wholesalers purchases. How to do it – read in our next articles.

Discounts, coupons and fees in Phone Orders for WooCommerce

Table of Contents

Phone Orders for WooCommerce is a plugin that allows customers to place orders over the phone. The plugin provides various features such as discounts, coupons, and fees to enhance the phone ordering experience. Customers can avail discounts on their purchases by applying coupon codes provided by the store. Additionally, the plugin allows store owners to add fees to orders, such as shipping fees or handling charges. These features make it convenient for customers to place orders over the phone and avail the same benefits and discounts as they would while ordering online.

Let’s look at how to manage discounts, fees and coupons in Phone Orders for WooCommerce.

Note: all settings described below are available only in the pro version.

Discounts

Discounts are located in Settings>Discount.

To remove the discount option, check the Hide “Add discount” checkbox.

Now there is no Discount field in order creation.

In the Coupon name (used by manual discount) field, enter the default coupon name.

For additional convenience of creating orders, enable the “Allow to edit coupon name” option. This way you can change the coupon name in the order editor.

Set the default discount type (fixed amount or percentage) so you don’t have to spend more time choosing. Check the box next to “Default discount type”.

Coupons

Coupons are located in Settings>Coupons.

To hide the warning about disabled coupons, simply tick the box provided. This will prevent any notifications from appearing when a coupon is disabled. This feature is useful for users who do not want to be bothered by unnecessary warnings and prefer to manage their coupons independently.

If your business does not have coupons, then check the Hide “Add coupon” option.

The “Show all coupons in autocomplete” option allows you to automate the manual search for coupons and optimize the time spent searching for the desired coupon.

Fees

Fees are located in Settings>Fee.

The feature Hide “Add fee” provides greater transparency to customers as they will not be surprised with any unexpected charges.

To specify the default fee name, fill in the “Fee name” field.

The “Fee amount” option helps set the default value for fees.

When it comes to taxes for the fee, you must choose an existing tax class. The “Fee tax class” option allows you to set one of 4 classes: Not taxable, Standard rate, Reduced rate and Zero rate.

Enabling the “Allow to use zero amount” checkbox will give you the ability to use zero fees when carrying out transactions. This function may be useful for small payments or charity donations, where even small transaction fees can cut deeply into the amount of money being donated.

Conclusion on discounts, coupons and fees in Phone Orders for WooCommerce

In conclusion, the use of discounts, coupons, and fees in Phone Orders for WooCommerce can greatly benefit both customers and businesses. By offering discounts and coupons, businesses can attract more customers and increase sales. These incentives can also encourage customer loyalty and repeat purchases. On the other hand, implementing fees for specific services or order types can help businesses cover additional costs or provide premium services. However, it is important for businesses to carefully consider the impact of these discounts, coupons, and fees on their overall profitability and customer satisfaction. By finding the right balance and effectively communicating these offers to customers, businesses can successfully leverage these strategies to drive growth and success in the WooCommerce platform.