WooCommerce is an extremely versatile eCommerce platform that allows you to customize and increase the functionality of your online store. One of the most useful tools offered by WooCommerce is the Advanced Order Export for WooCommerce plugin. The plugin allows you to easily export orders from your WooCommerce store to different formats, giving you the ability to manage your orders, generate custom reports, and more. However, there are many more features and benefits to this amazing plugin that you may not be aware of. In this blog post, I’m going to share with you 9 secrets about Advanced Order Export for WooCommerce that you may not know.
Various Formats
It allows you to export orders in various formats. You can export orders in CSV, XML, and JSON format, and you can also export orders as PDFs. This makes it easy to work with your orders in any system.
Custom Fields
You can create custom fields for order exporting. You can customize your order exporting process to include fields such as customer name, email address, order date, and more. This gives you the freedom to export the exact data you need.
Bulk Export
You can use the plugin to export orders in bulk. You can select orders based on date ranges, order statuses, or other filters and then export them all at once. This is especially useful for businesses with large order volumes.
Filter Orders
You can use the plugin to filter orders. You can create custom filters and then use them to export orders that match specific criteria. This makes it easy to find the orders you need without having to manually search through them.
Integrate with Zapier
You can integrate with Zapier. Advanced Order Export for WooCommerce also integrates with Zapier, allowing you to easily import your orders into other applications or systems. This can be especially useful if you’re looking to use the data from your orders in another system.
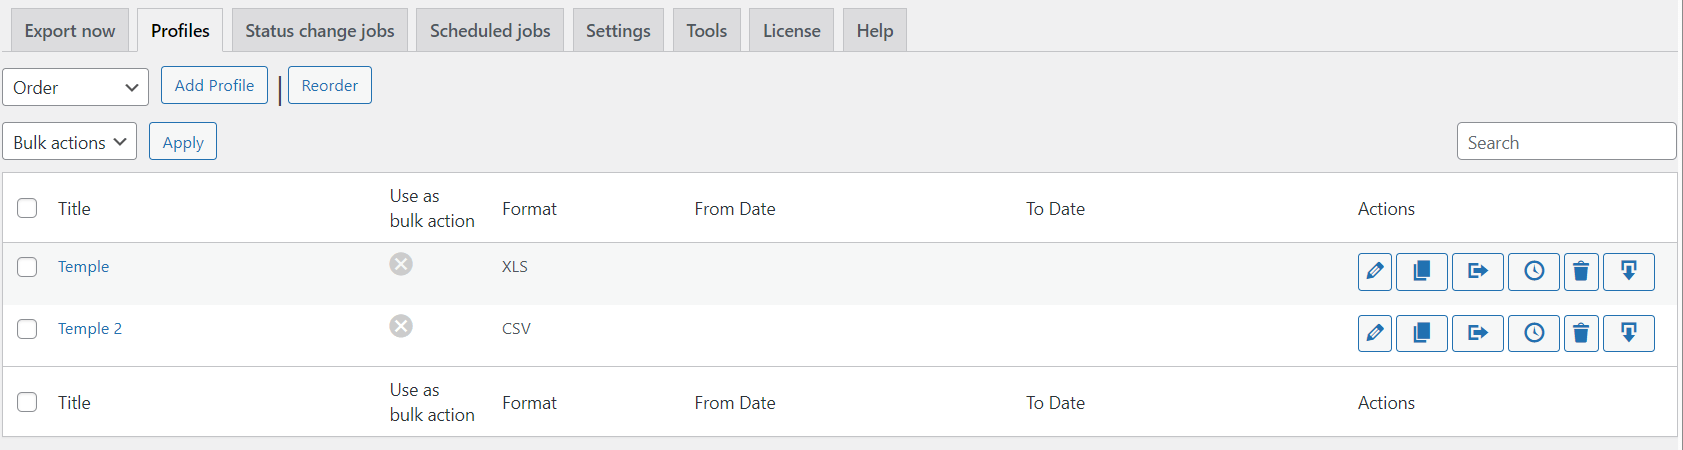
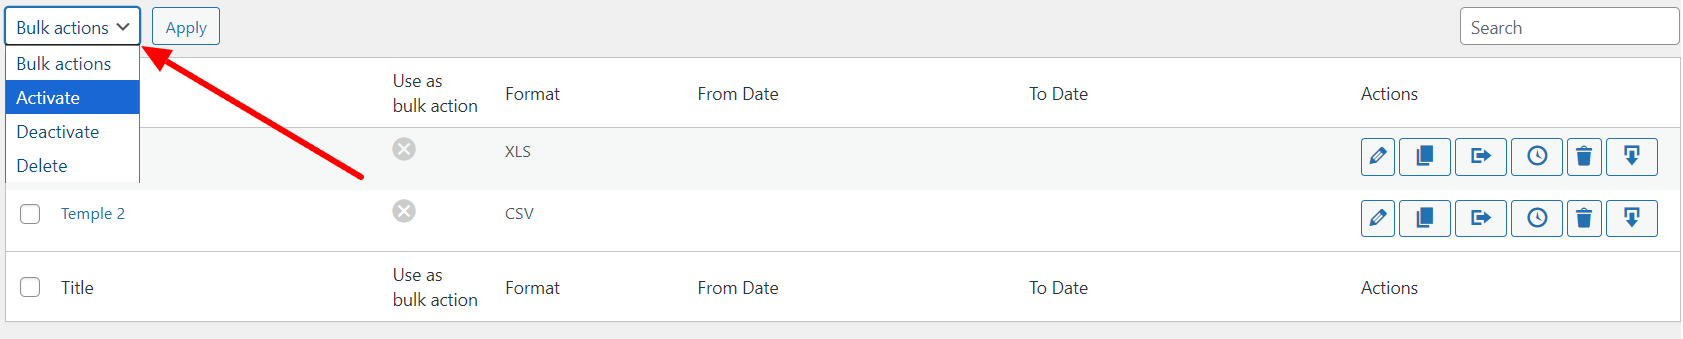
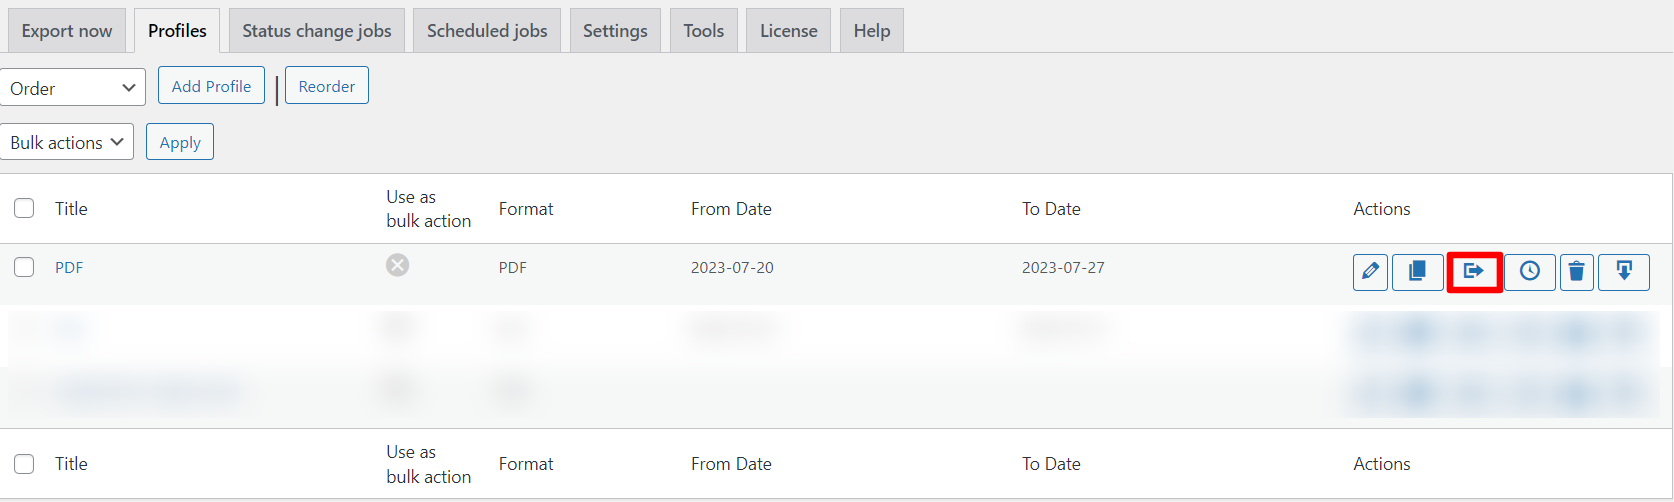
Profiles
You can include export profiles for different order types. You can create profiles for different order types, such as wholesale orders or international orders. This makes it easy to quickly export orders based on their type.
Export Different Data
You can use the plugin to export different data. In addition to exporting orders, you can also export customer data. This includes customer name, email address, billing address, and more.
Email Notifications
You can also configure the plugin to automatically send email notifications to customers when their order is exported. This feature can be very useful in ensuring that customers are kept up to date with the progress of their orders.
Automated Export
You can schedule automated exports. You can set up automated exports to run on a daily, weekly, or monthly basis. This makes it easy to keep your order data up-to-date without having to manually export it.
These are just a few of the secrets about Advanced Order Export for WooCommerce. This plugin is a great way to make managing orders from your WooCommerce store easier and more efficient. With its powerful features and customization options, it’s a must-have for any business.
Exporting orders from WooCommerce is often straightforward and efficient for basic e-commerce needs, allowing store owners to quickly access and manage their sales data. However, as your online store grows or encounters unique requirements, this process can present a variety of challenges that necessitate more sophisticated approaches and tools. In this quick guide, we’ll kick things off with a step-by-step walkthrough of performing a simple order export, ensuring even beginners can get started without hassle.
Your Options to Export WooCommerce Orders
Exporting orders is a key feature for sales analysis, reporting, and integration with external systems. To export WooCommerce orders, you can use various plugins:
Advanced Order Export for WooCommerce by AlgolPlus. This is a highly versatile plugin with strengths in comprehensive customization, automation, and advanced features like bulk actions, scheduled exports, real-time triggers on status changes, and support for multiple formats (CSV, XML, JSON, PDF). It excels in filtering by orders, products, and customers, with summary modes and templates for efficiency. Functional capabilities include destinations like email, FTP, and HTTP, making it ideal for large-scale stores needing robust integration.
Built-in WordPress Export Tool. Strengths lie in its simplicity and no-cost availability, as it’s included in WordPress. It allows basic export of posts, pages, and users, but for orders, it’s limited to general data without WooCommerce-specific fields. Weaknesses include lack of customization, no advanced filters, and inability to export in multiple formats or automate processes. Functional capabilities are minimal, suitable only for very basic data dumps without analysis or integration features.
WP All Export by Soflyy. Strengths include user-friendly interface and support for exporting any WordPress data, including WooCommerce orders, with drag-and-drop field mapping. It offers scheduling and real-time exports, along with multiple formats like CSV and XML. Weaknesses are fewer WooCommerce-specific optimizations compared to dedicated plugins, potential performance issues with large datasets, and a premium cost. Functional capabilities cover custom filters and destinations like email and FTP, but it’s less focused on order-specific automation.
Order Export & Order Import for WooCommerce by Webtoffee. Strengths are in its dual export/import functionality, making it great for data migration, with support for CSV format and basic filters by date, status, and products. It includes scheduled exports and is relatively affordable. Weaknesses include limited format options (mainly CSV), no real-time triggers or advanced destinations, and less customization for complex reports. Functional capabilities focus on straightforward exports for small to medium stores, with import features to complement order management.
WooCommerce Customer / Order / Coupon Export by SkyVerge. Strengths include easy setup and support for exporting orders, customers, and coupons in CSV format, with basic filters and scheduling. It’s reliable for simple reporting. Weaknesses are the lack of advanced formats, automation like real-time exports, or destinations beyond downloads, making it less scalable for growing businesses. Functional capabilities are basic, ideal for quick exports without deep integration or customization.
In this article, we’ll explore the main options for exporting orders in WooCommerce, covering basic and advanced exports. We’ll outline the steps step-by-step by using plugin Advanced Order Export for WooCommerce by AlgolPlus.
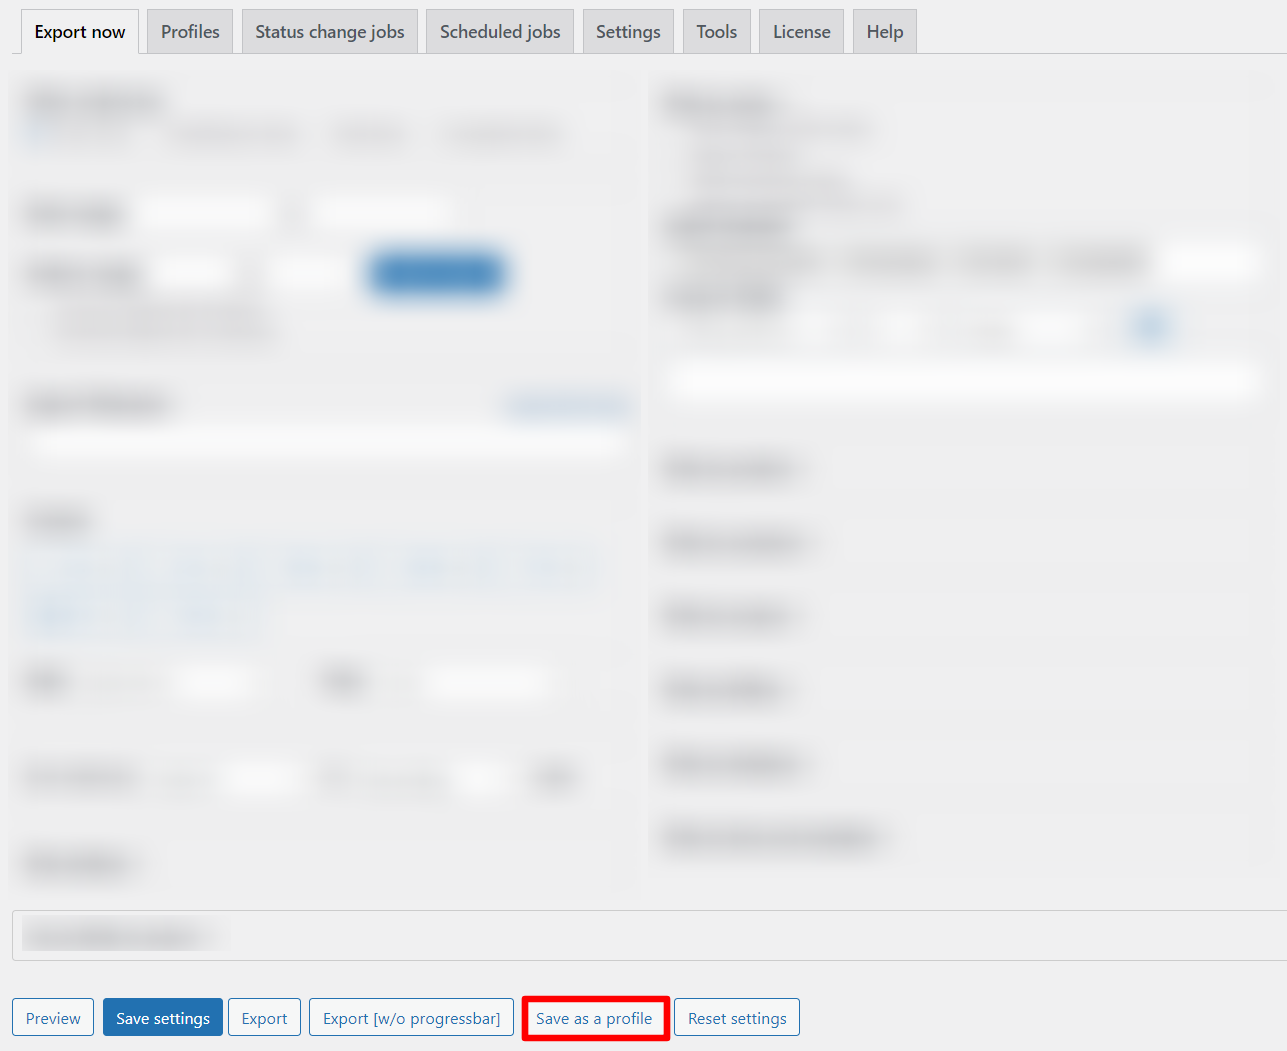
How to Handle a Basic WooCommerce Order Export
Basic export is a straightforward way to export orders without complex configurations. It’s perfect for quick data analysis.
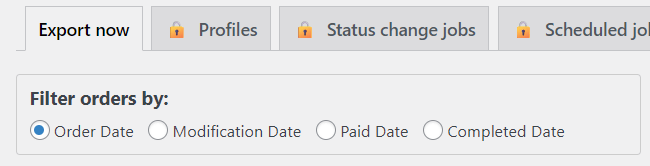
Step 1: Filter orders
Start by filtering orders to export only the relevant data. The primary filter is the Order Date filter. Also, you can choose Modification Date filter, Paid Date filter, Completed Date filter.
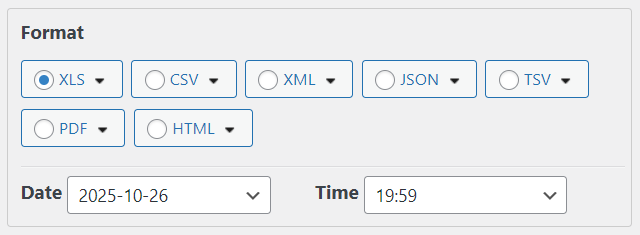
Step 2: Configure file format
Choose the file format for export, for example, Excel (XLS or XLSX), which is convenient for viewing in spreadsheet applications like Microsoft Excel or Google Sheets.
Step 3: Choose Your Order Export Columns
Specify which columns to include in the export: order ID, date, amount, status, etc.
Step 4: Preview
Review the data before exporting. This step displays a preview of the file to ensure all columns and filters are applied correctly. It helps prevent errors in the final file.
Step 5: Complete Your Order Export and Download Your Export File
Click the “Export” button (at the bottom of the interface). After processing, the file downloads automatically.
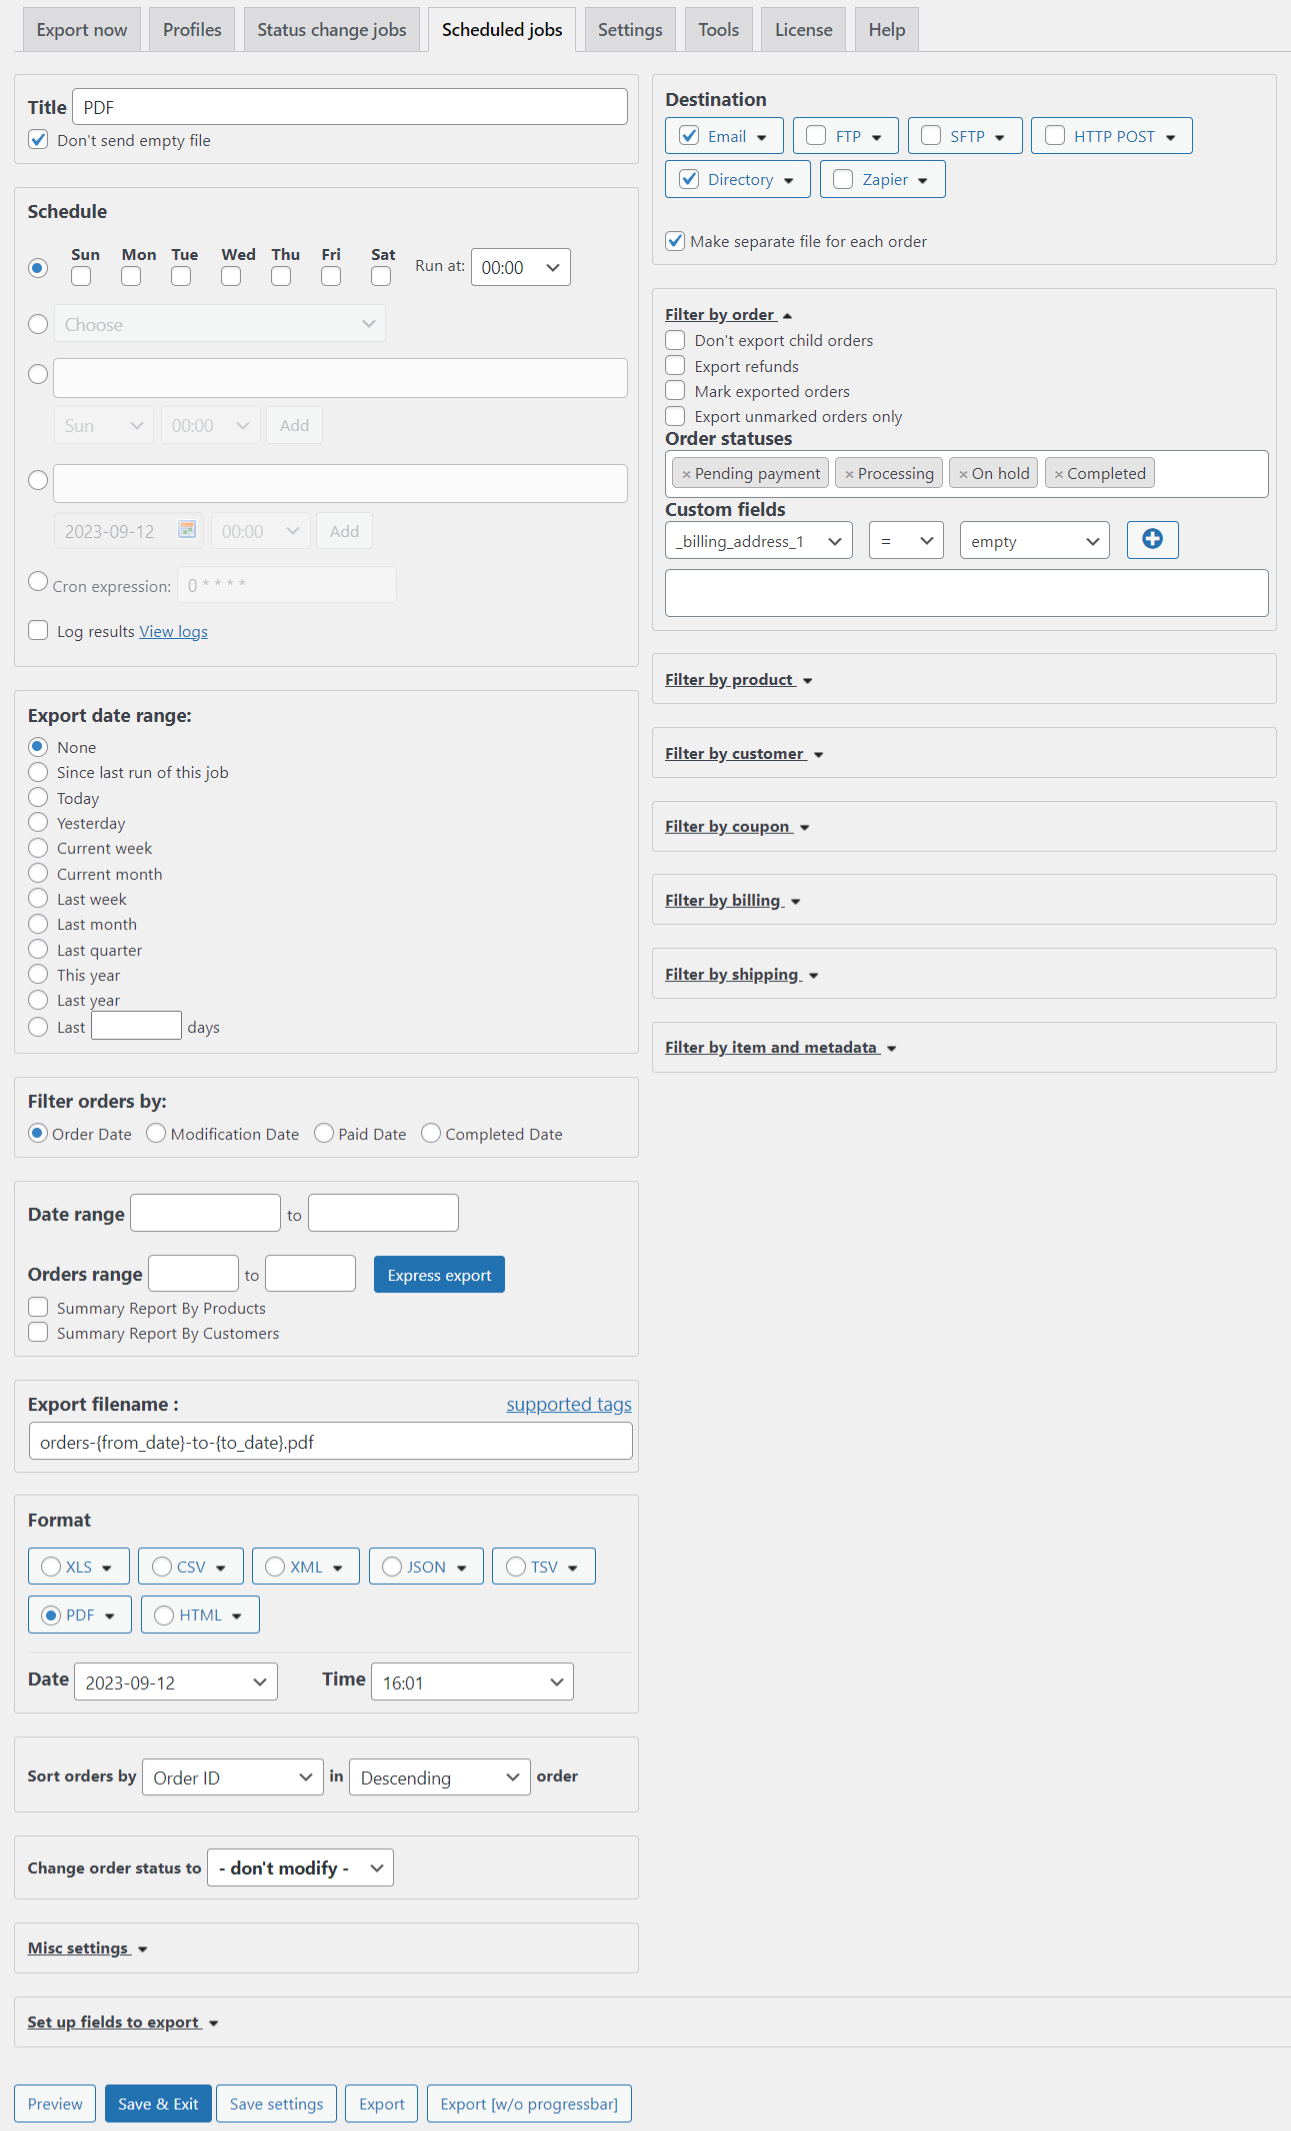
Advanced Order Export Sections
Advanced order export offers more flexibility for larger stores. It includes addition functions such as templates, realtime order export, scheduled exports and etc.
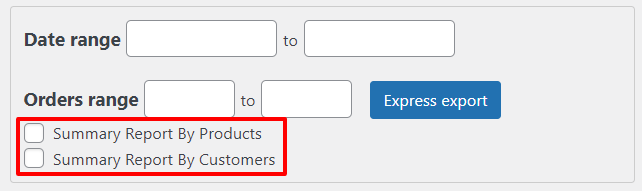
Summary modes
Summary modes allow you to aggregate data by customers or products. For example, you can get a report on purchase totals by customers or product popularity. This is useful for marketing analysis and inventory optimization.
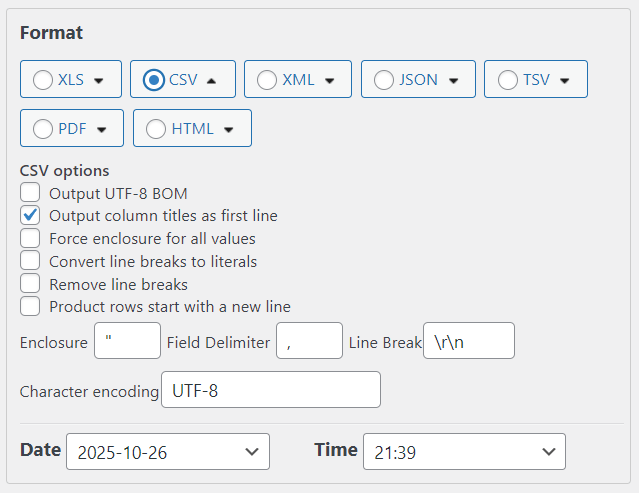
Configure Formats
Select the file format: CSV (for simple text export), XML (for structured data), JSON (for API integrations), or PDF (for printable reports). Each format has unique benefits: CSV is universal, XML for complex structures, JSON for web apps, and PDF for presentations.
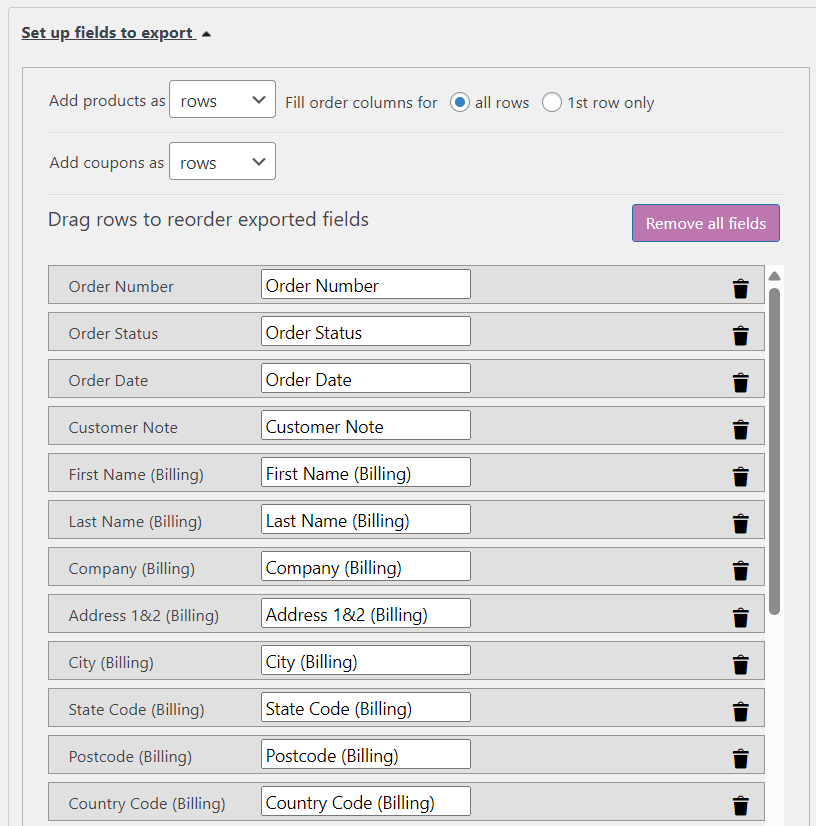
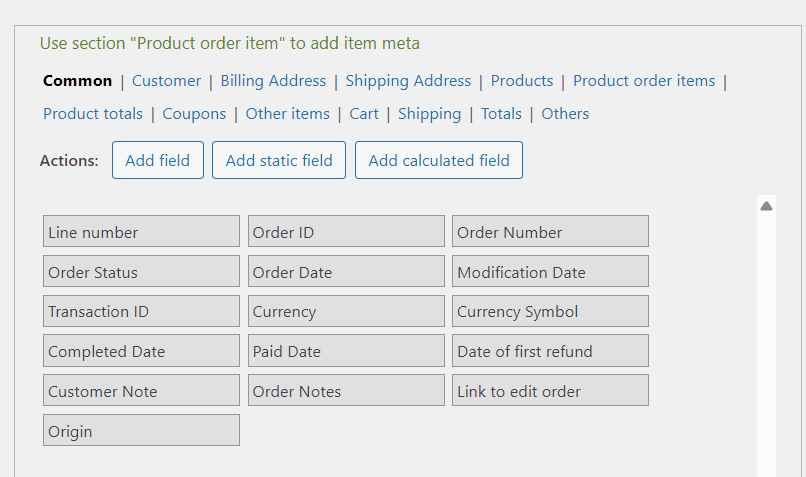
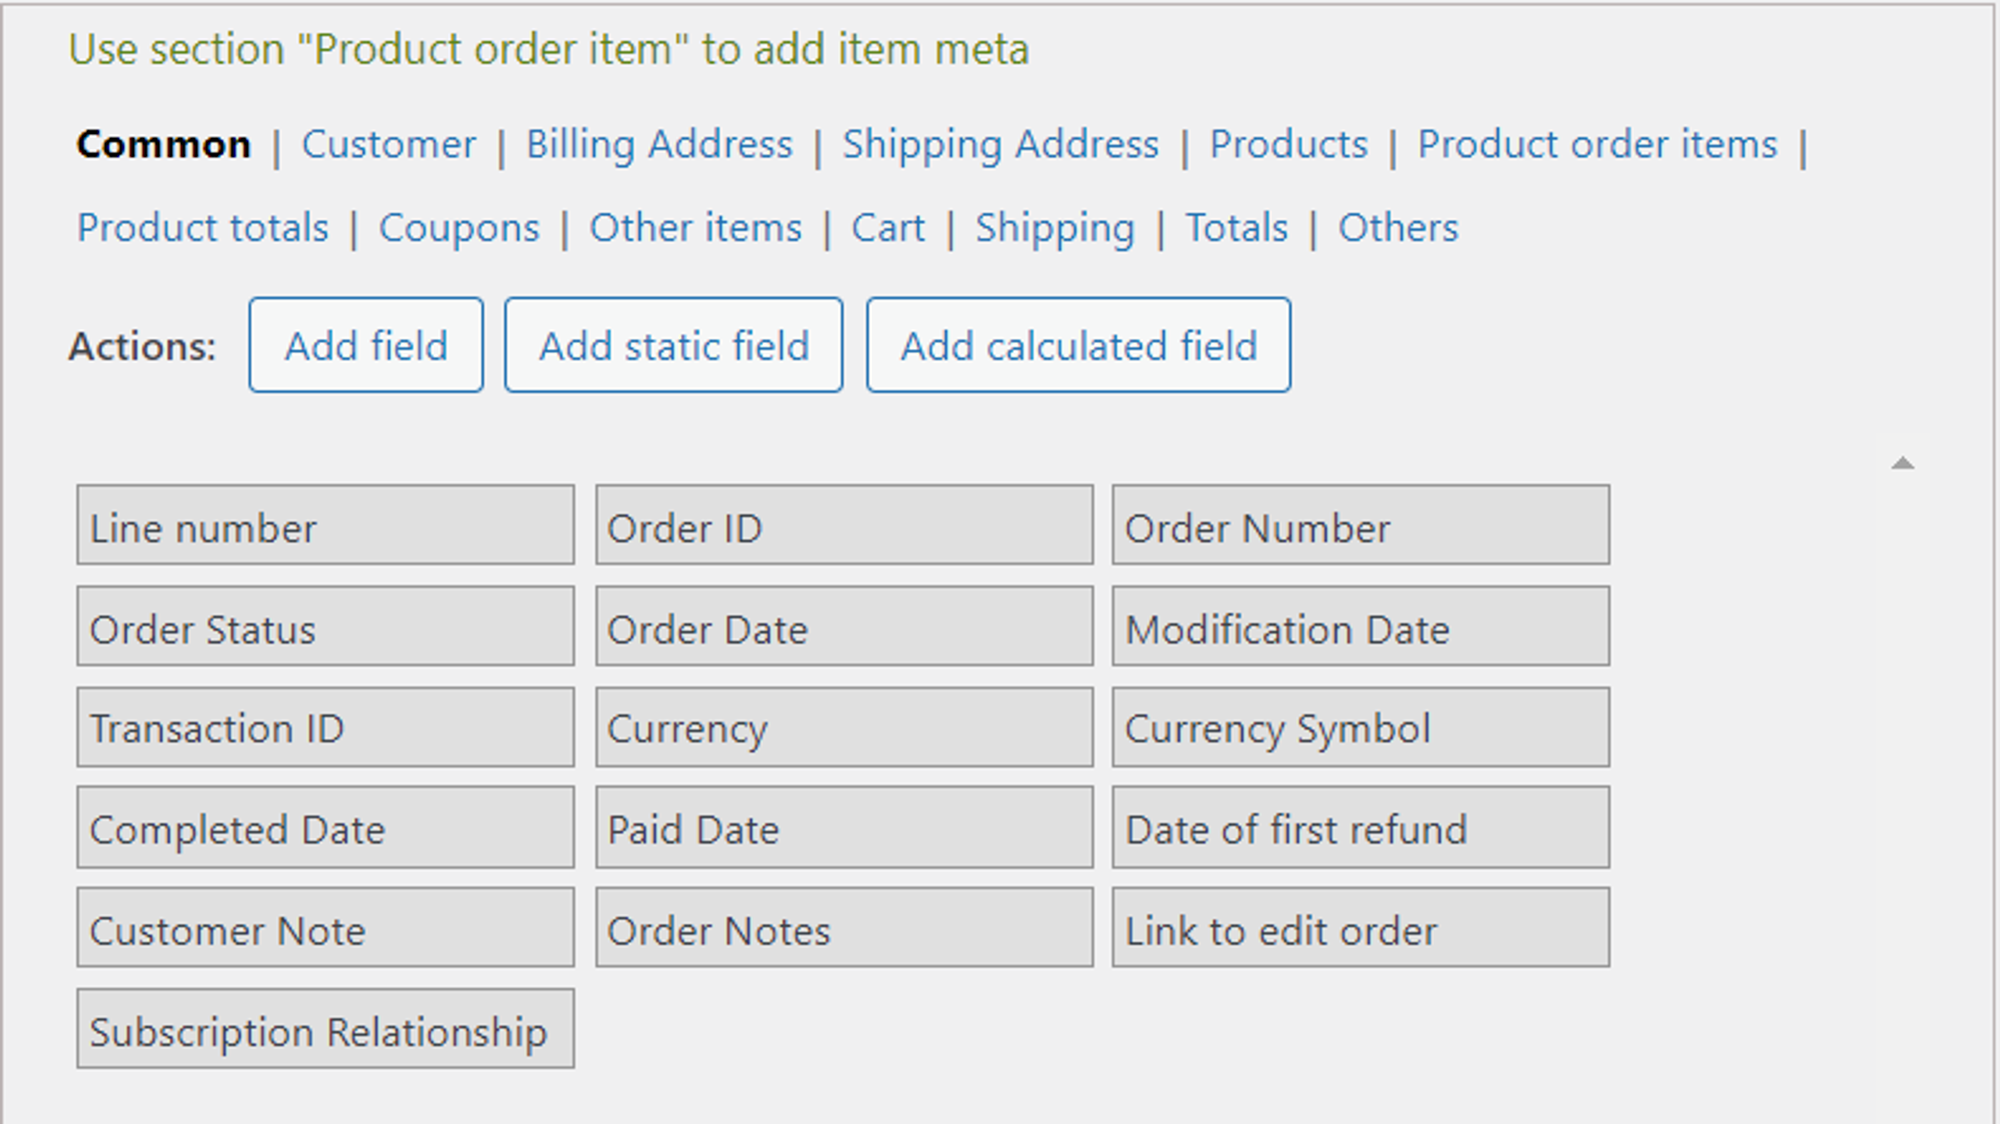
Setup Fields
Define the fields to export, divided into sections: Common, Billing, Shipping, and others. This lets you customize the export to your needs, such as including only shipping addresses.
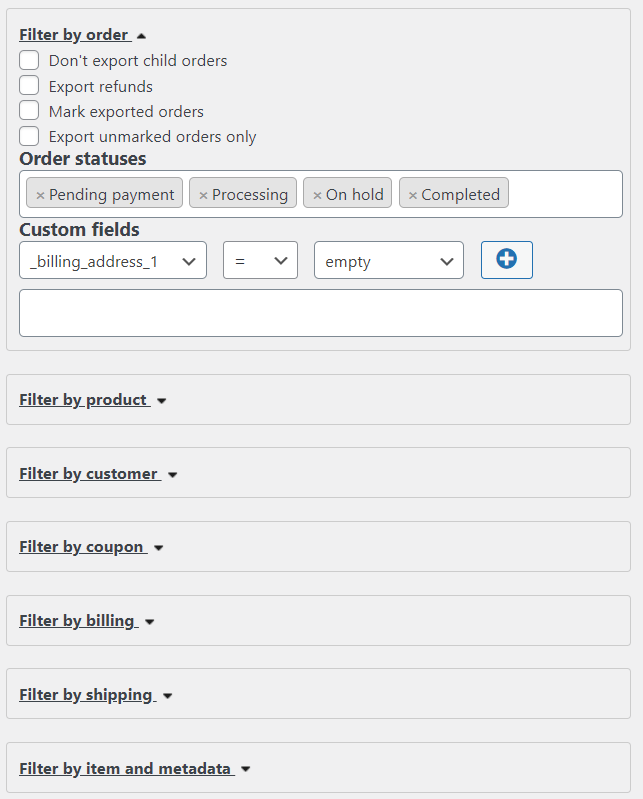
Filtering Your WooCommerce Order Exports
Set filters for precise selection: by orders (status, amount), products (category, price), customers, coupons, billings, shippings, metadata.
Templates to save time
Templates are essential for saving export settings to avoid repeating them each time. They streamline workflows for regular tasks.
Unique option: the “as Bulk actions” mode, allowing you to apply exports to selected orders directly in the WooCommerce admin. This speeds up operations for frequent exports.
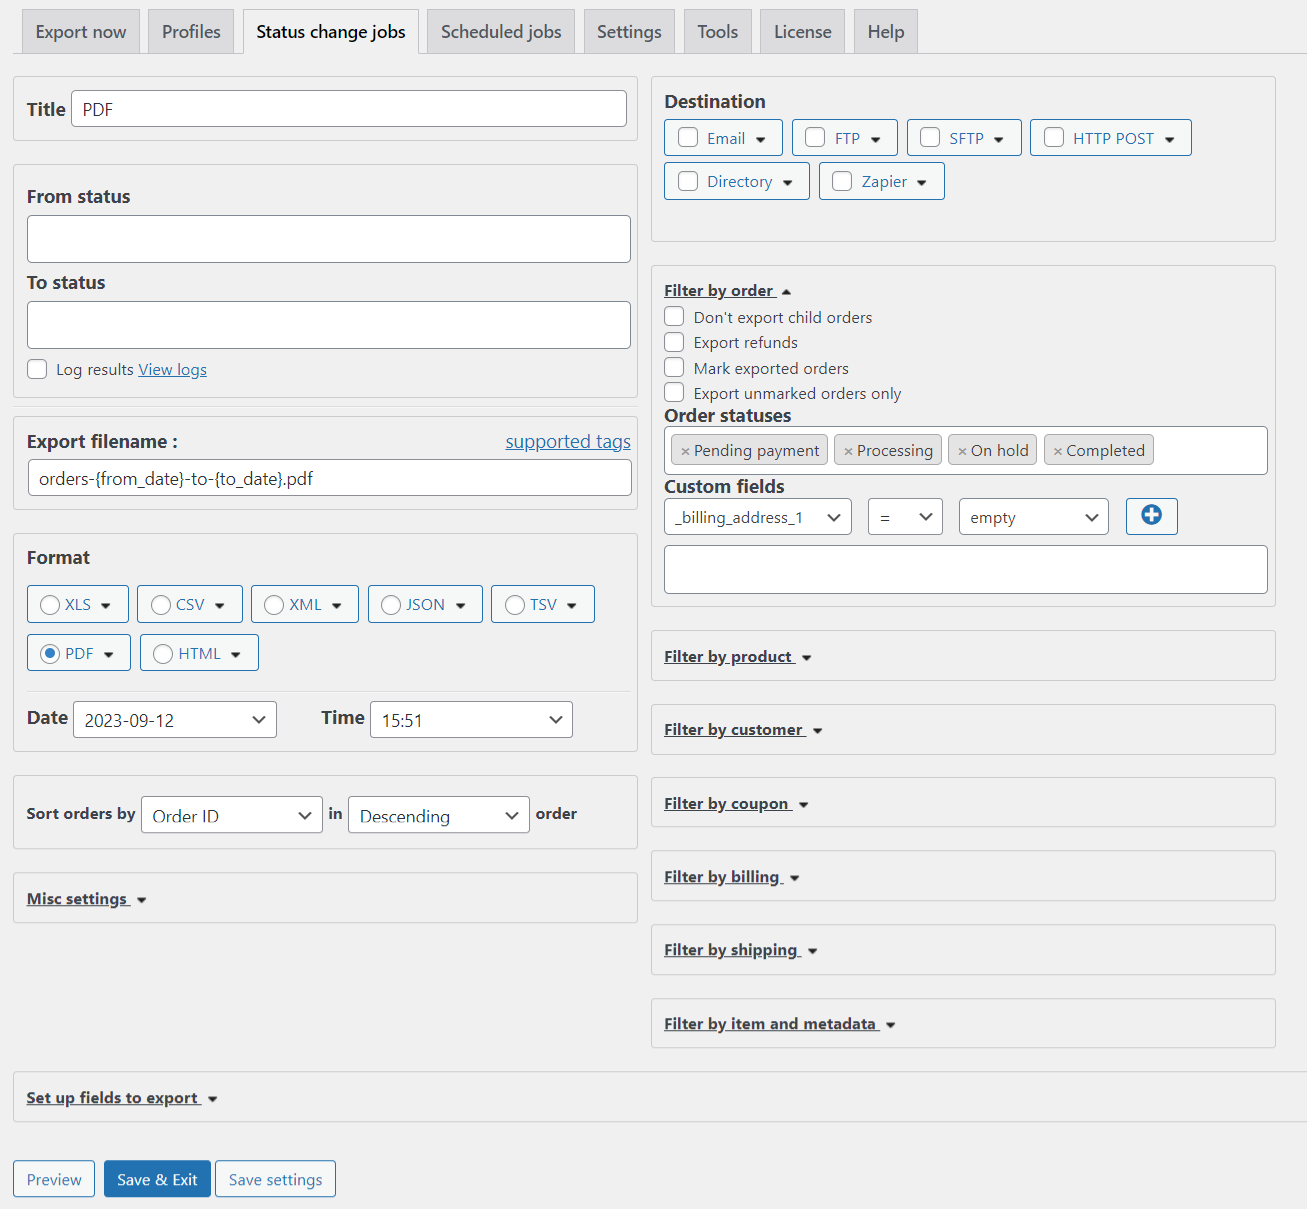
Realtime order export, on order status change
This tool automatically exports orders when their status changes (e.g., from “Processing” to “Completed”). It’s crucial for integrating with external systems like CRM or inventory management, ensuring real-time data sync. Unique options: triggering for specific statuses (pending payment, processing, completed, on hold, cancelled, refunded, failed, draft).
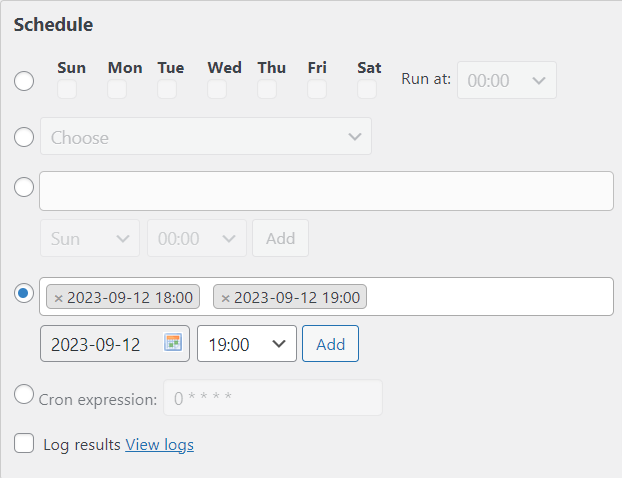
Scheduled exports
Scheduled exports automate exports on a set schedule (e.g., daily or weekly). They’re necessary for consistent reporting without manual intervention. Unique options: export ranges (by dates or order quantities).
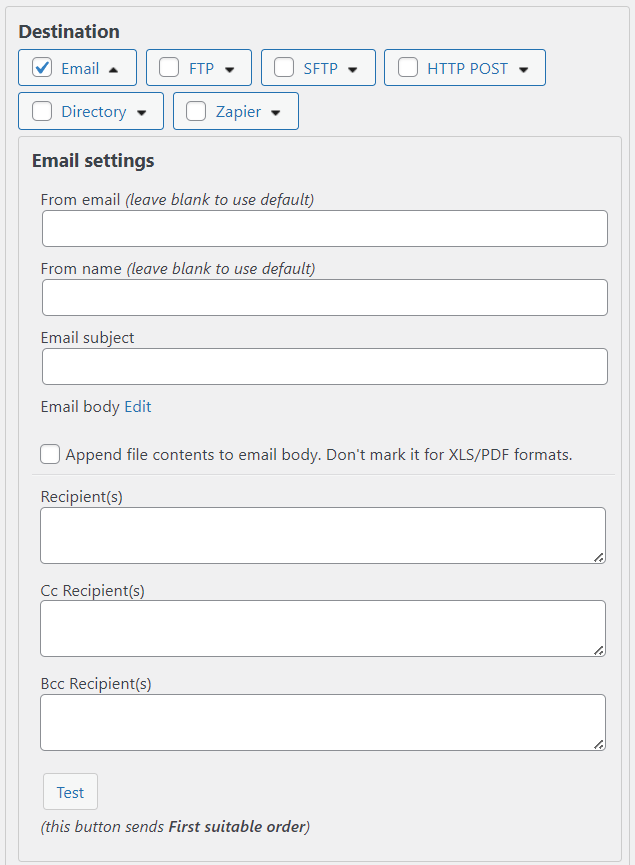
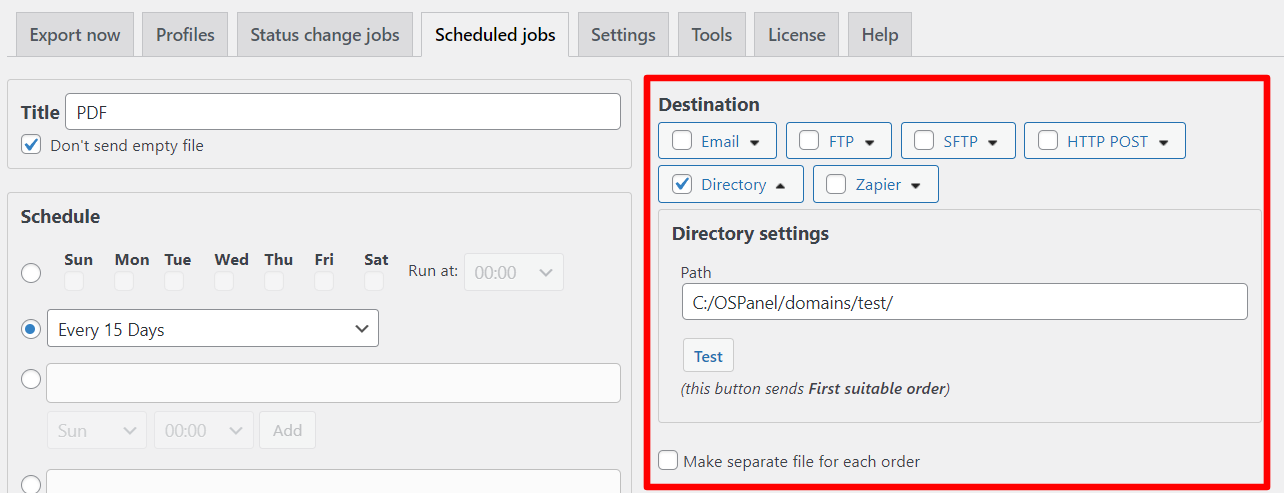
Destinations supported by realtime and scheduled exports
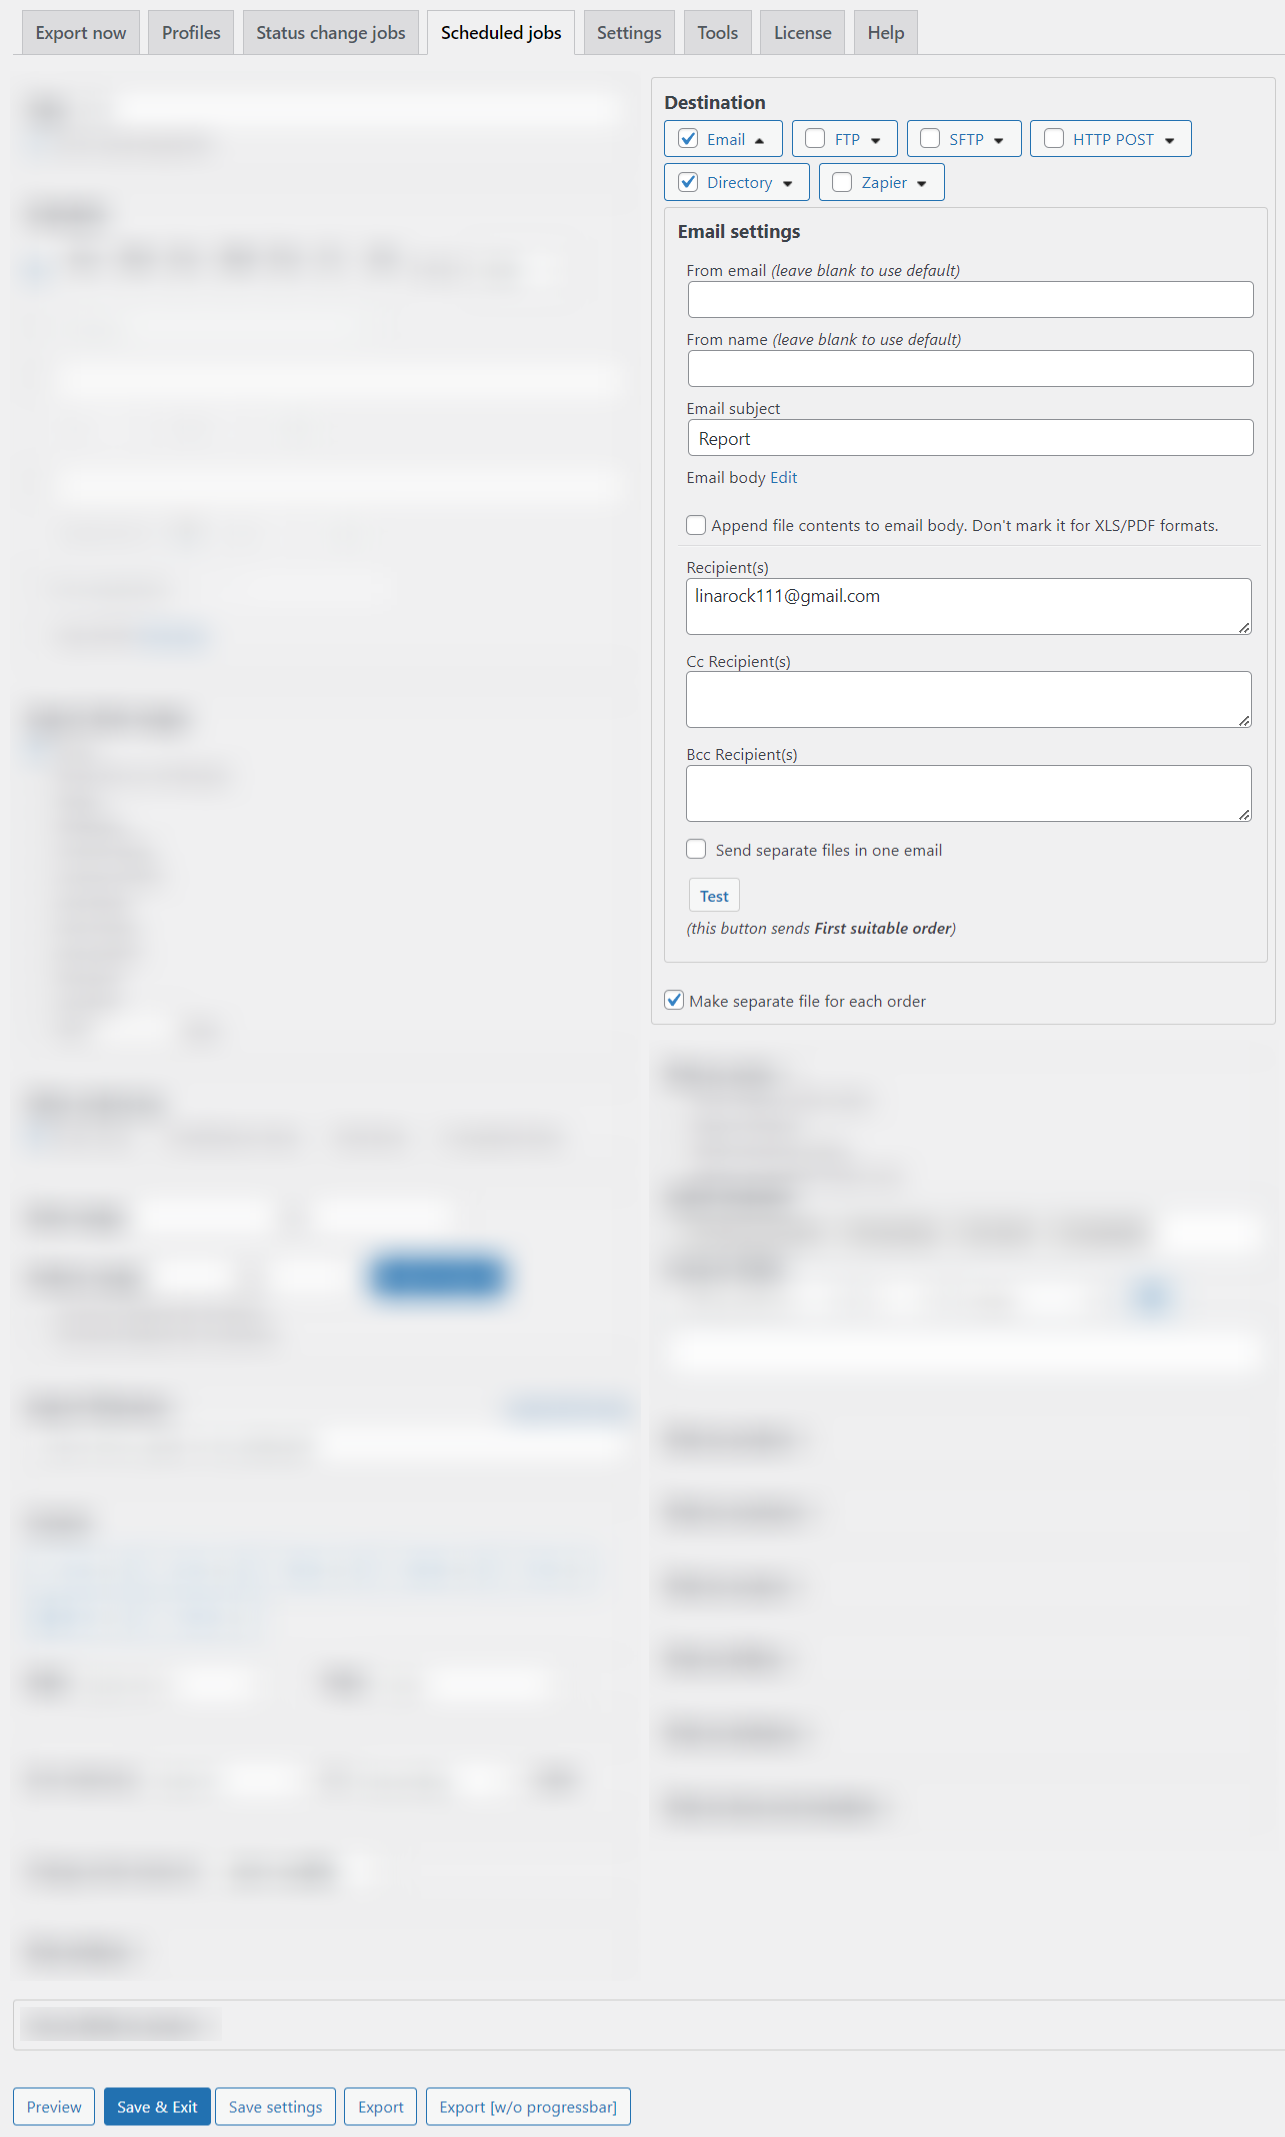
Exported files can be sent to various destinations: Email (direct sending to inbox), FTP (uploading to a server), HTTP (integrating with APIs), SFTP, Directory and Zapier. It also possibility to make separate file for each order. This function is available for realtime and scheduled exports.
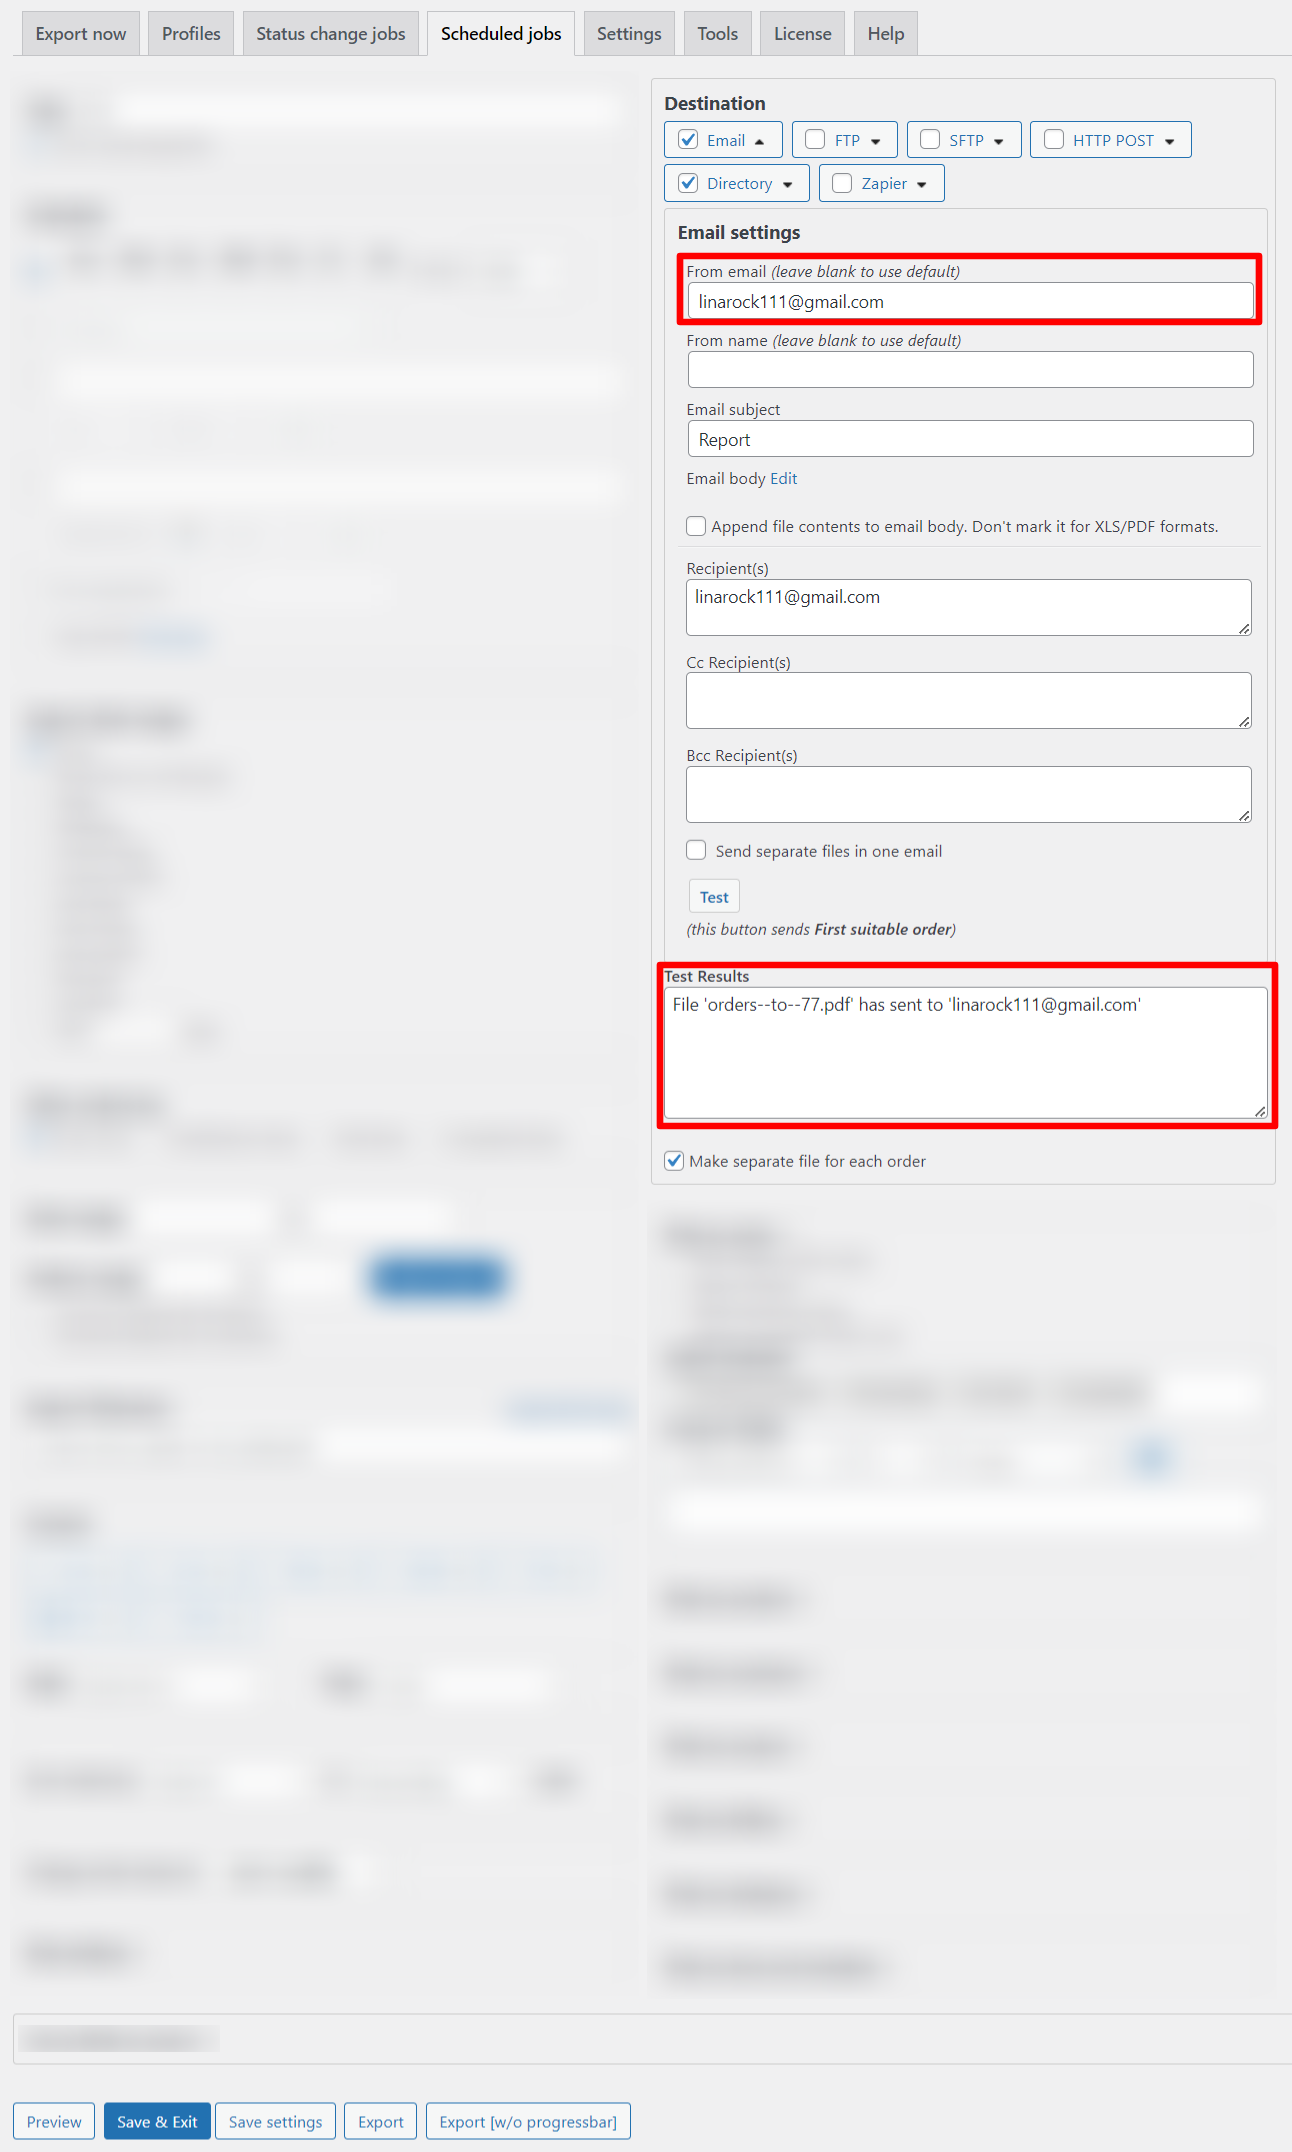
The email functions allow users to automate the delivery of export files (e.g., CSV, XLS, or PDF reports on orders) directly to inboxes, with customizable sender details, content, and recipients. Key functions include:
From Email & Name Fields: Customize sender details (blank uses site defaults for a professional touch).
Subject Field: Sets the email’s title (e.g., with dynamic placeholders like {date}).
Body Editor: Crafts the message content; note avoids XLS/PDF references for clean formatting.
Append File Contents Checkbox: Embeds export data inline in the body (unchecked; best for simple previews, not complex files).
Recipient Fields (To, CC, BCC): Specify primary and secondary emails (comma-separated; empty here) for targeted delivery.
Test Button: Sends a sample export of the first order to verify setup without full processing.
In conclusion, exporting WooCommerce orders is an essential capability for any online store owner looking to gain insights into sales performance, streamline reporting, and integrate with external tools like accounting software or CRMs. Whether you opt for the simplicity of the built-in WordPress tool for quick basic exports or the robust features of plugins like Advanced Order Export for WooCommerce by AlgolPlus for automation and customization, the right choice depends on your store’s size, technical needs, and budget. For small operations, free or low-cost options like the built-in tool or SkyVerge’s plugin suffice, while larger businesses will benefit from AlgolPlus’s advanced scheduling and real-time triggers. Remember to test exports with sample data to ensure accuracy, and always prioritize data security when handling customer information. If you’re unsure which plugin fits your workflow or need help setting one up, feel free to reach out — our technical support here to assist!
Advanced Order Export for WooCommerce allows businesses to efficiently manage and export their order data. This plugin simplifies the process of exporting order data by providing customizable options and automating the export process. With Advanced Order Export for WooCommerce, businesses can easily extract and organize their order data into various formats such as CSV, Excel, PDF or etc.
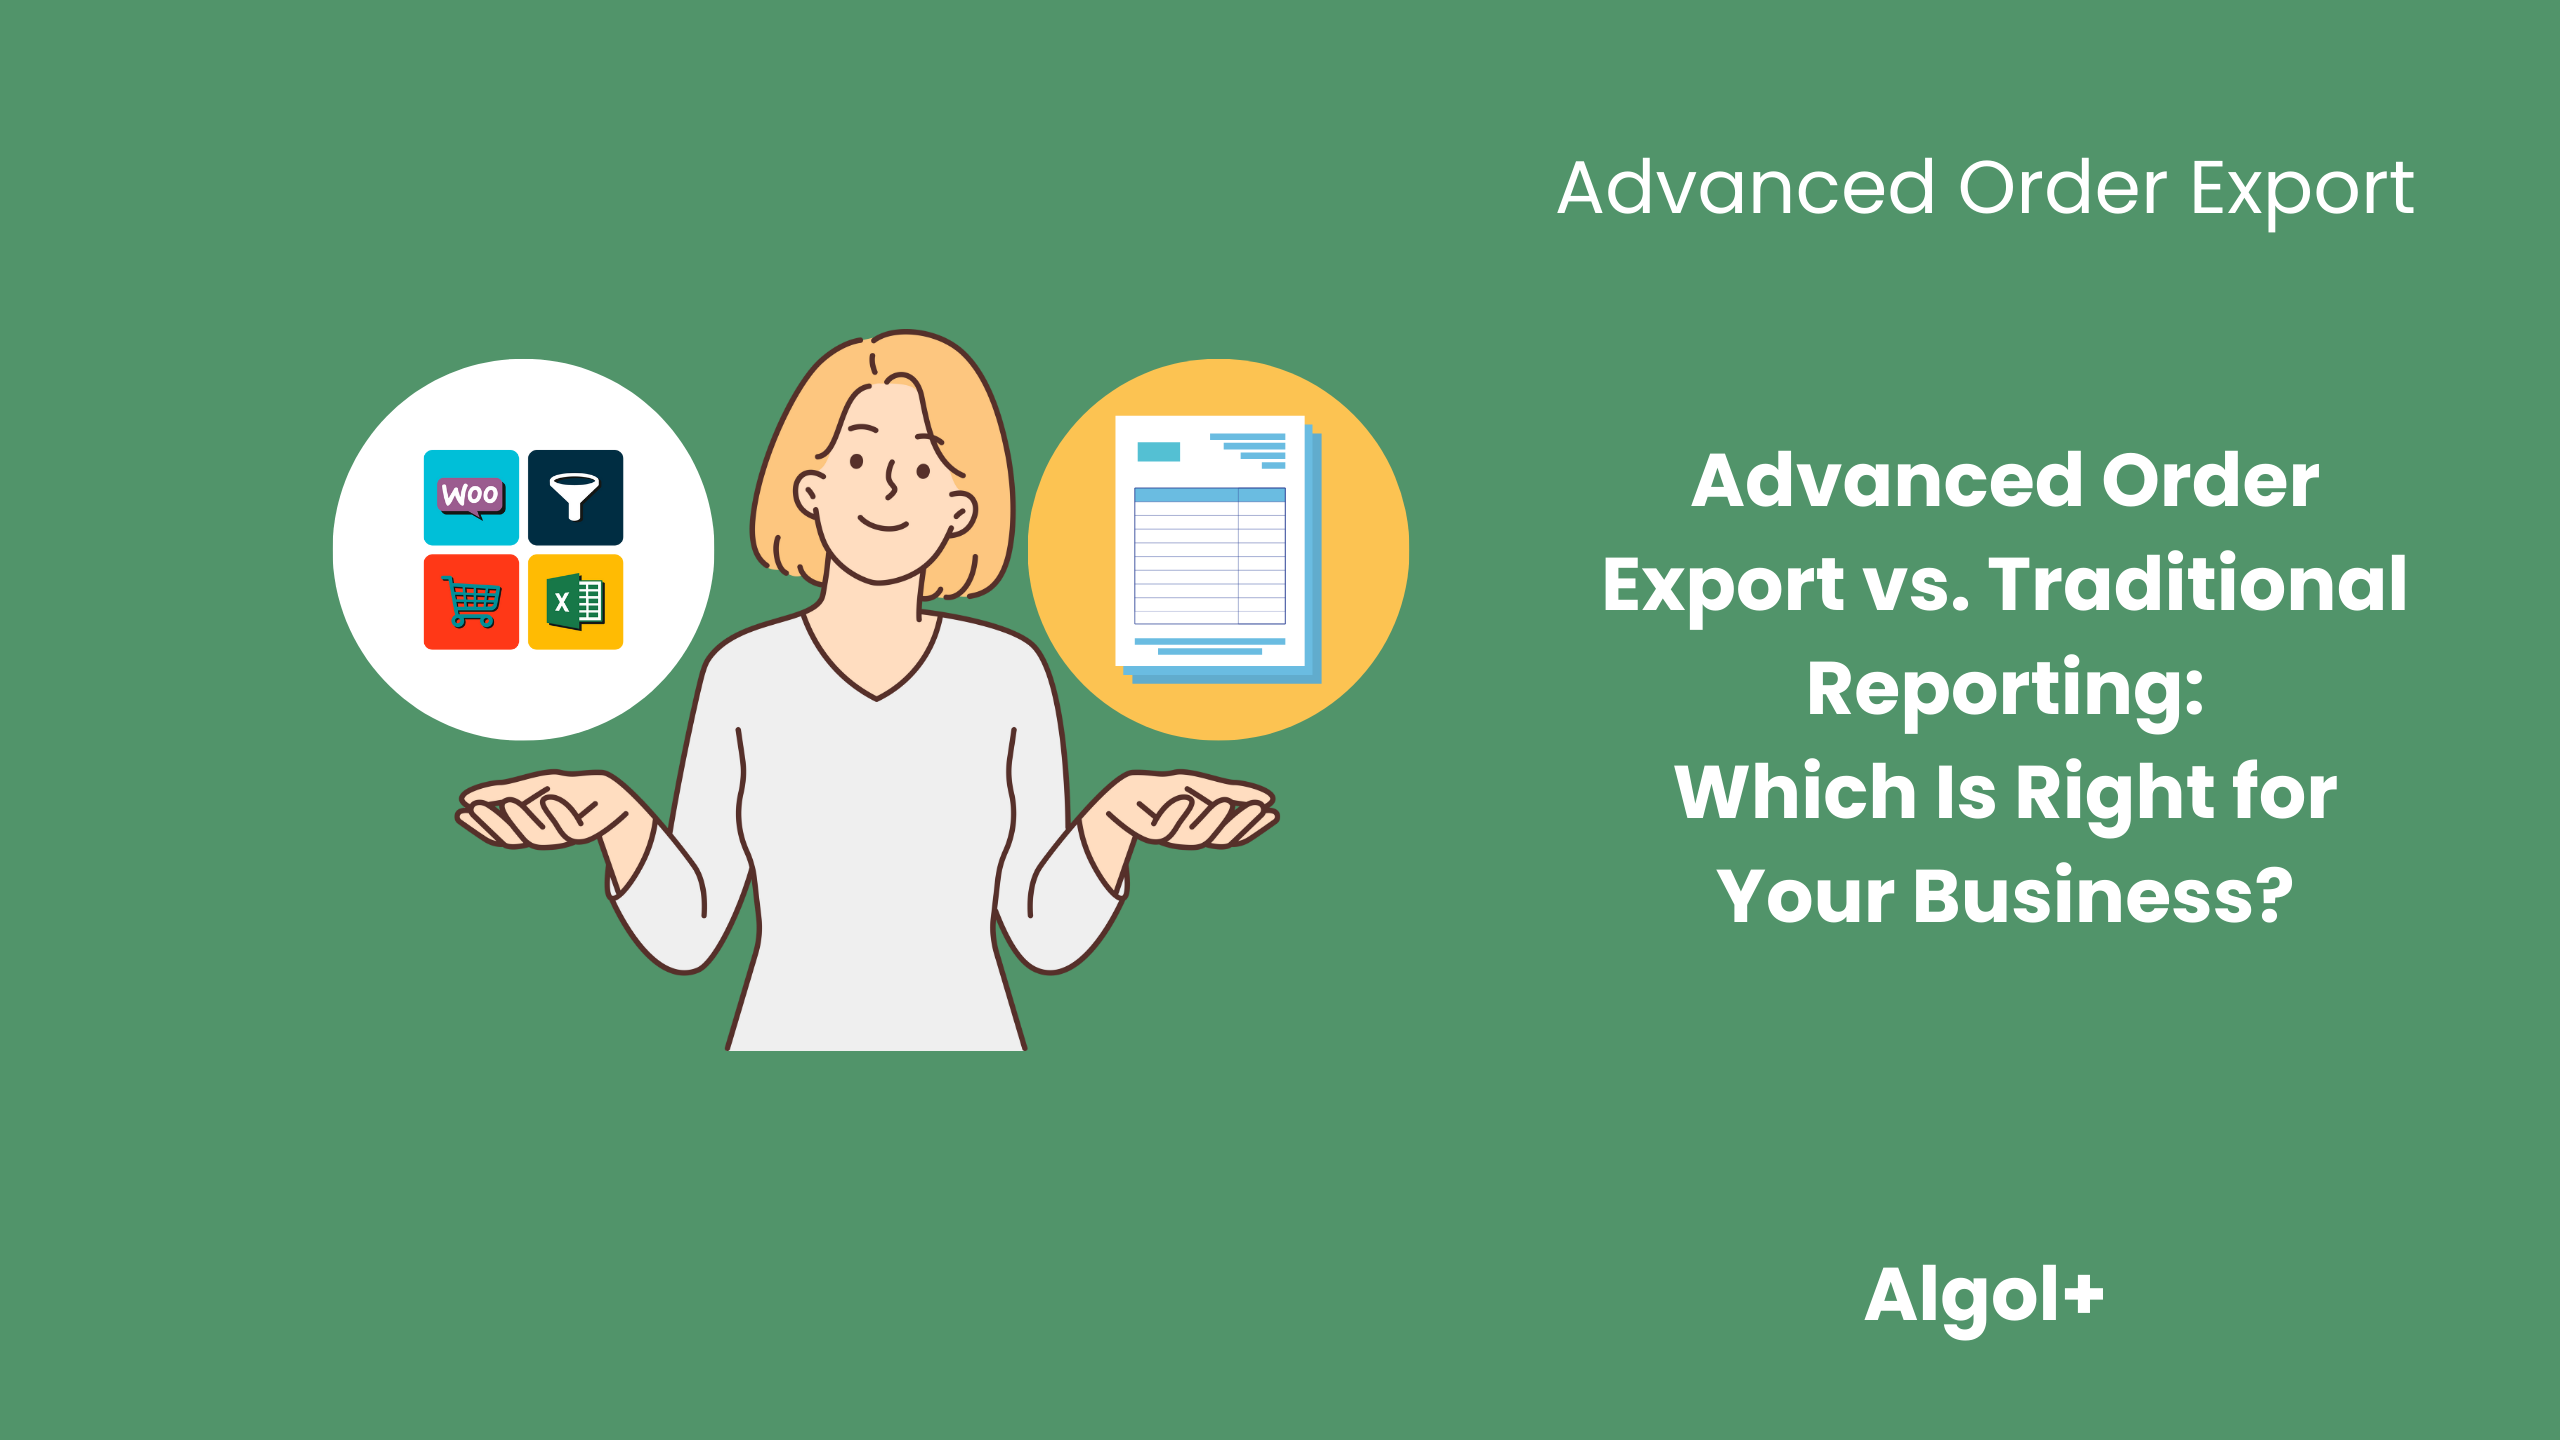
How does Advanced Order Export differ from traditional reporting?
Let’s first understand what Advanced Order Export for WooCommerce and traditional reporting are and how they differ. Traditional reporting involves pulling data from various sources and compiling it into a report, usually in the form of charts and graphs. This process can be time-consuming and requires technical expertise. On the other hand, plugin is a more automated and streamlined approach to reporting, where data is extracted from a single source and exported into a customizable format, such as Excel or CSV.
One of the main advantages of Advanced Order Export for WooCommerce is its ability to provide real-time insights. With traditional reporting, data is often outdated by the time it is compiled and analyzed. This can lead to delayed decision-making and missed opportunities. On the other hand, Advanced order export can provide up-to-date data, allowing businesses to make decisions timely and accurate. There are two similar functions: Status change jobs and Schedule jobs.
Another significant difference between the two methods is the level of customization and flexibility. Traditional reporting often follows a standard format, making it difficult to tailor the report according to specific business needs. On the contrary, Advanced Order Export for WooCommerce allows for customization of data fields, filters, and formats, giving businesses the freedom to create reports that best suit their requirements. This level of flexibility can save time and effort, as businesses can focus on the specific data they need rather than sorting through irrelevant information.
Advanced Order Export for WooCommerce has a lot of filters:
Filter by order
Filter by product
Filter by customer
Filter by coupon
Filter by billing
Filter by shipping
Filter by item and metadata
One of the limitations of traditional reporting is the lack of the integration with other plugins. For instance, if a business is using a multiple software for different functions, it can be challenging to consolidate data from these systems into a traditional report. For all that, Advanced Order Export for WooCommerce, can integrate with multiple systems, making it easier to compile and analyze data from various sources in one place.
Here’s the list of compatibility plugins:
Checkout Add-ons
PDF Product Vouchers
Woocommerce Subscriptions
WooCommerce Bookings
WooCommerce Appointments
WooCommerce Memberships
WooCommerce Product Vendors
Local Pickup Plus
FooEvents
Tickera
WooCommerce Box Office
Shipping Multiple Addresses
WooCommerce TM Extra Product Options (each option as column)
WooCommerce TM Extra Product Options (each option as separate row)
WooCommerce TM Extra Product Options (all options as ONE row)
Note: you can find out more about compatibility and how to set it up here
Essential Advanced Order Export examples
Summary reports
One of the most common use cases for the plugin is to generate summary reports. This involves exporting data from a specific period or date range and summarizing it into a single document. For example, a business may want to generate a monthly report of all orders processed, including total sales, order volume, and average order value.
Advanced Order Export for WooCommerce allows businesses to customize their summary reports according to their specific needs. They can choose which data fields to include, such as customer information, product details, and shipping information. This level of customization enables businesses to gain a clear understanding of their order data and identify any trends or patterns that may impact their operations.
Profiles
Another essential example of advanced order export is the ability to create profiles. Profiles are pre-defined sets of rules that determine which data is exported and how it is formatted. This is particularly useful for businesses that regularly export data in a specific format for further analysis or integration with other systems.
For instance, a business may have a profile set up to export order data in a CSV format and automatically send it to their accounting software every day. This eliminates the need for manual data entry and ensures that the information is always up-to-date.
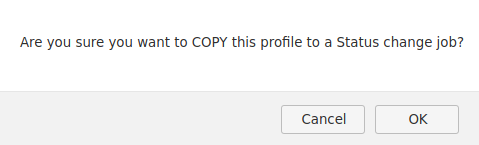
Scheduled and Status change jobs
Scheduled jobs allow businesses to automatically export orders at a specific time and frequency. This feature is especially useful for businesses that have a high volume of daily orders. With Advanced Order Export for WooCommerce options, businesses can also set up status change jobs to export orders when they reach a particular status, such as when an order is shipped or cancelled. This allows businesses to efficiently manage their order processing and fulfillment. For example, a business can set up a status change job to export orders with the status ‘processing’ to their fulfillment partner, ensuring timely delivery to customers.
On a final note, while traditional reporting has been a tried and tested method for data analysis, Advanced Order Export for WooCommerce offers a more efficient, accurate, and customizable approach. With the ever-increasing amount of data that businesses have to deal with, this plugin is becoming the preferred choice for many organizations. It allows businesses to gain valuable insights into their operations, improve decision-making, and stay ahead of the competition. So, if you want to take your business to the next level, consider switching to Advanced Order Export for WooCommerce for a more comprehensive and data-driven approach to reporting.
Advanced Order Export is a powerful and versatile tool that makes it easy to export orders from your online store in a variety of formats. With the free version of Advanced Order Export, you can export orders to CSV, XML, and PDF formats, as well as to various platforms. You can also filter orders by date range, order status, and other criteria. The free version also includes basic mapping options, allowing you to map the exported data to your own custom fields. However, the free version does not offer support any of the more advanced features.
Features of Pro
Advanced Order Export Pro is an invaluable plugin for any store owner looking to make the most out of their WooCommerce store. The automation that the pro version has can save you time and money in the long run, allowing you to focus on other aspects of your business.
All key functions of the pro version are presented in the table:
Features
Free
Pro
Profiles
–
+
Status Change Jobs
–
+
Scheduled jobs
–
+
Destination Block
–
+
Advanced settings
–
+
Profiles
Profiles are a block containing saved export settings. With it, you can easily create different profiles to export your WooCommerce orders into various formats.
Status Change Jobs
The plugin also has a feature that allows you to export orders based on their status, such as processing, refunded, or completed.
Scheduled jobs
With the advanced order export scheduled jobs, store owners can easily automate the process, saving them time and resources. This allows them to focus on other aspects of their business, such as marketing and customer service.
Destination Block
This feature is ideal for businesses that need to quickly and accurately transfer order data from one platform to another. It allows for the export of orders to a wide variety of destinations, including HTTP, XML, FTP, and even direct to a web service.
Advanced settings
With its advanced settings, you can customize your order export process in detail. It allows you to configure General, Interface, Jobs, Failed Export, Zapier and HTML.
Conclusion
The Advanced Order Export plugin for WooCommerce is a great way to keep track of orders and export data quickly and easily from the store. While the free version is a great starter tool for basic data export needs, the pro version offers more features and options for more advanced data export tasks. In the professional version, you can configure and save multiple export settings, schedule automatic exports, and even export orders to different destination blocks. For those with more complex export needs, the pro version is the best choice. It offers more features and options for faster and more efficient order export tasks.
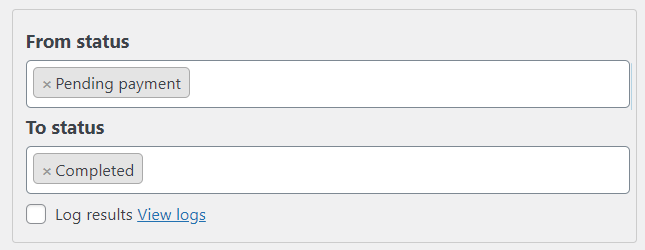
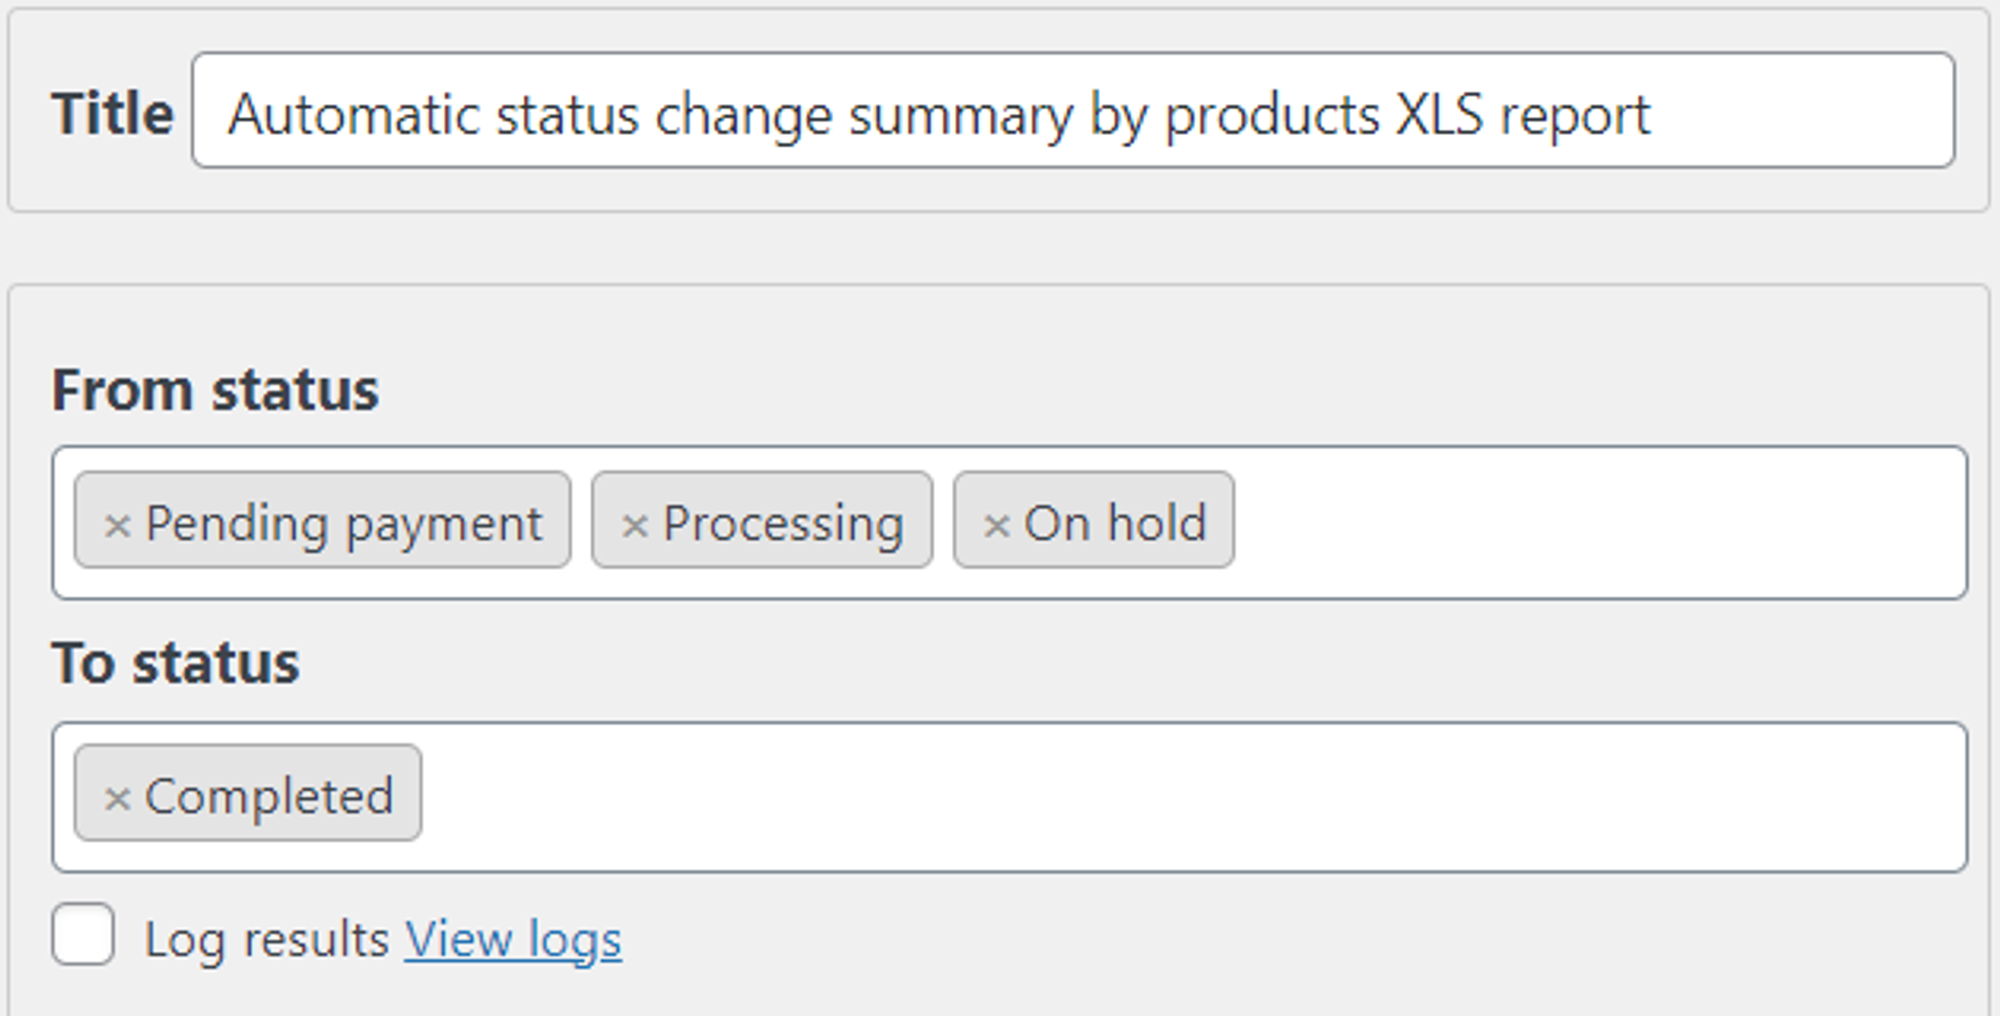
If you have already set up your “Profile” earlier, then you only need to specify “From status” and “To status” for the jobs. Let’s select the statuses “Processing” and “On hold” in the line “From statuses” and “Completed” in the “To status”.
“From status” and “To status”
Save settings.
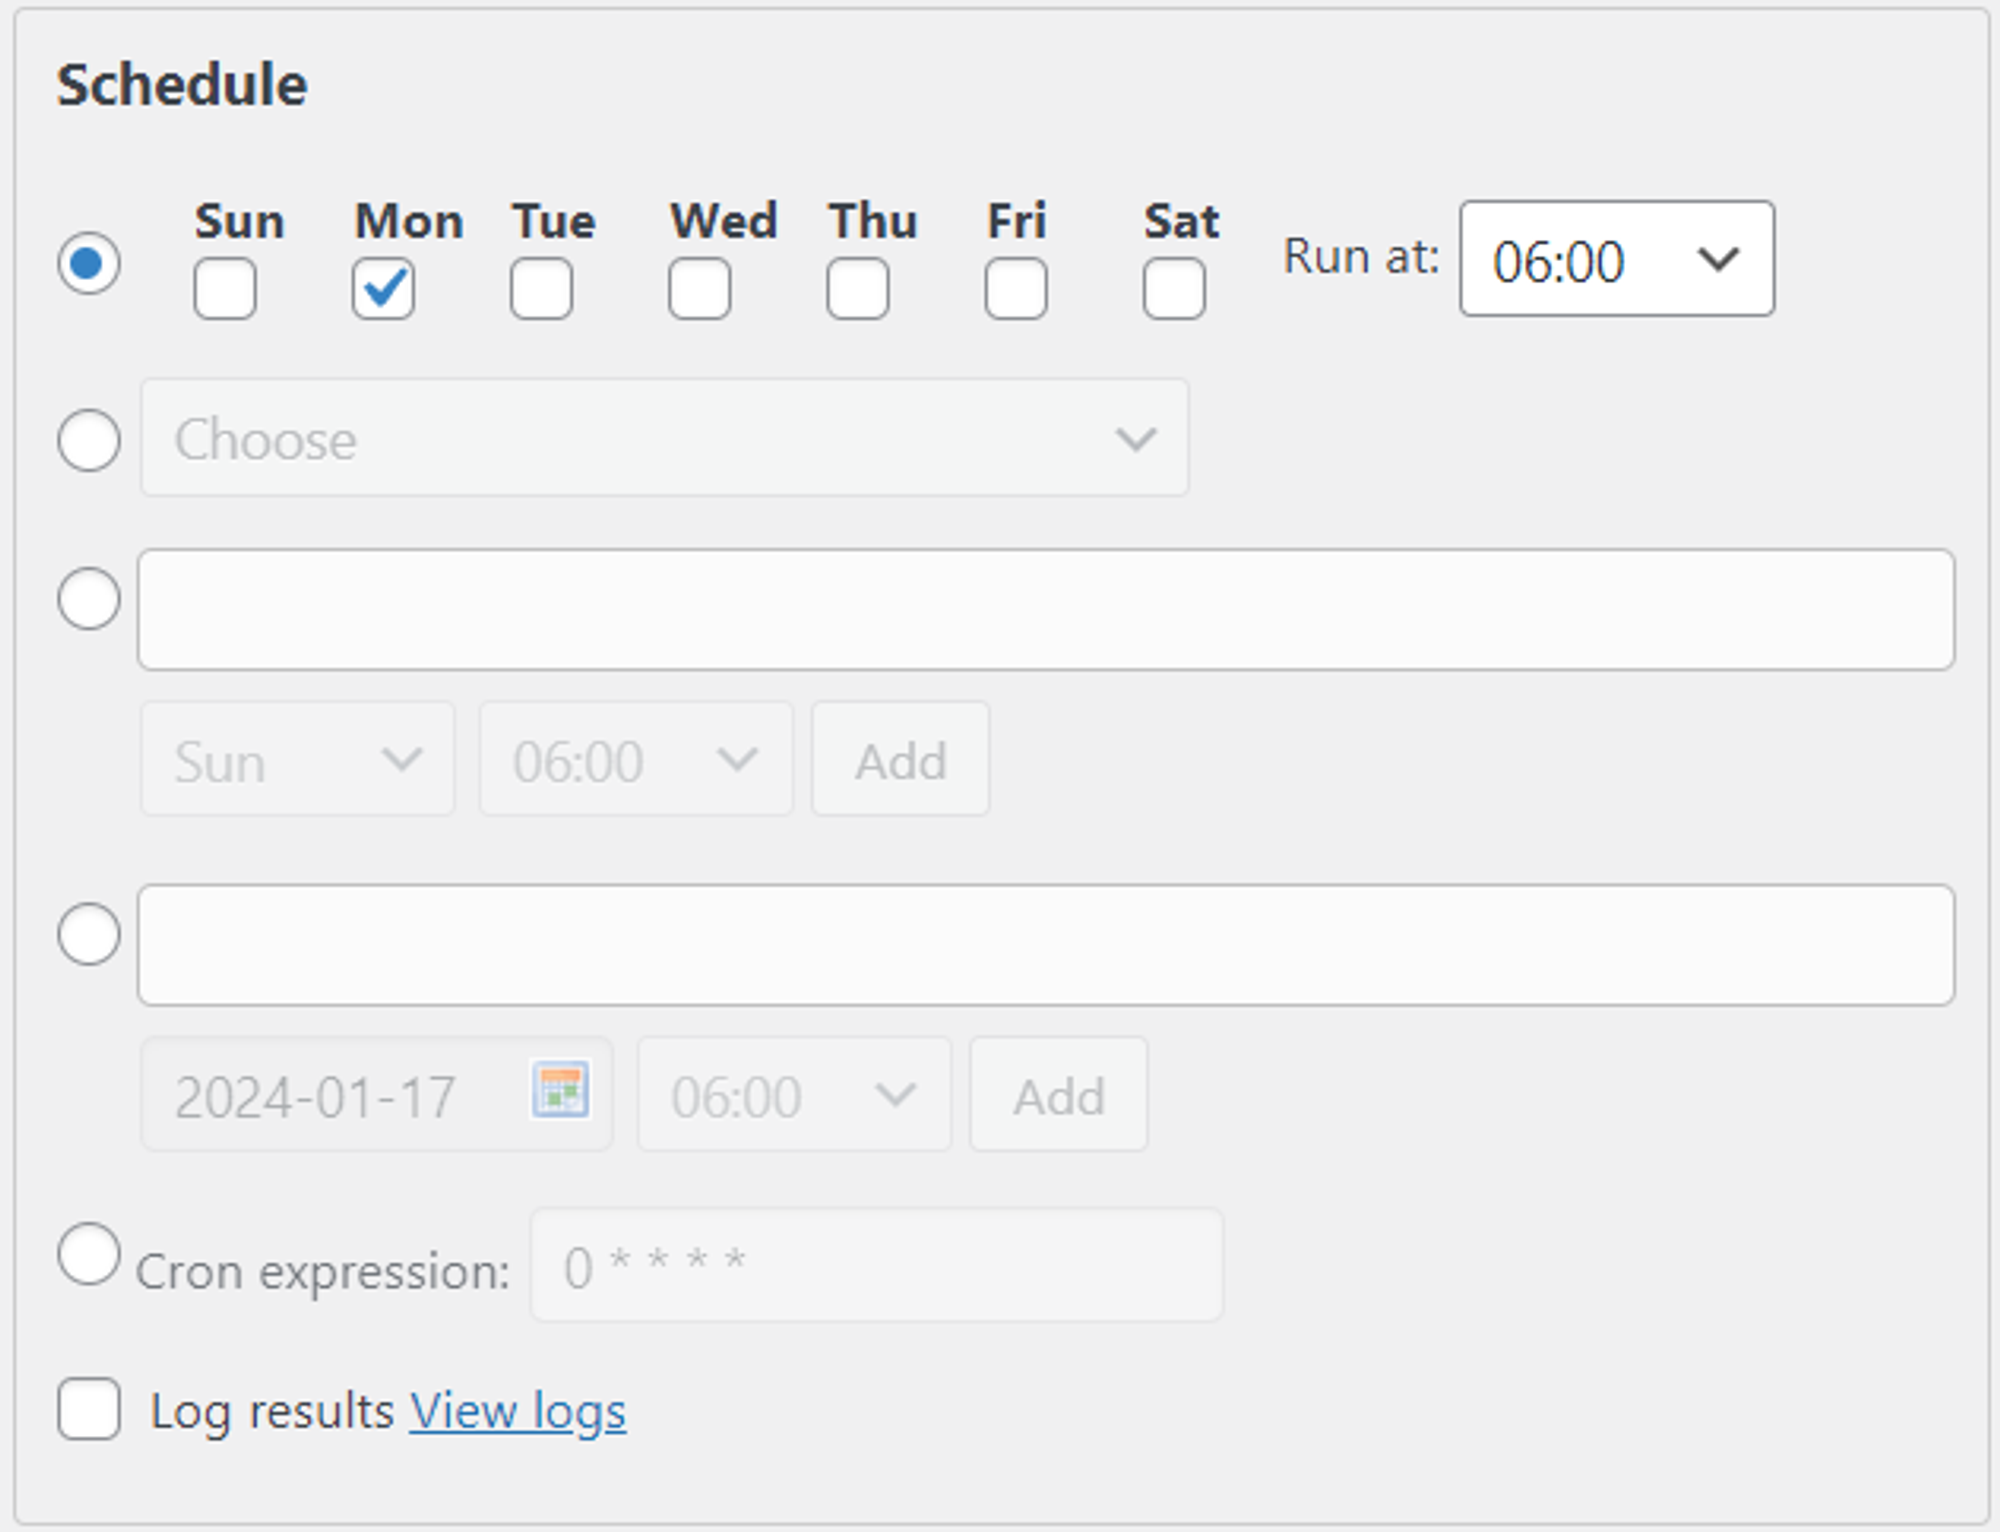
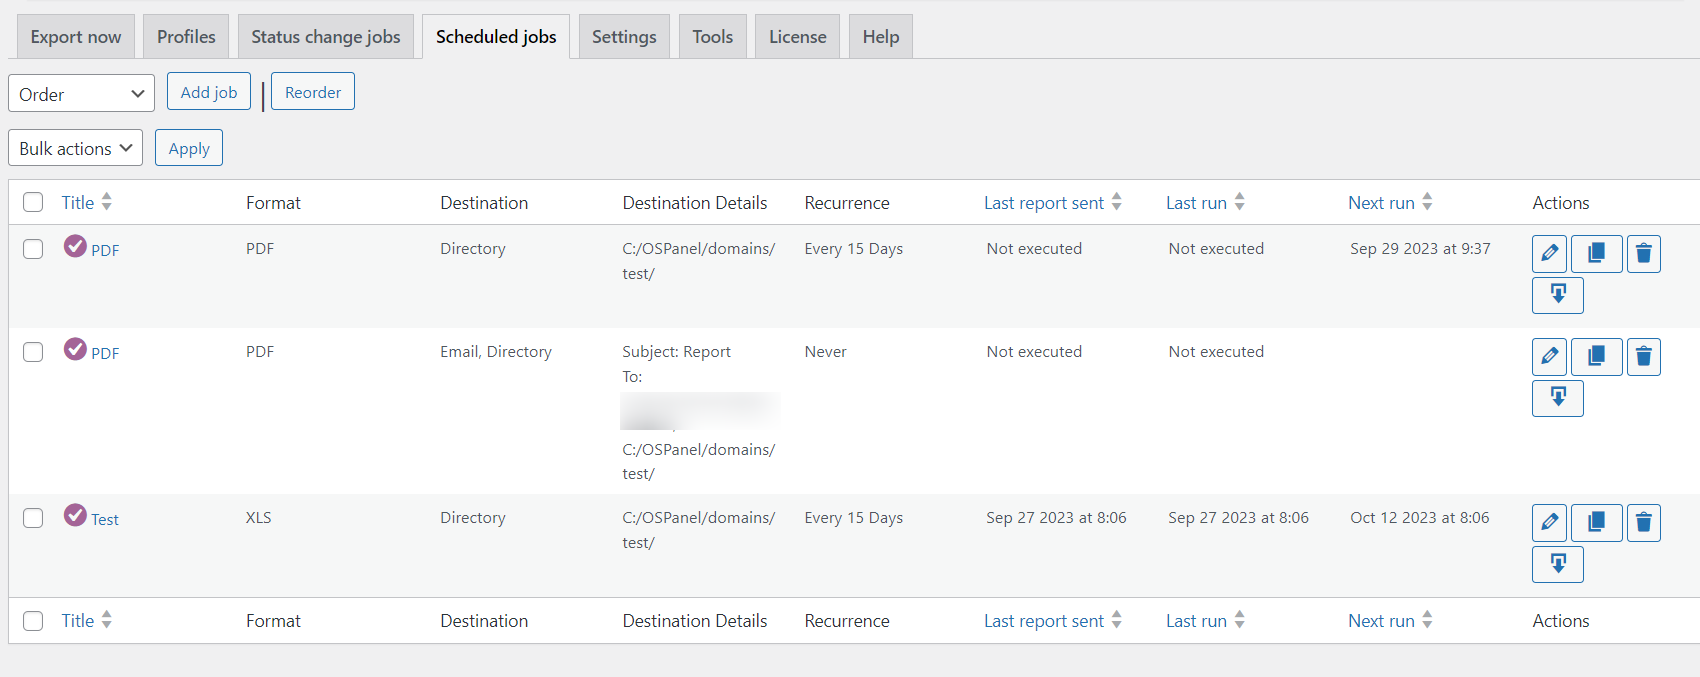
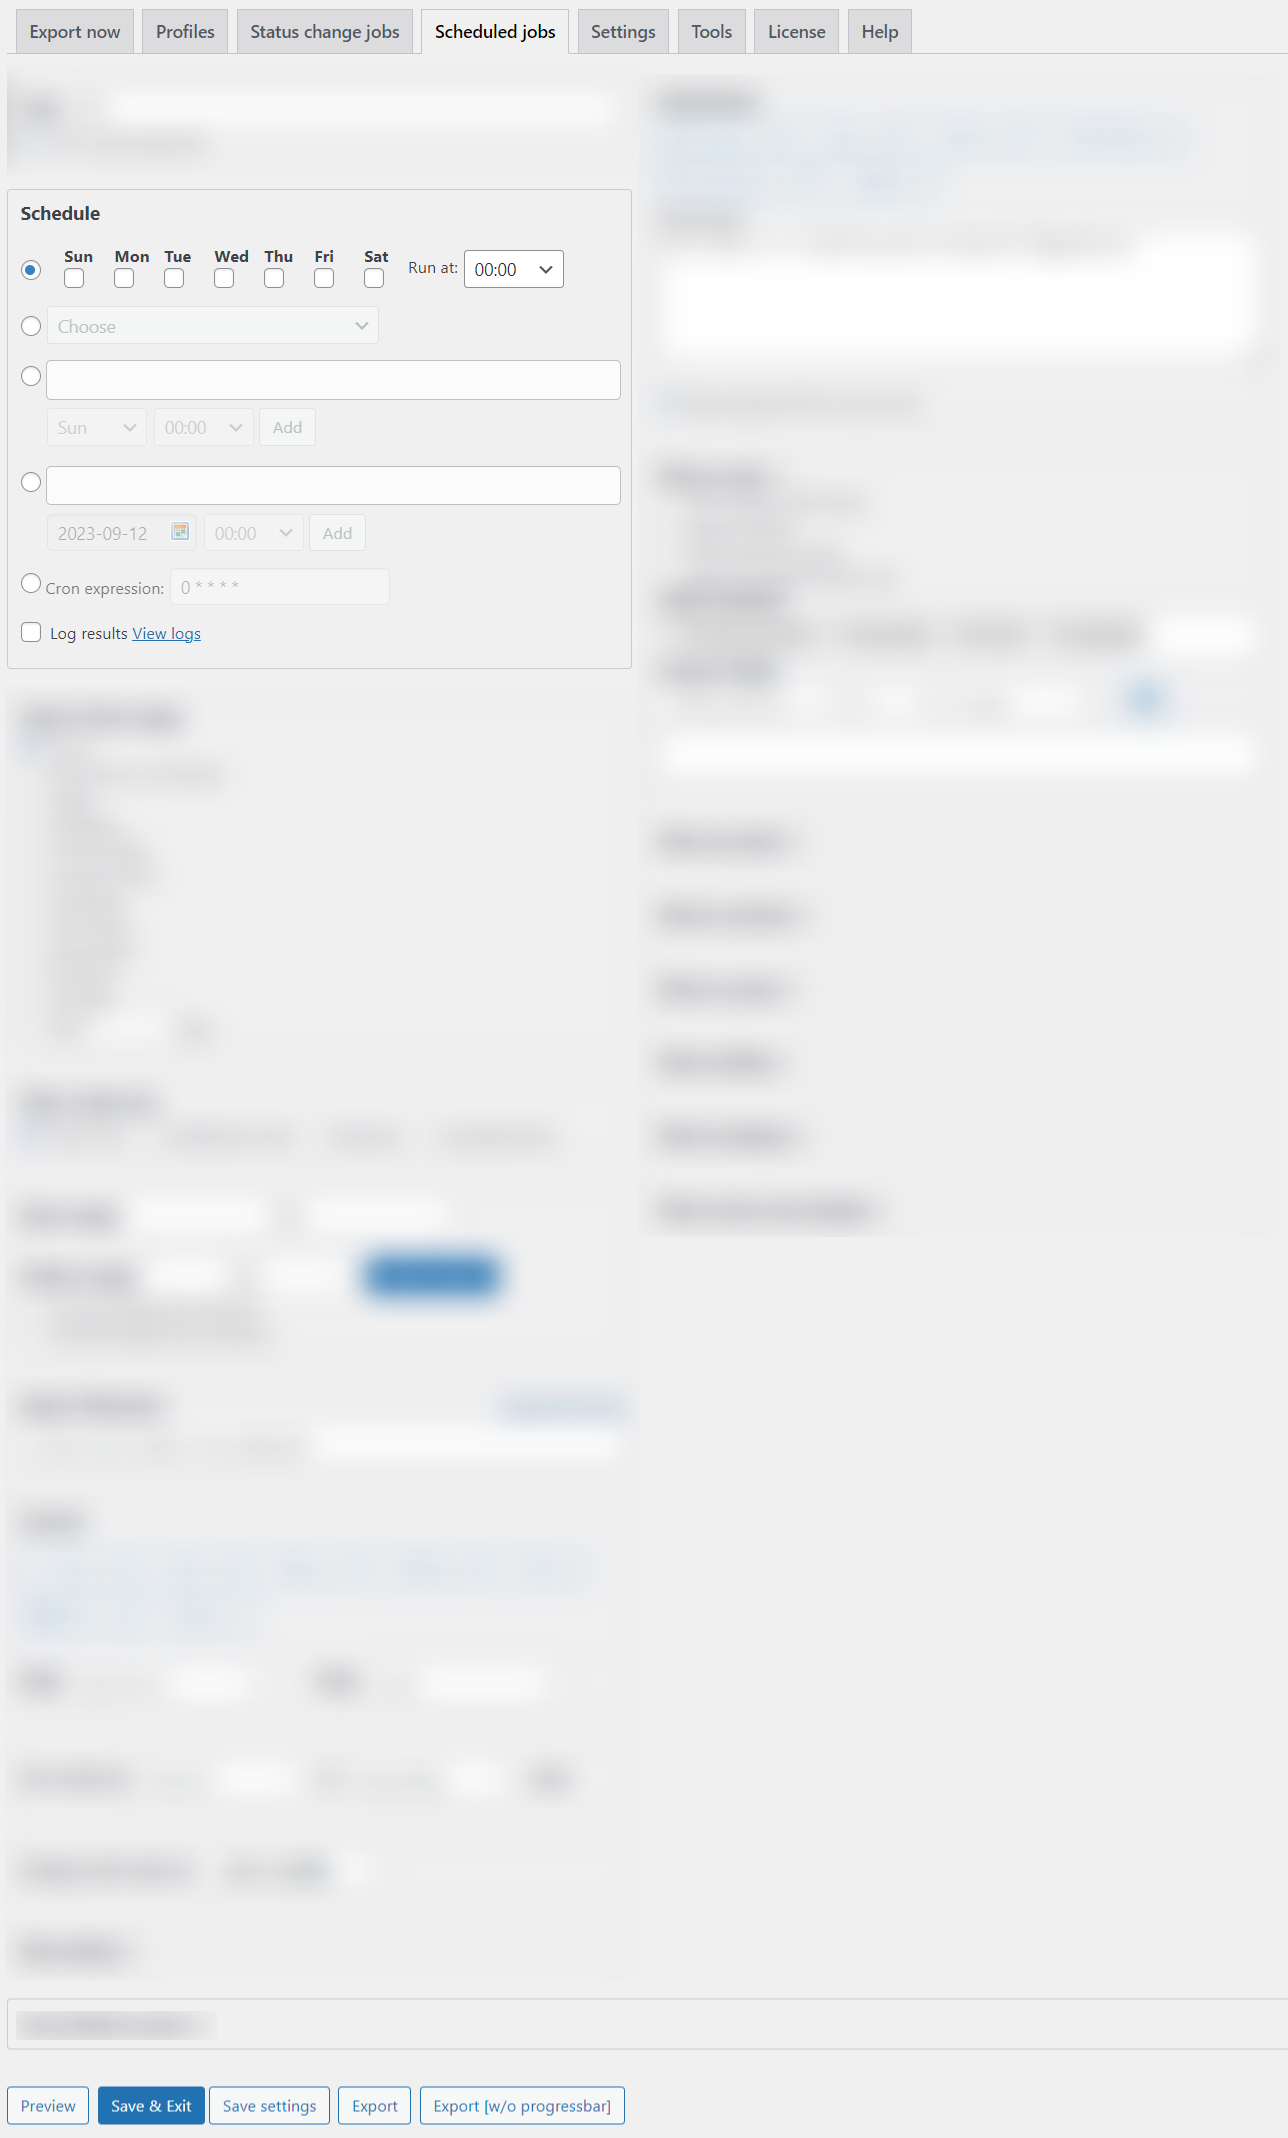
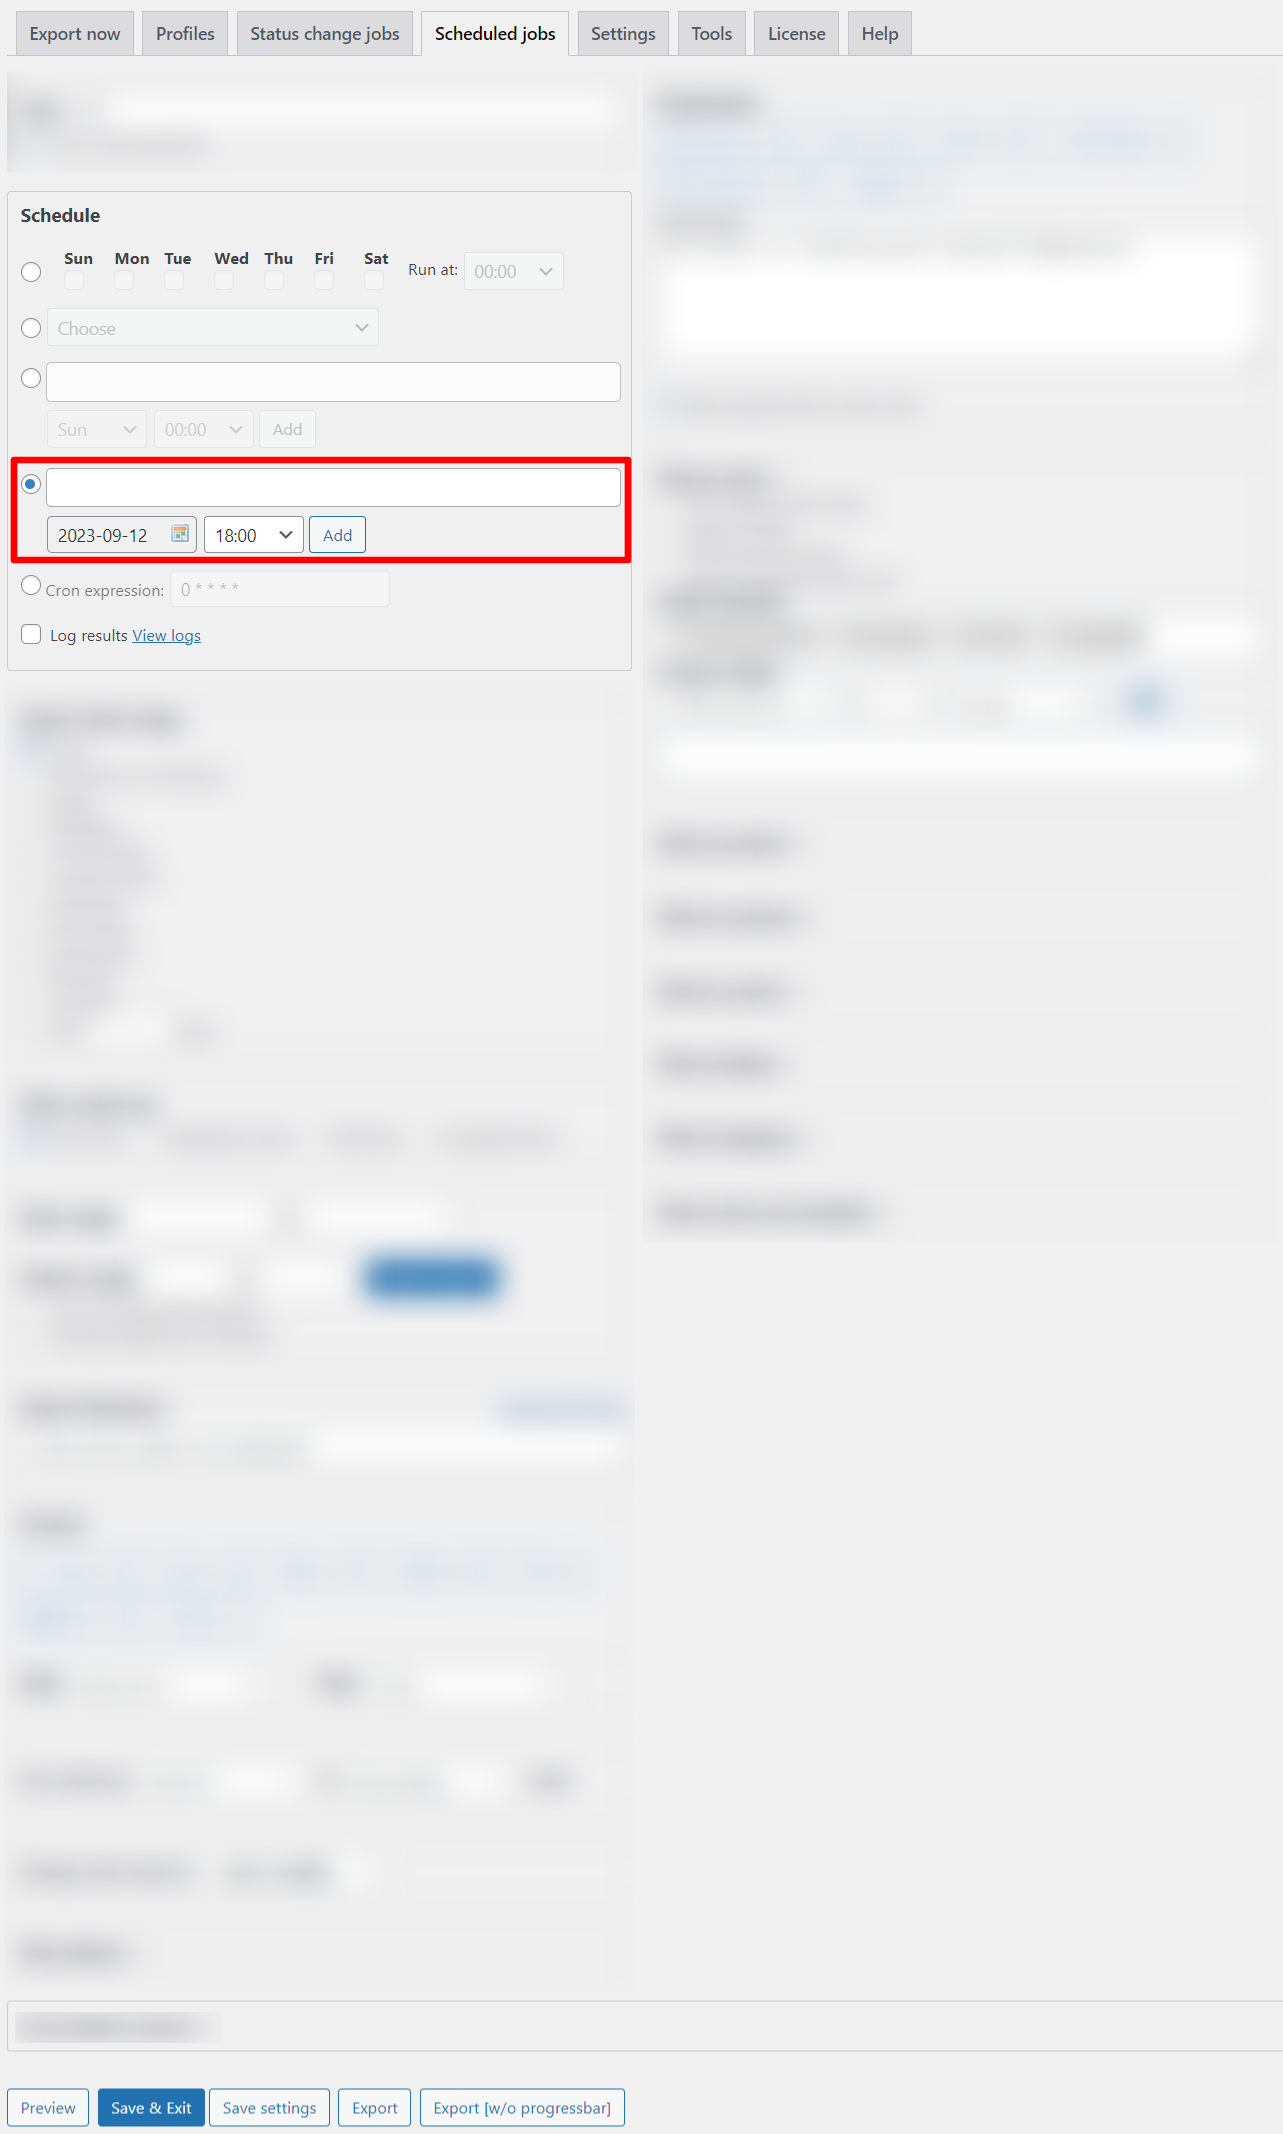
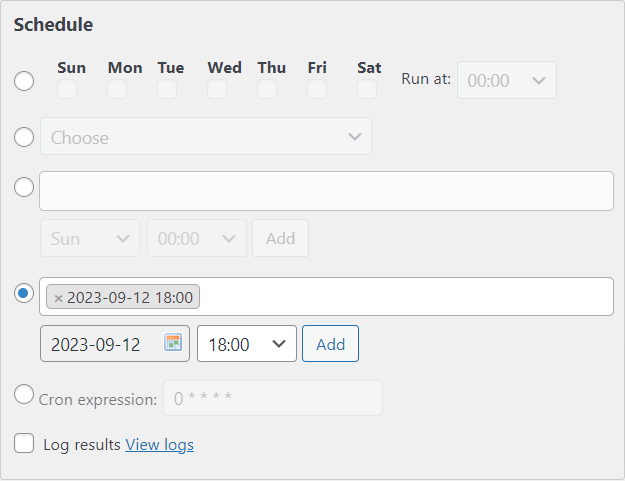
How to configure Scheduled Jobs in Advanced Order Export for Woocommerce (Pro)
You can configure the “Scheduled Jobs” tab to have reports exported on a schedule.
There are two ways to create a job in the “Scheduled Jobs” tab:
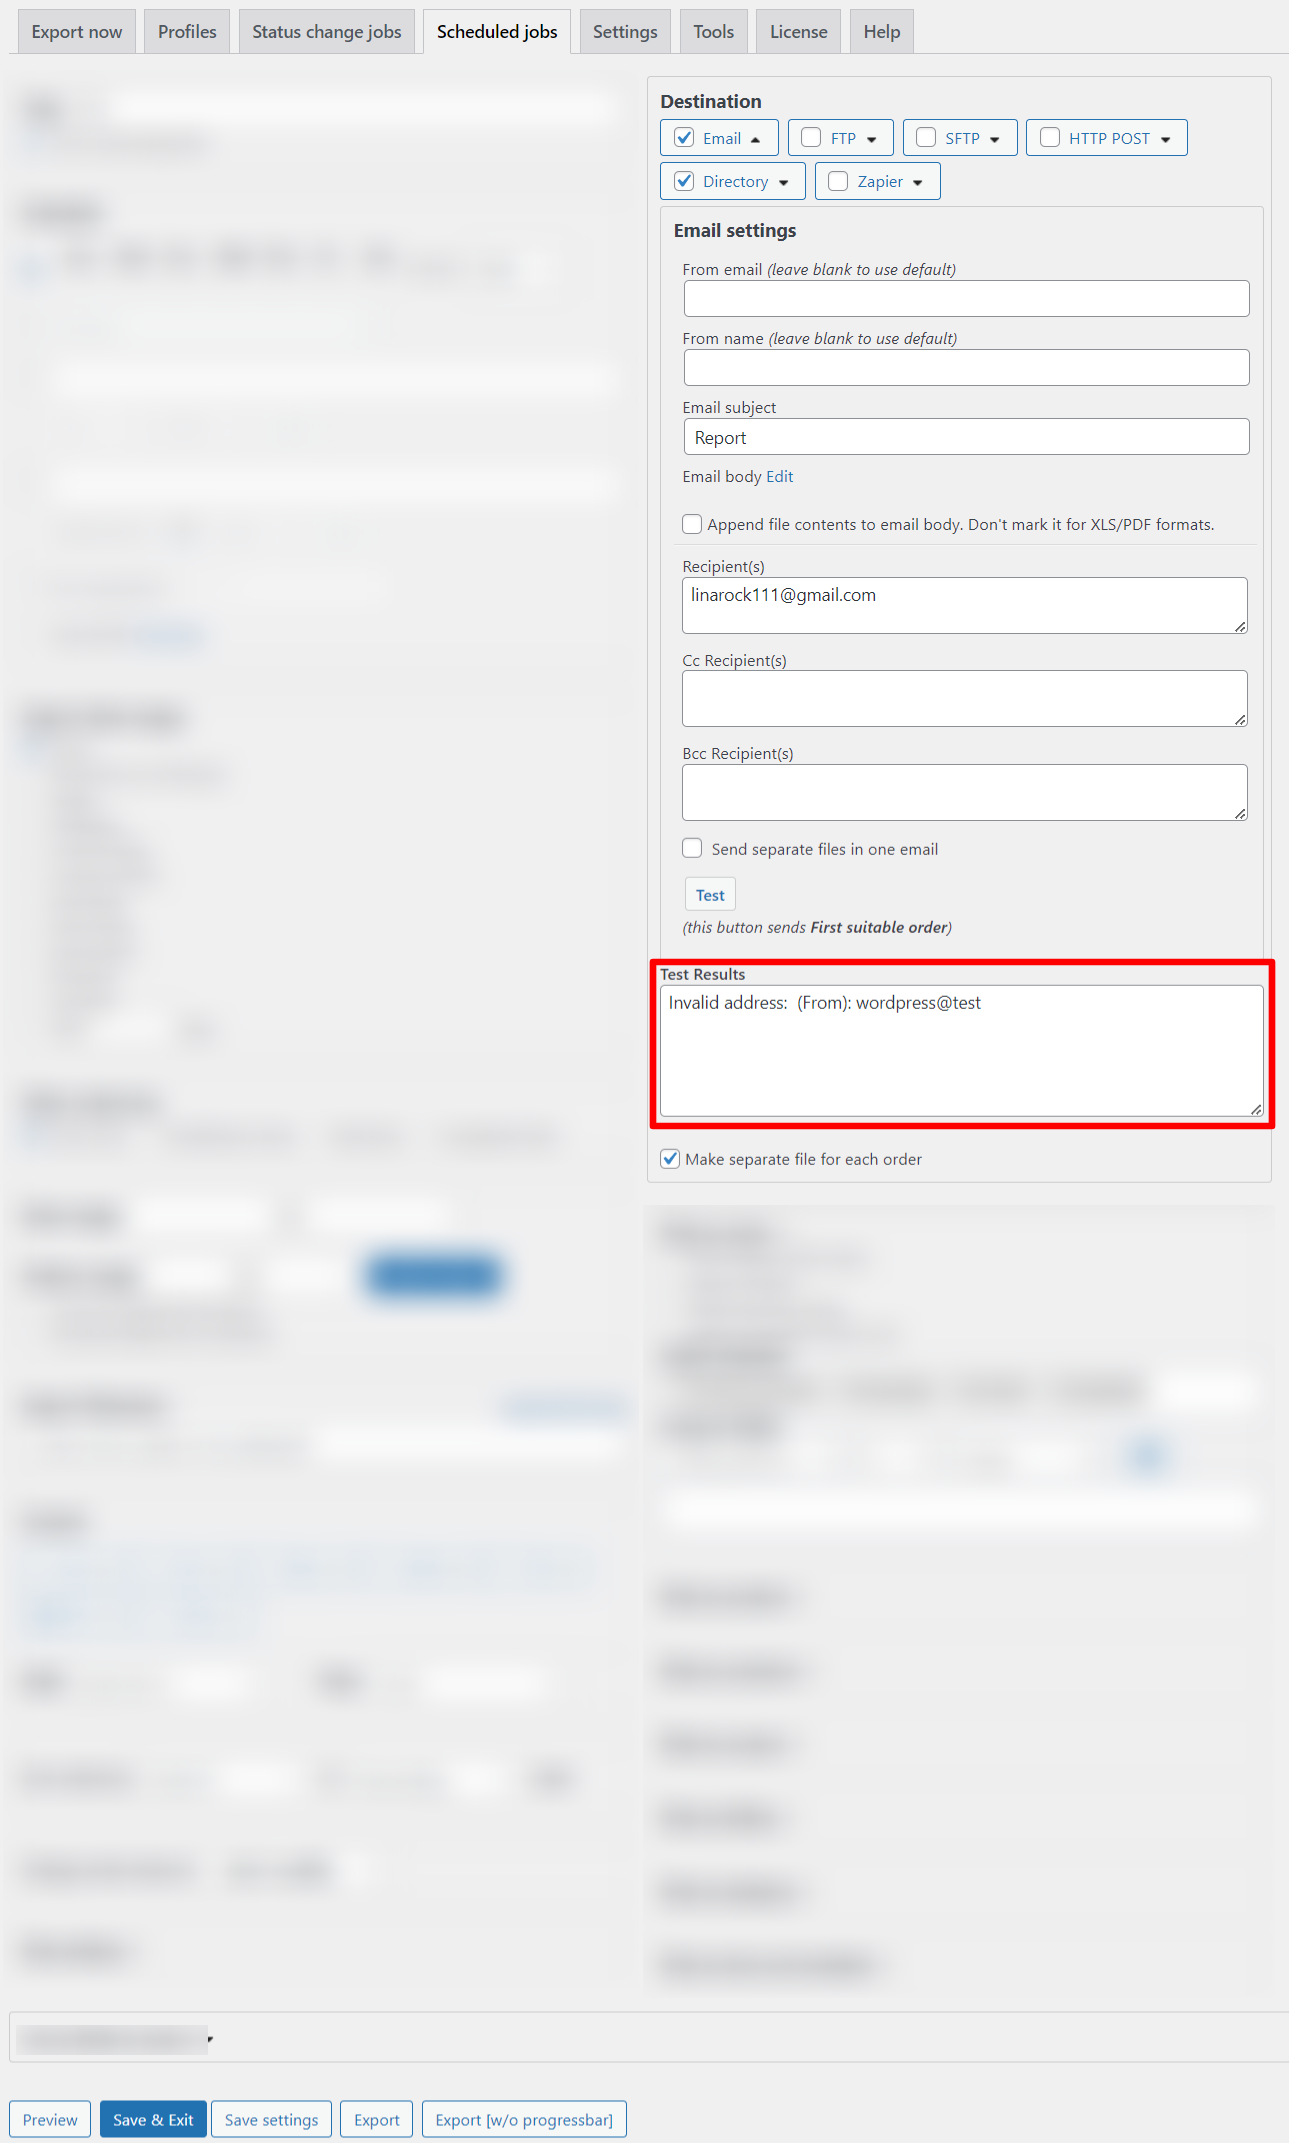
You can choose another export destination (or destinations). For example, Email and Directory. To set up the Email, be sure to include a recipient. Then click on the ”Test” button.
The Email
If you have a similar error, then enter email in the “From email” field.
Conclusion on how to set up Advanced Order Export for Woocommerce (Pro)
Now you figured out how to configure Advanced Order Export for Woocommerce (Pro). It also has many other equally useful settings. You can read about all of them in our plugin documentation.
As an online store owner, it is crucial to have a smooth and efficient order export process in place. This process involves exporting orders from your WooCommerce store to a file that can be easily shared with third-party platforms or fulfillment services.
In recent years, the use of order export plugins for WooCommerce has become increasingly popular among store owners. These plugins offer a range of features that can simplify and streamline the order export process. However, like any other technology, there are some common mistakes that store owners make when using these order export plugins. In this article, we will discuss these mistakes and how to avoid them.
Not Selecting the Right Plugin
The first and most crucial mistake that store owners make is not selecting the right plugin for their needs. With a plethora of order export plugins available in the market, it can be overwhelming to choose the right one. However, it is essential to do thorough research and select a plugin that meets your specific requirements. Some plugins may have features that you do not need, while others may lack critical functions. Take your time to evaluate different options and choose the one that best suits your store’s needs.
You can read a review of the plugins in this article.
Not checking the export format
Another common mistake is not checking the export format before exporting data. WooCommerce offers various export formats, such as CSV, Excel, and PDF. Each format has its own advantages and limitations, and choosing the wrong format can result in data being exported in an unusable or unreadable format.
Advanced Order Export for WooCommerce has even more formats, such as TSV, HTML, XML and JSON. Moreover, you can export your orders to other services using Zapier.
Not scheduling regular exports
Many merchants make the mistake of not scheduling regular exports and instead only exporting data when needed. This can lead to missing out on important data and insights that can help improve their business. Regularly exporting data allows merchants to track trends and identify patterns, which can be used to make data-driven decisions.
To avoid this mistake, merchants should set up a schedule for regular exports, depending on their business needs. This can be daily, weekly, or monthly, depending on the volume of orders and the frequency of changes in their data.
Another mistake that merchants make is not filtering the orders before exporting them. By default, WooCommerce exports all the orders, including cancelled and refunded orders. This can lead to confusion and inaccurate data analysis. Therefore, it is crucial to filter the orders based on their status, date, and other criteria before exporting. This will ensure that you only export the orders that are relevant to your purpose.
Not backing up data
Merchants often make the mistake of not regularly backing up their data. This can result in losing crucial data in case of system crashes, accidental deletion, or other unforeseen circumstances.
To avoid this mistake, merchants should make it a habit to regularly back up their data. They can also use backup plugins or services to automate this process and ensure their data is always safe.
You might have missed it: a video about the backup tool function, with which you can copy your export settings.
We shows you the most common mistakes that users make when choosing and using an export plugin. They are often caused by inattention and can be corrected manually. However, if you have a problem and you don’t know how to solve it, then feel free to write to our support. The Advanced Order Export for WooCommerce plugin team is always ready to help you!
Customizing reports is an important part of any business, whether it be a small business or a large corporation. Reports are an effective way to track progress, analyze data, and identify areas for improvement. For businesses, customizing reports can help ensure that the right information is available to decision makers, leading to better decisions and improved performance.
Customizing reports can also help improve the accuracy of the data. By taking into account the specific variables and conditions of the business, the report can be tailored to provide more accurate and reliable results. This is especially important when dealing with complex data sets.
In addition to improving accuracy, customizing reports can also help save time. Since the reports are tailored to the specific needs of the business, they can be quickly generated. This can help save time and resources that would otherwise be spent on manually creating reports.
Do Your Customized Export
When it comes to exporting data, creating a customized export report can be a daunting task. The good news is that there are several steps you can follow to make the process easier. This little guide will provide an overview of how to create a customized export report.
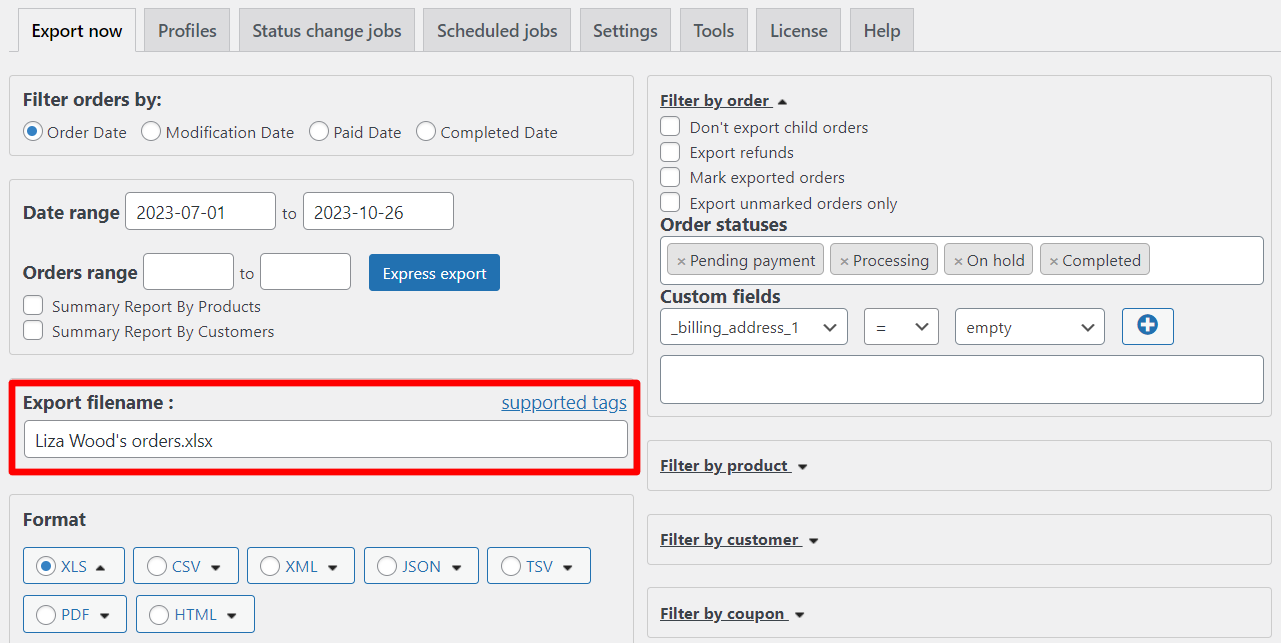
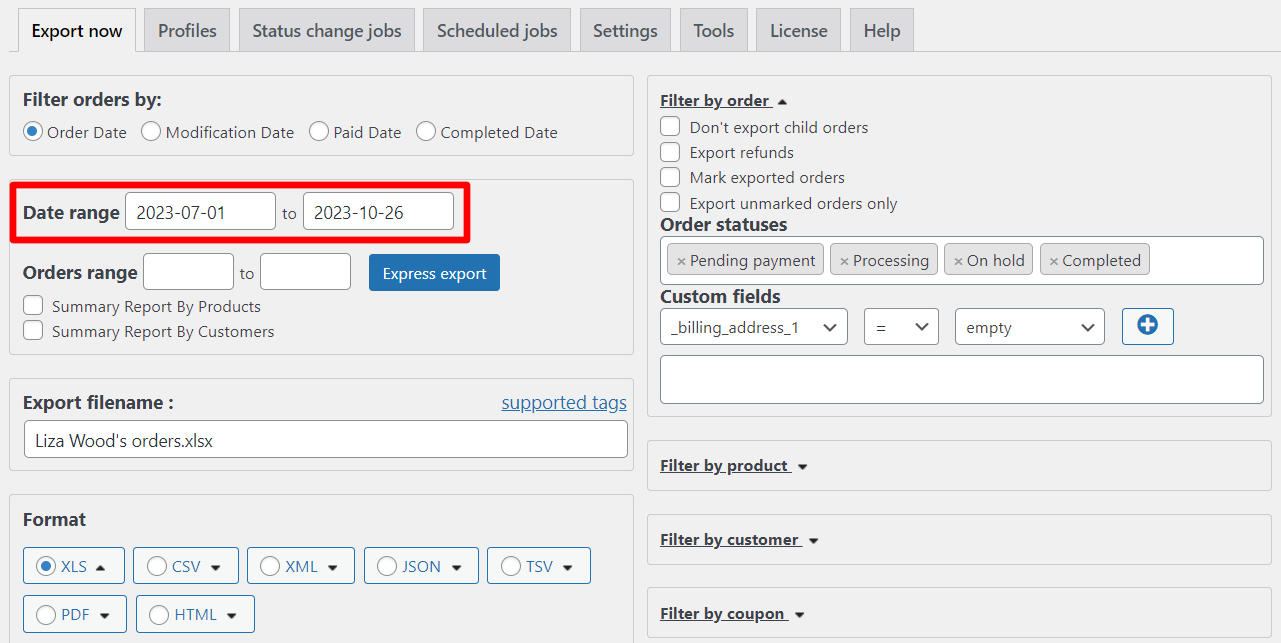
Give the report a title.
Set a date range.
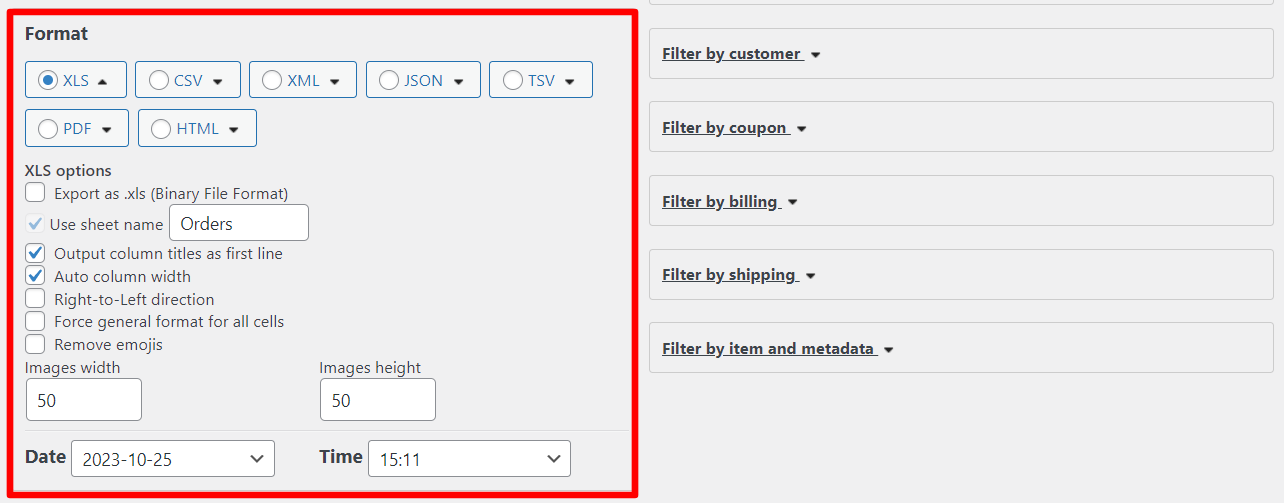
Select the desired export format and configure it. You can choose, for example, the XLS format and adjust the direction from right to left, remove emojis, or give a different name to the sheet.
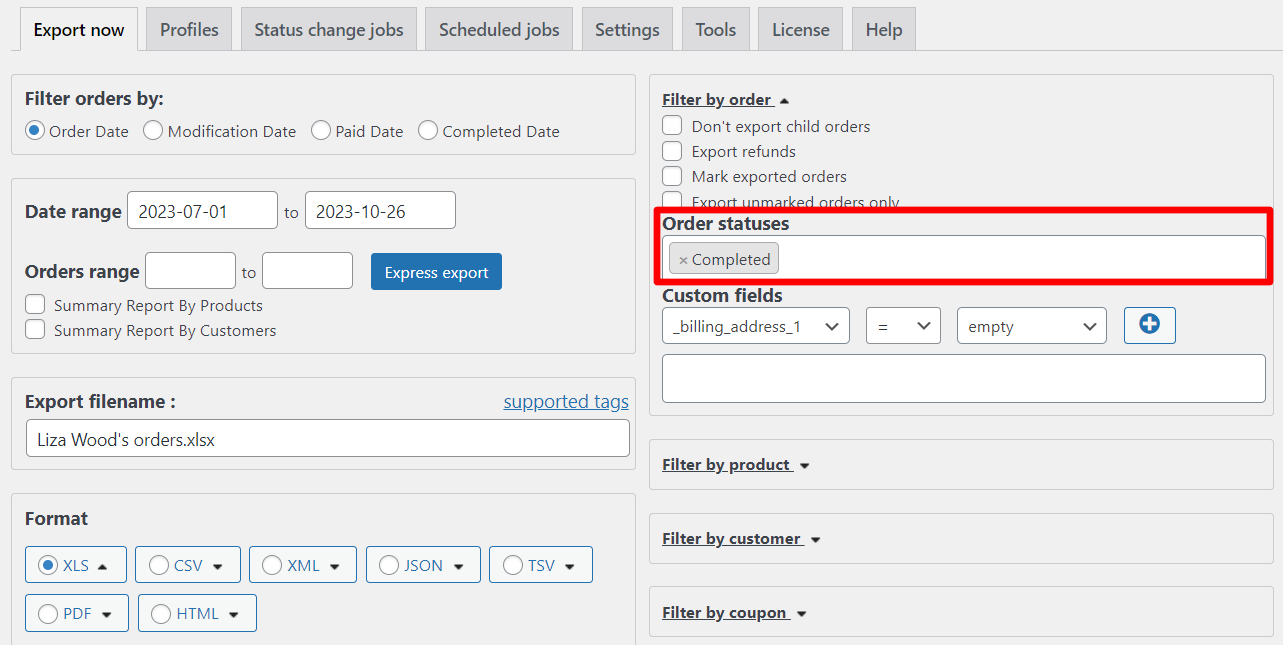
Specify the status with which the exported orders should be. In our case, these are all completed orders.
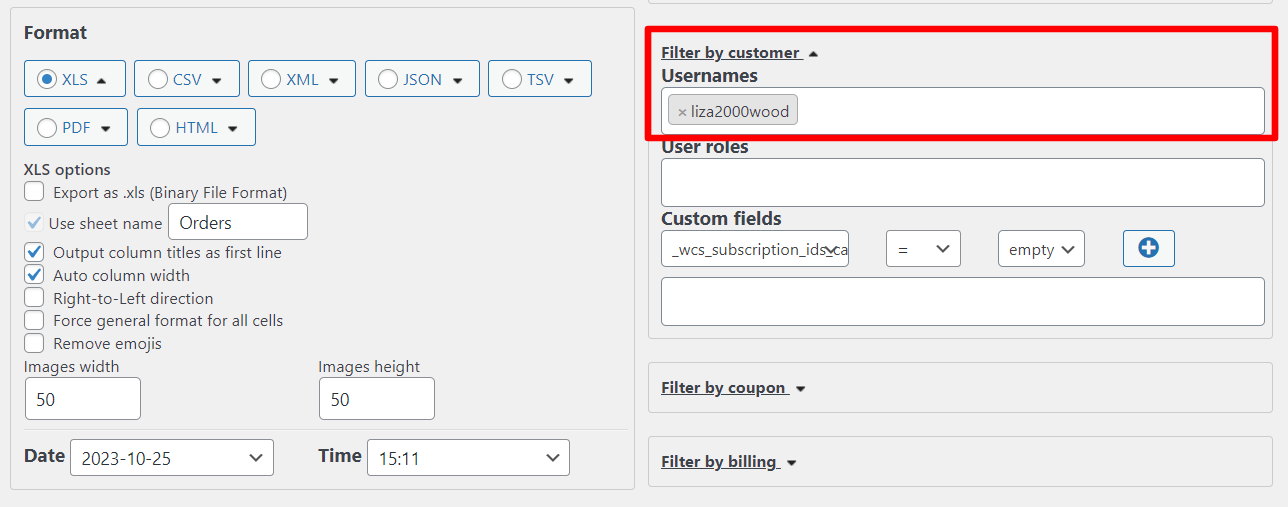
Let’s add a filter by customer. We export all Lisa Wood’s orders.
In the Misc Settings field, check Export all order notes and Shipping fields use billing details (if shipping address is empty).
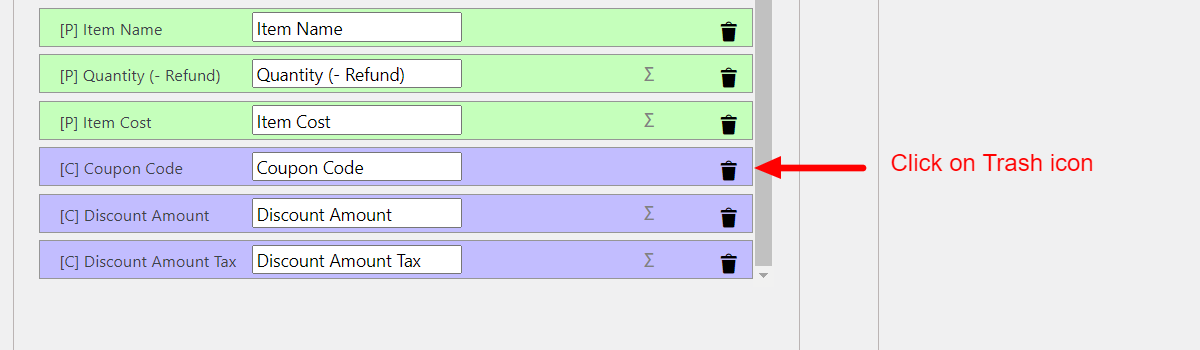
In the Set up fields to export section, remove unnecessary fields, for example, all coupon’s information and billing details.
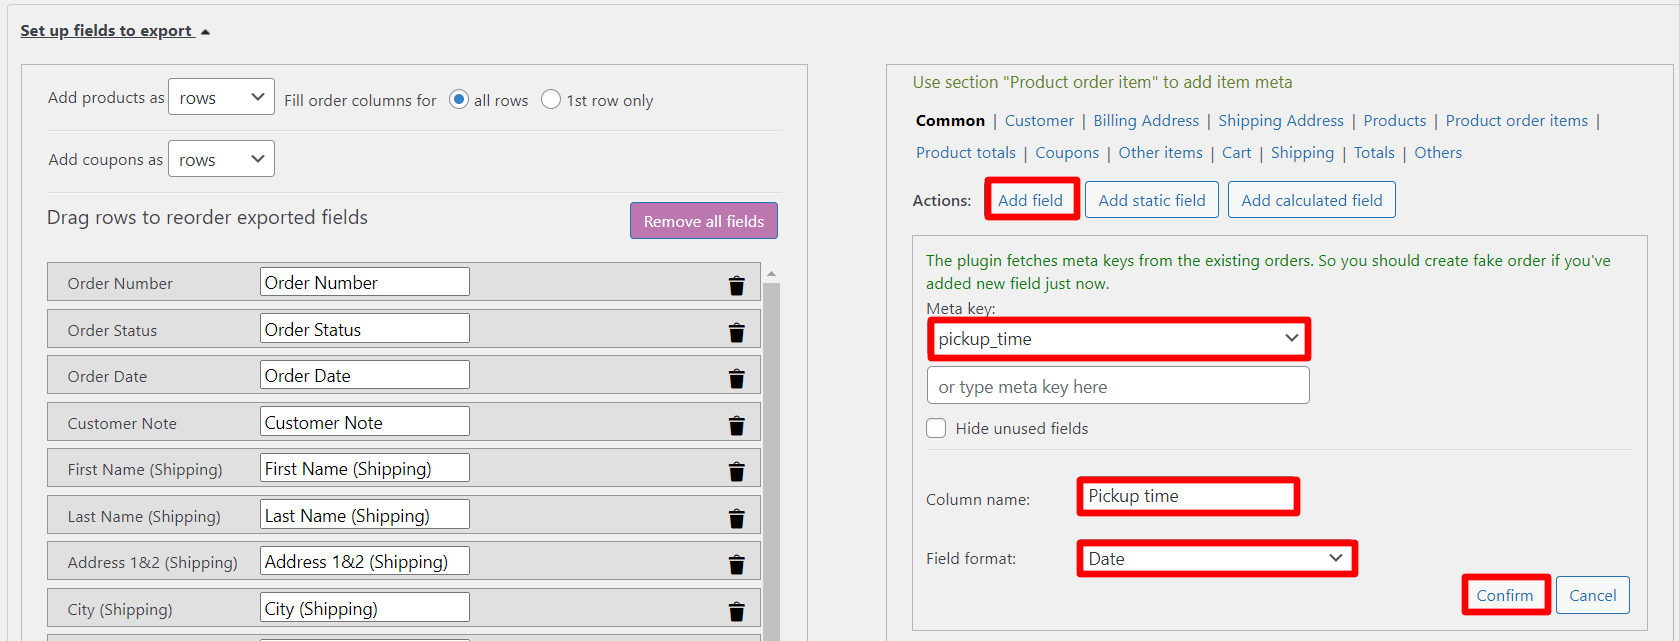
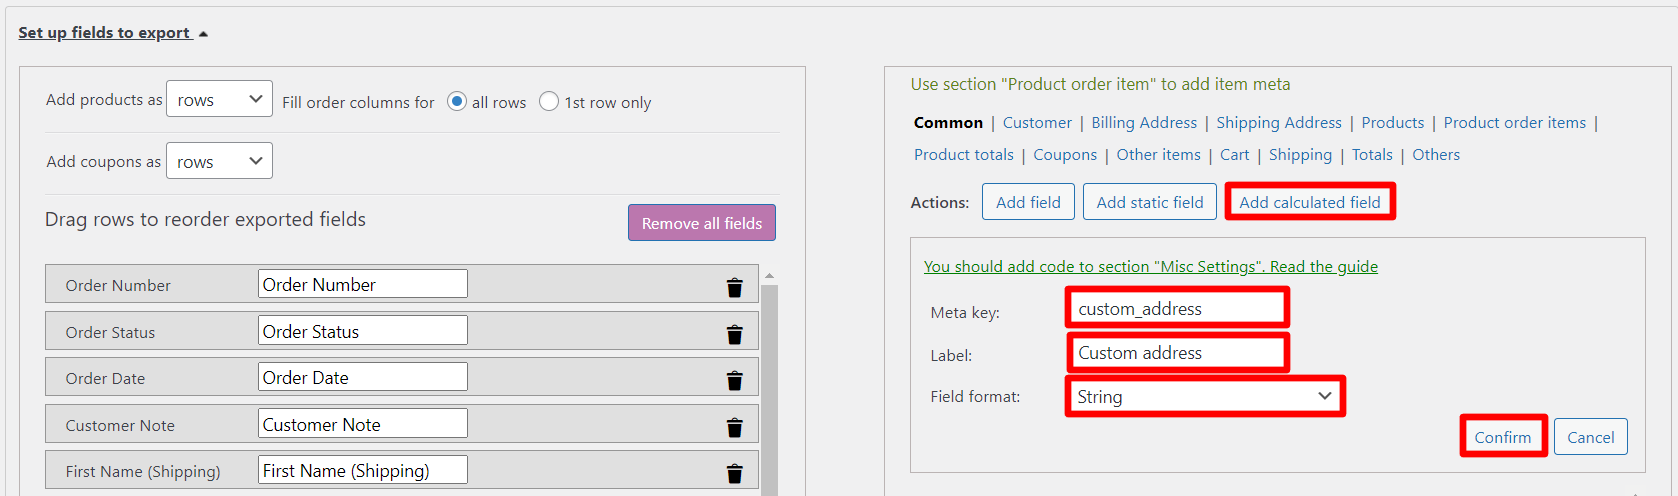
Add your custom field. Click Add field and select meta key pickup_time. Let’s name the field Pickup time and select the date format. Let’s drag it to the left column using the drag-and-drop method.
Note: This field was previously created as part of this article.
Let’s create a calculated field. Click Add calculated field and fill in the custom meta key custom_address. Let’s specify the column name and its format. Also drag it to the left column using the drag-and-drop method.
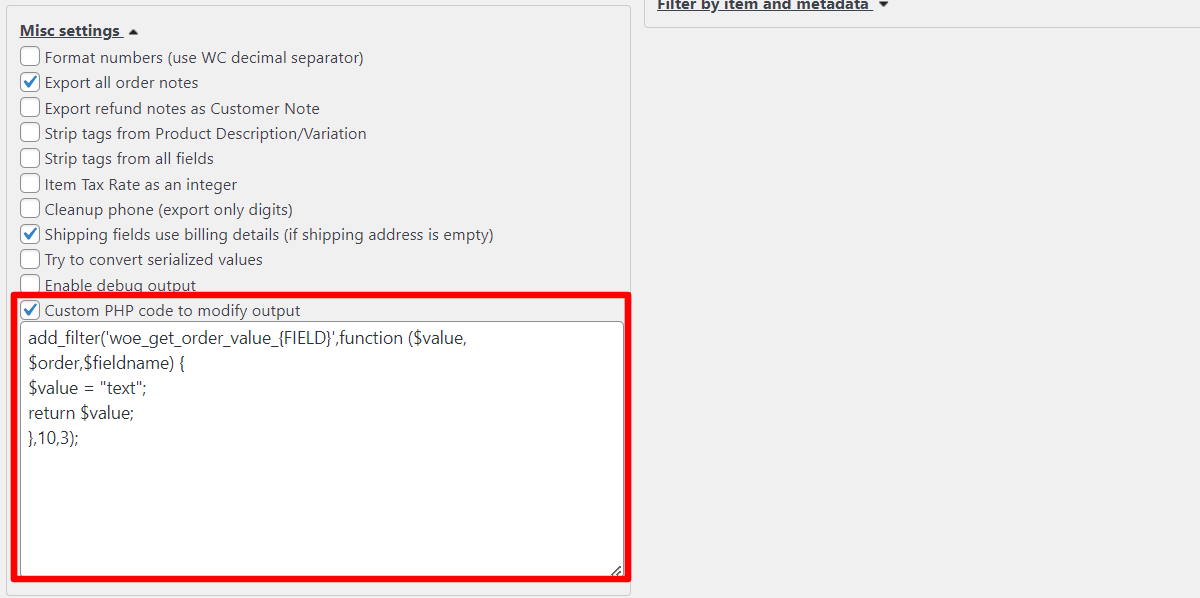
Next, let’s create a calculation function. In the Misc Settings section, check the “Custom PHP code to modify output” checkbox and paste the following rough function into the text field:
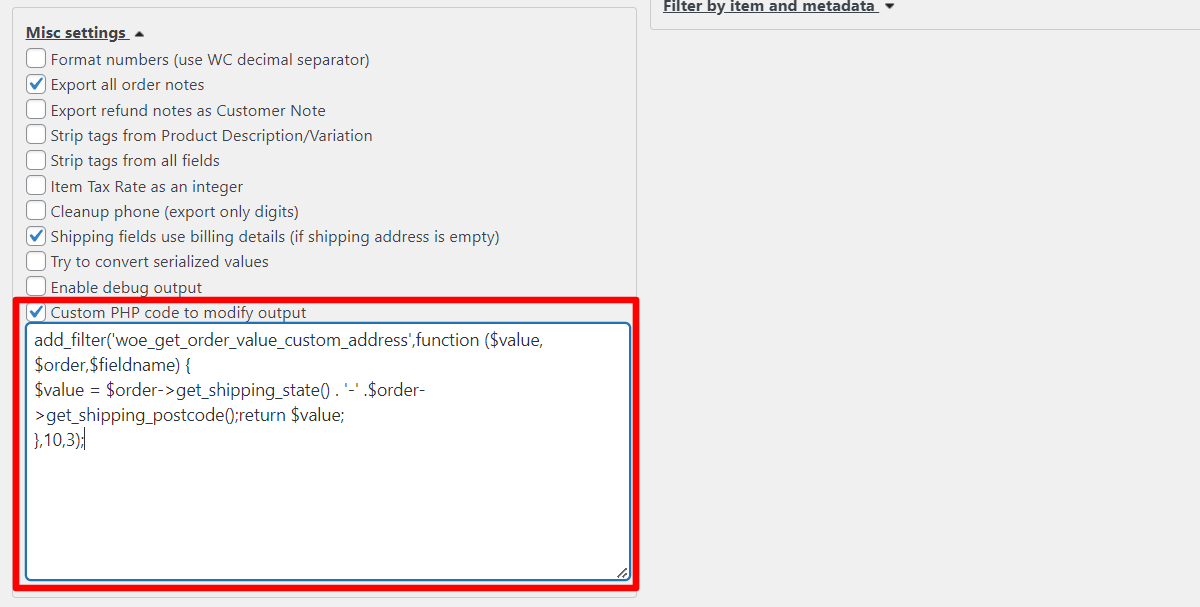
Let’s replace {FIELD} with the previously created metakey and replace $value = “text”; with the following code (this code combines state and postcode):
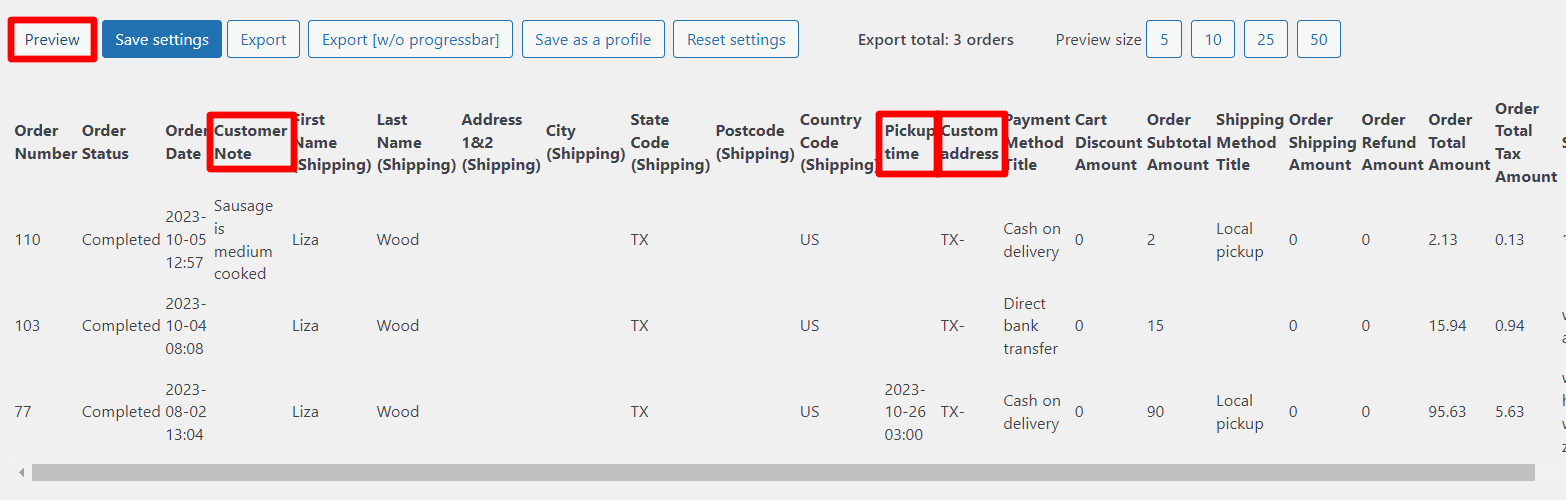
Click on the “Preview” button and check the results.
Note: there is not any postcode in Liza Wood’s orders, so report has only state in Custom address field.
Once the export is complete, you can then use the data to analyze your spending and income trends, create budget plans, and predict your financial future.
Avoid These Common Mistakes
As a business owner, it is important to customize reports to get the most accurate information about your business. However, customizing reports can be a tricky process. To get the most accurate information, you must avoid common mistakes that can lead to inaccurate or unreliable reports.
First, you must choose the right data fields to include in your report. Too often, business owners choose data fields that are not relevant to their goals. For example, if you are trying to analyze customer spending, it would not make sense to include data fields related to employee productivity. To get the most accurate information, you must select data fields that are directly related to the goals of your report.
Second, you must ensure that you are using the most up-to-date data. Reports can quickly become outdated if you are not regularly updating the data. To get the most accurate information, you must regularly review the data and update it as necessary.
Third, you must make sure that your report is free of errors. Mistakes in data entry or calculations can lead to inaccurate information. To ensure that your report is accurate, you must double-check all the data and calculations.
In conclusion, customizing reports is an important and necessary part of any work environment. Provide more detailed insight into performance and identify potential areas for improvement with Advanced Order Export for WooCommerce!
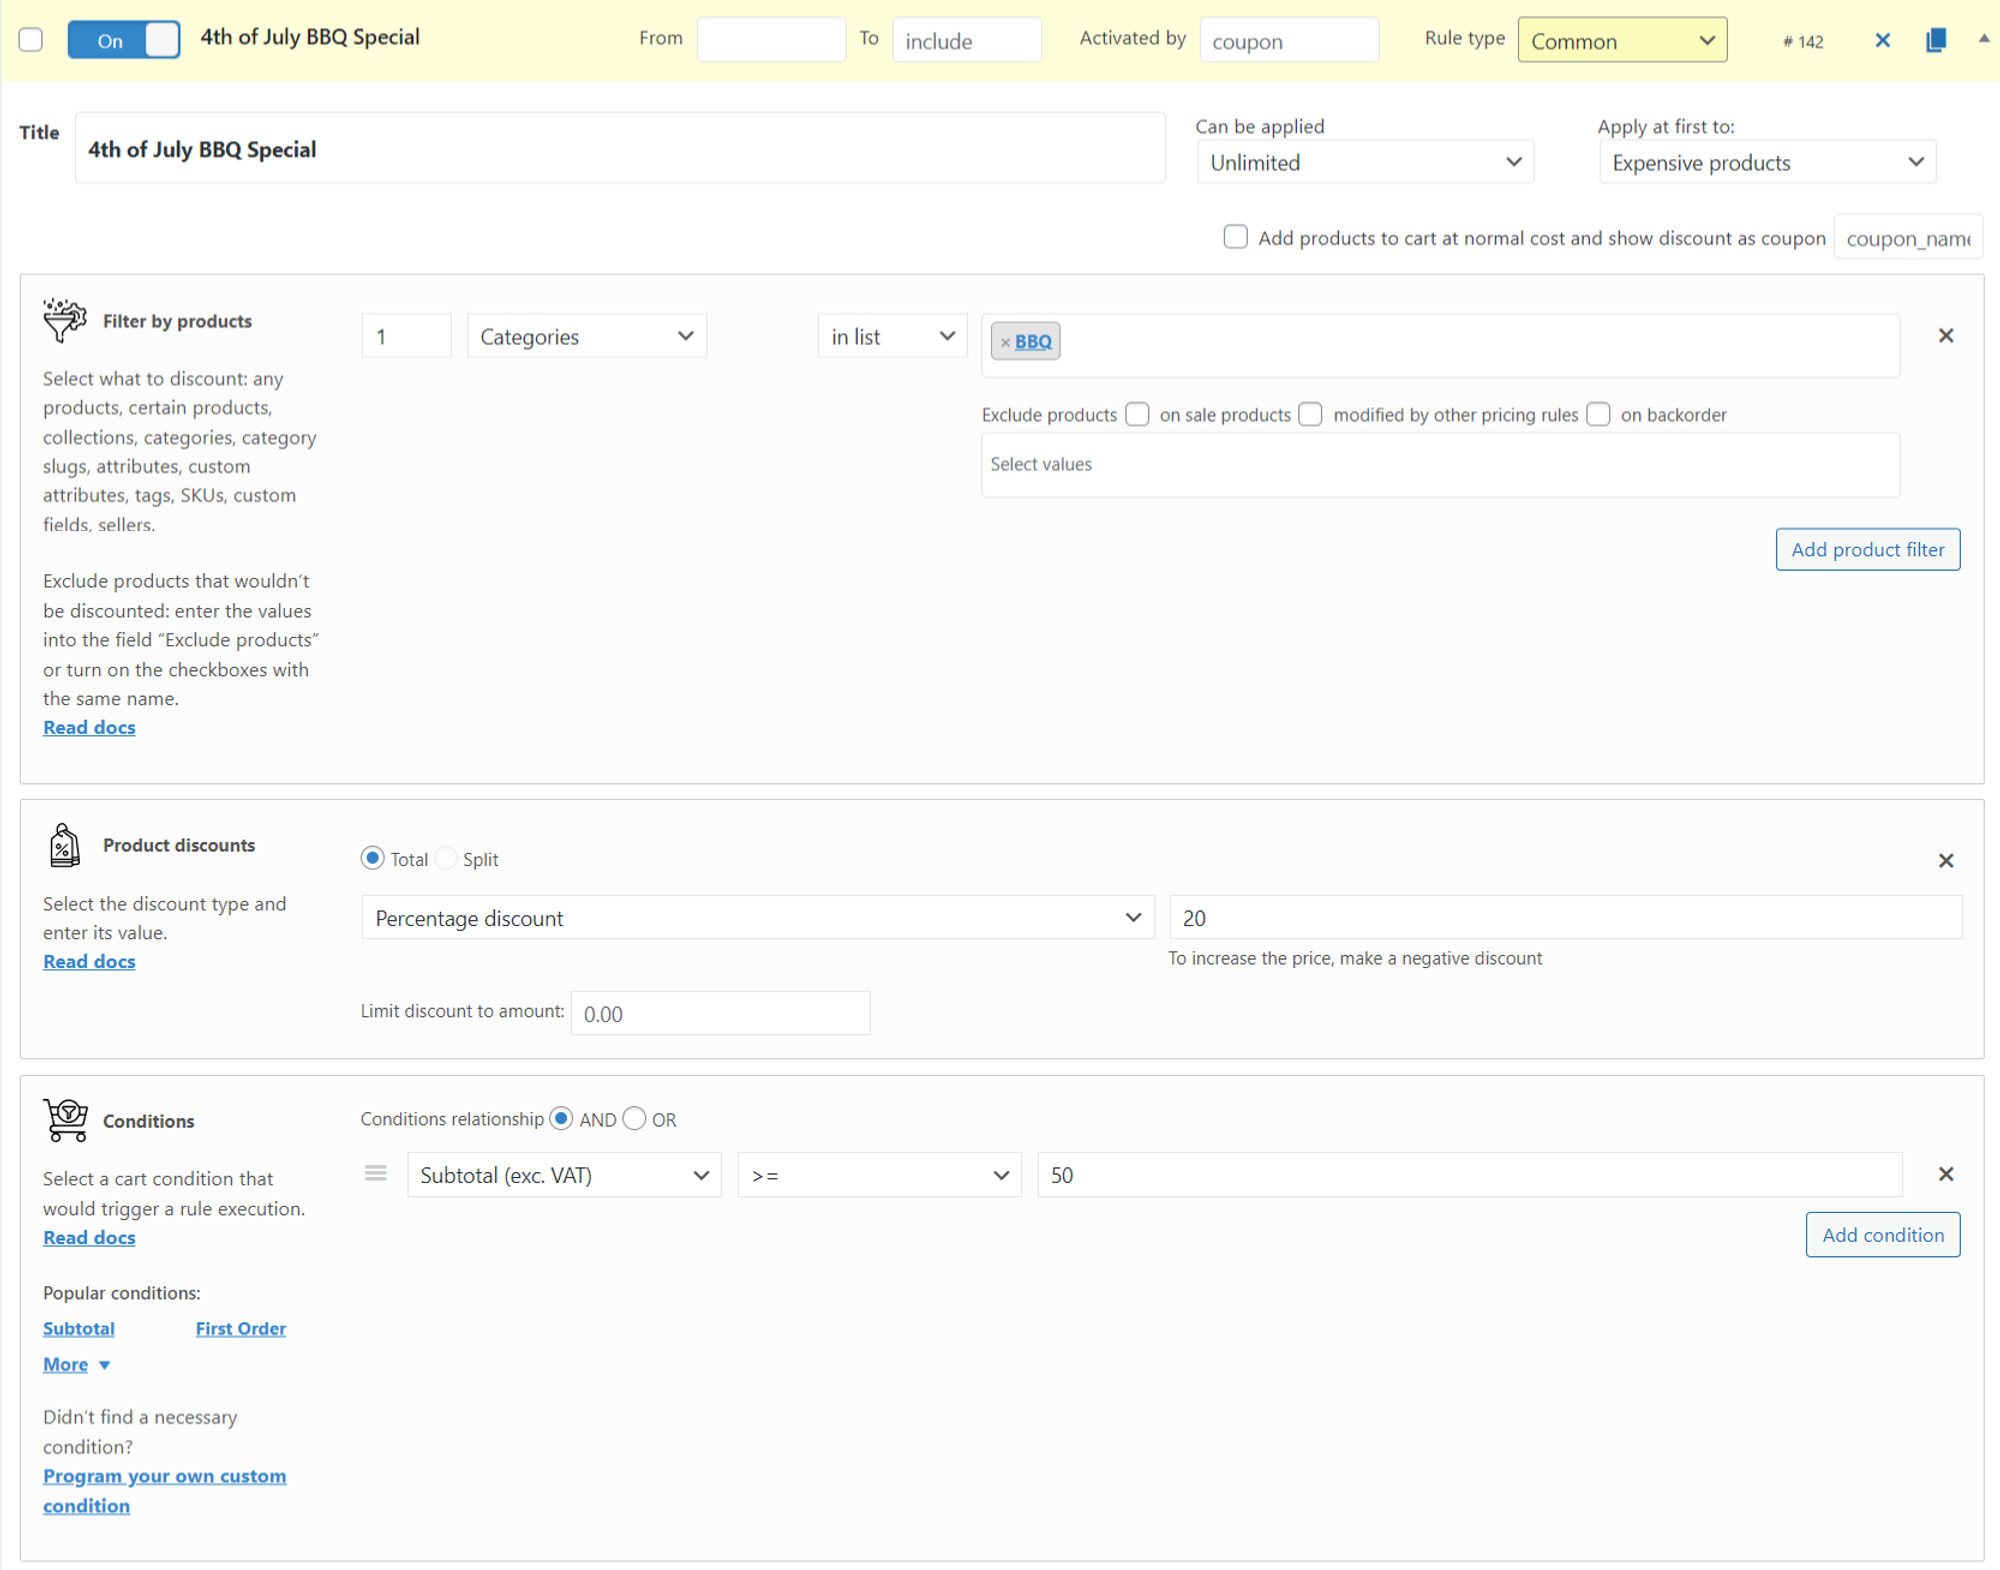
The 4th of July is a significant holiday that brings a surge of sales to retailers across the United States. As an online store owner, it’s crucial to prepare your WooCommerce store to handle the influx of customers looking for deals and to streamline your operations for the big day. Algol+ plugins offer a suite of tools that can help you optimize your store for this busy time. Let’s explore how plugins like Advanced Dynamic Pricing, Advanced Order Export, and Phone Orders can enhance your store’s performance and customer experience.
Advanced Dynamic Pricing for WooCommerce
The Advanced Dynamic Pricing plugin allows you to set up dynamic pricing rules that automatically apply discounts based on various conditions. For example, you can create a “Buy One, Get One Free” offer for American flags, or offer a 20% discount on all barbecue-related products when a customer’s cart total exceeds $50.
Example:
Rule: “4th of July BBQ Special”
Condition: Cart subtotal (exc. VAT) >= $50
Discount: 20% off on selected BBQ products This encourages customers to spend more to reach the threshold for the discount, increasing your average order value.
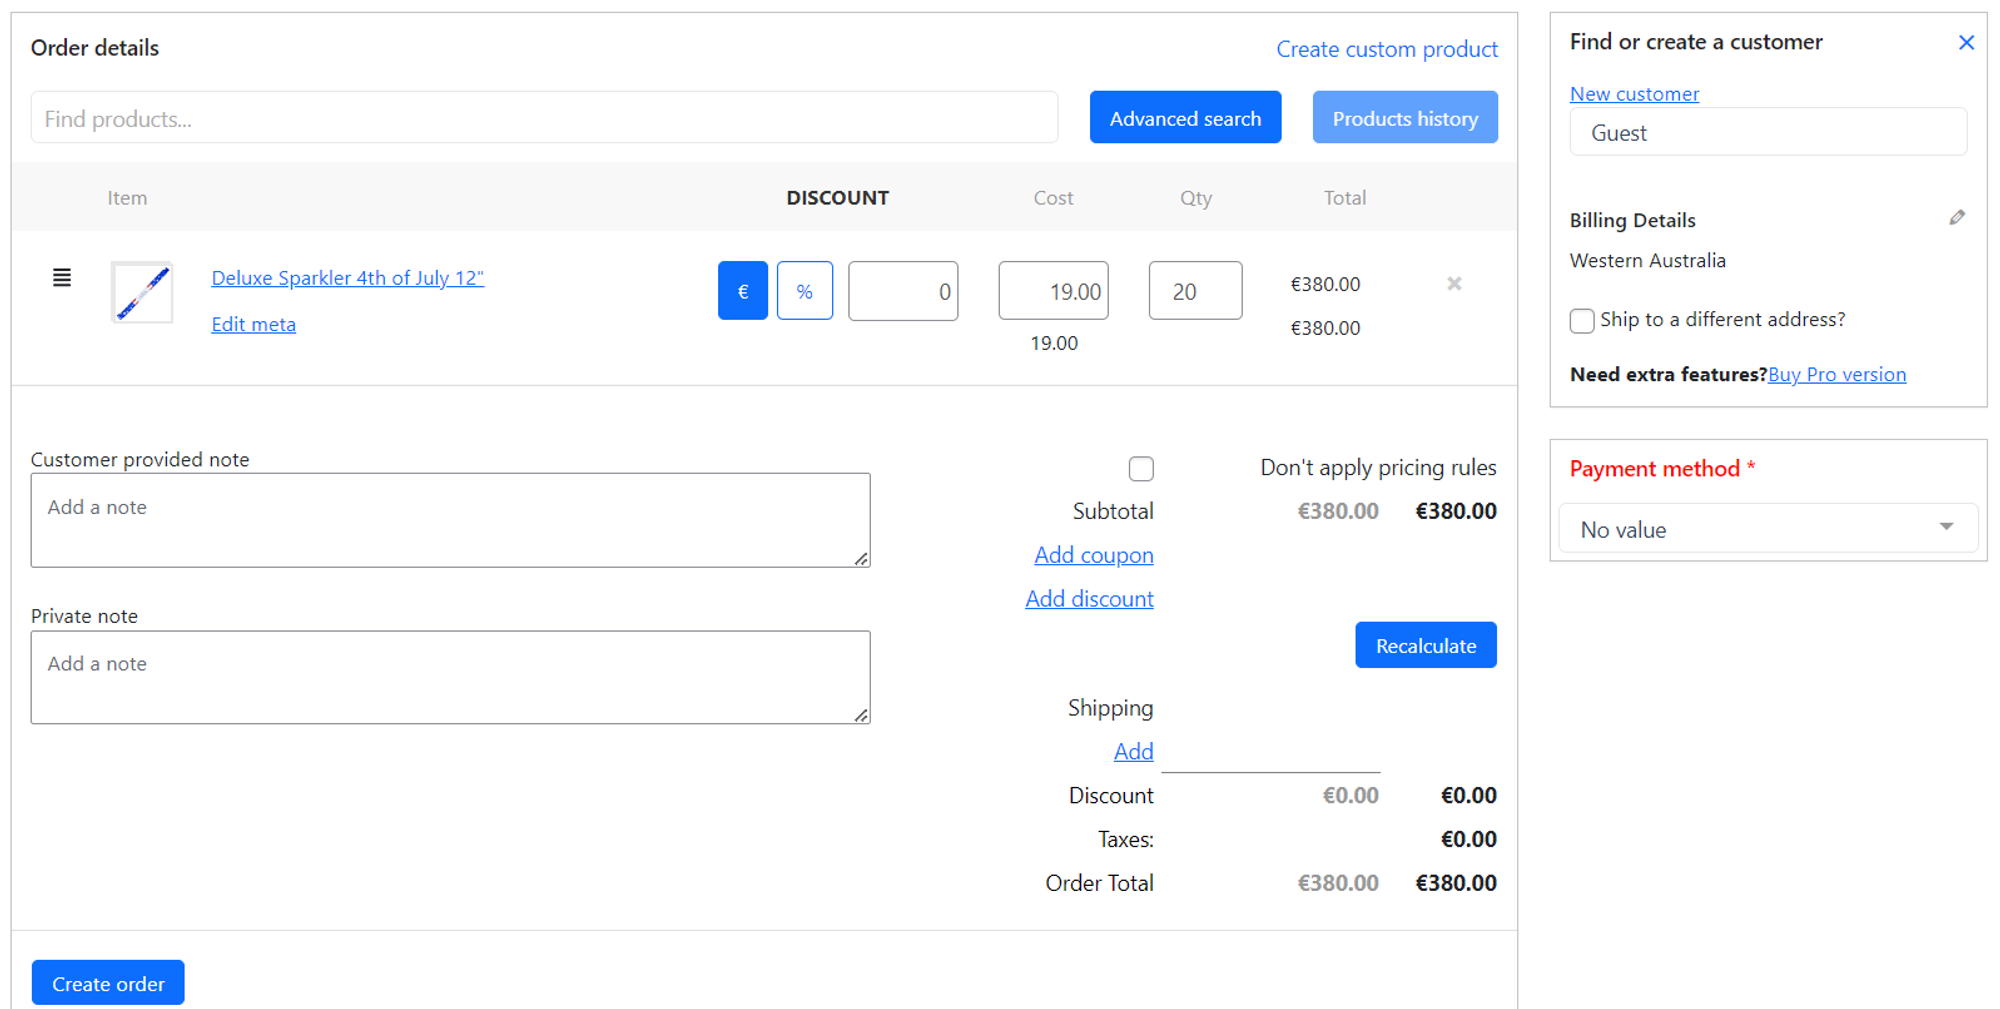
Phone Orders for WooCommerce
Not all customers are comfortable placing orders online, especially when it comes to last-minute purchases. The Phone Orders plugin enables you to take orders over the phone and manually enter them into your WooCommerce system. This is particularly useful for catering to less tech-savvy customers or handling complex orders that require customization.
Example:
Customer Call: “I need 20 sparklers delivered by July 3rd.”
Manual Entry: Create a new order in WooCommerce with 20 sparklers, set delivery date, and process payment over the phone. By offering a personal touch, you can capture sales that might otherwise be lost.
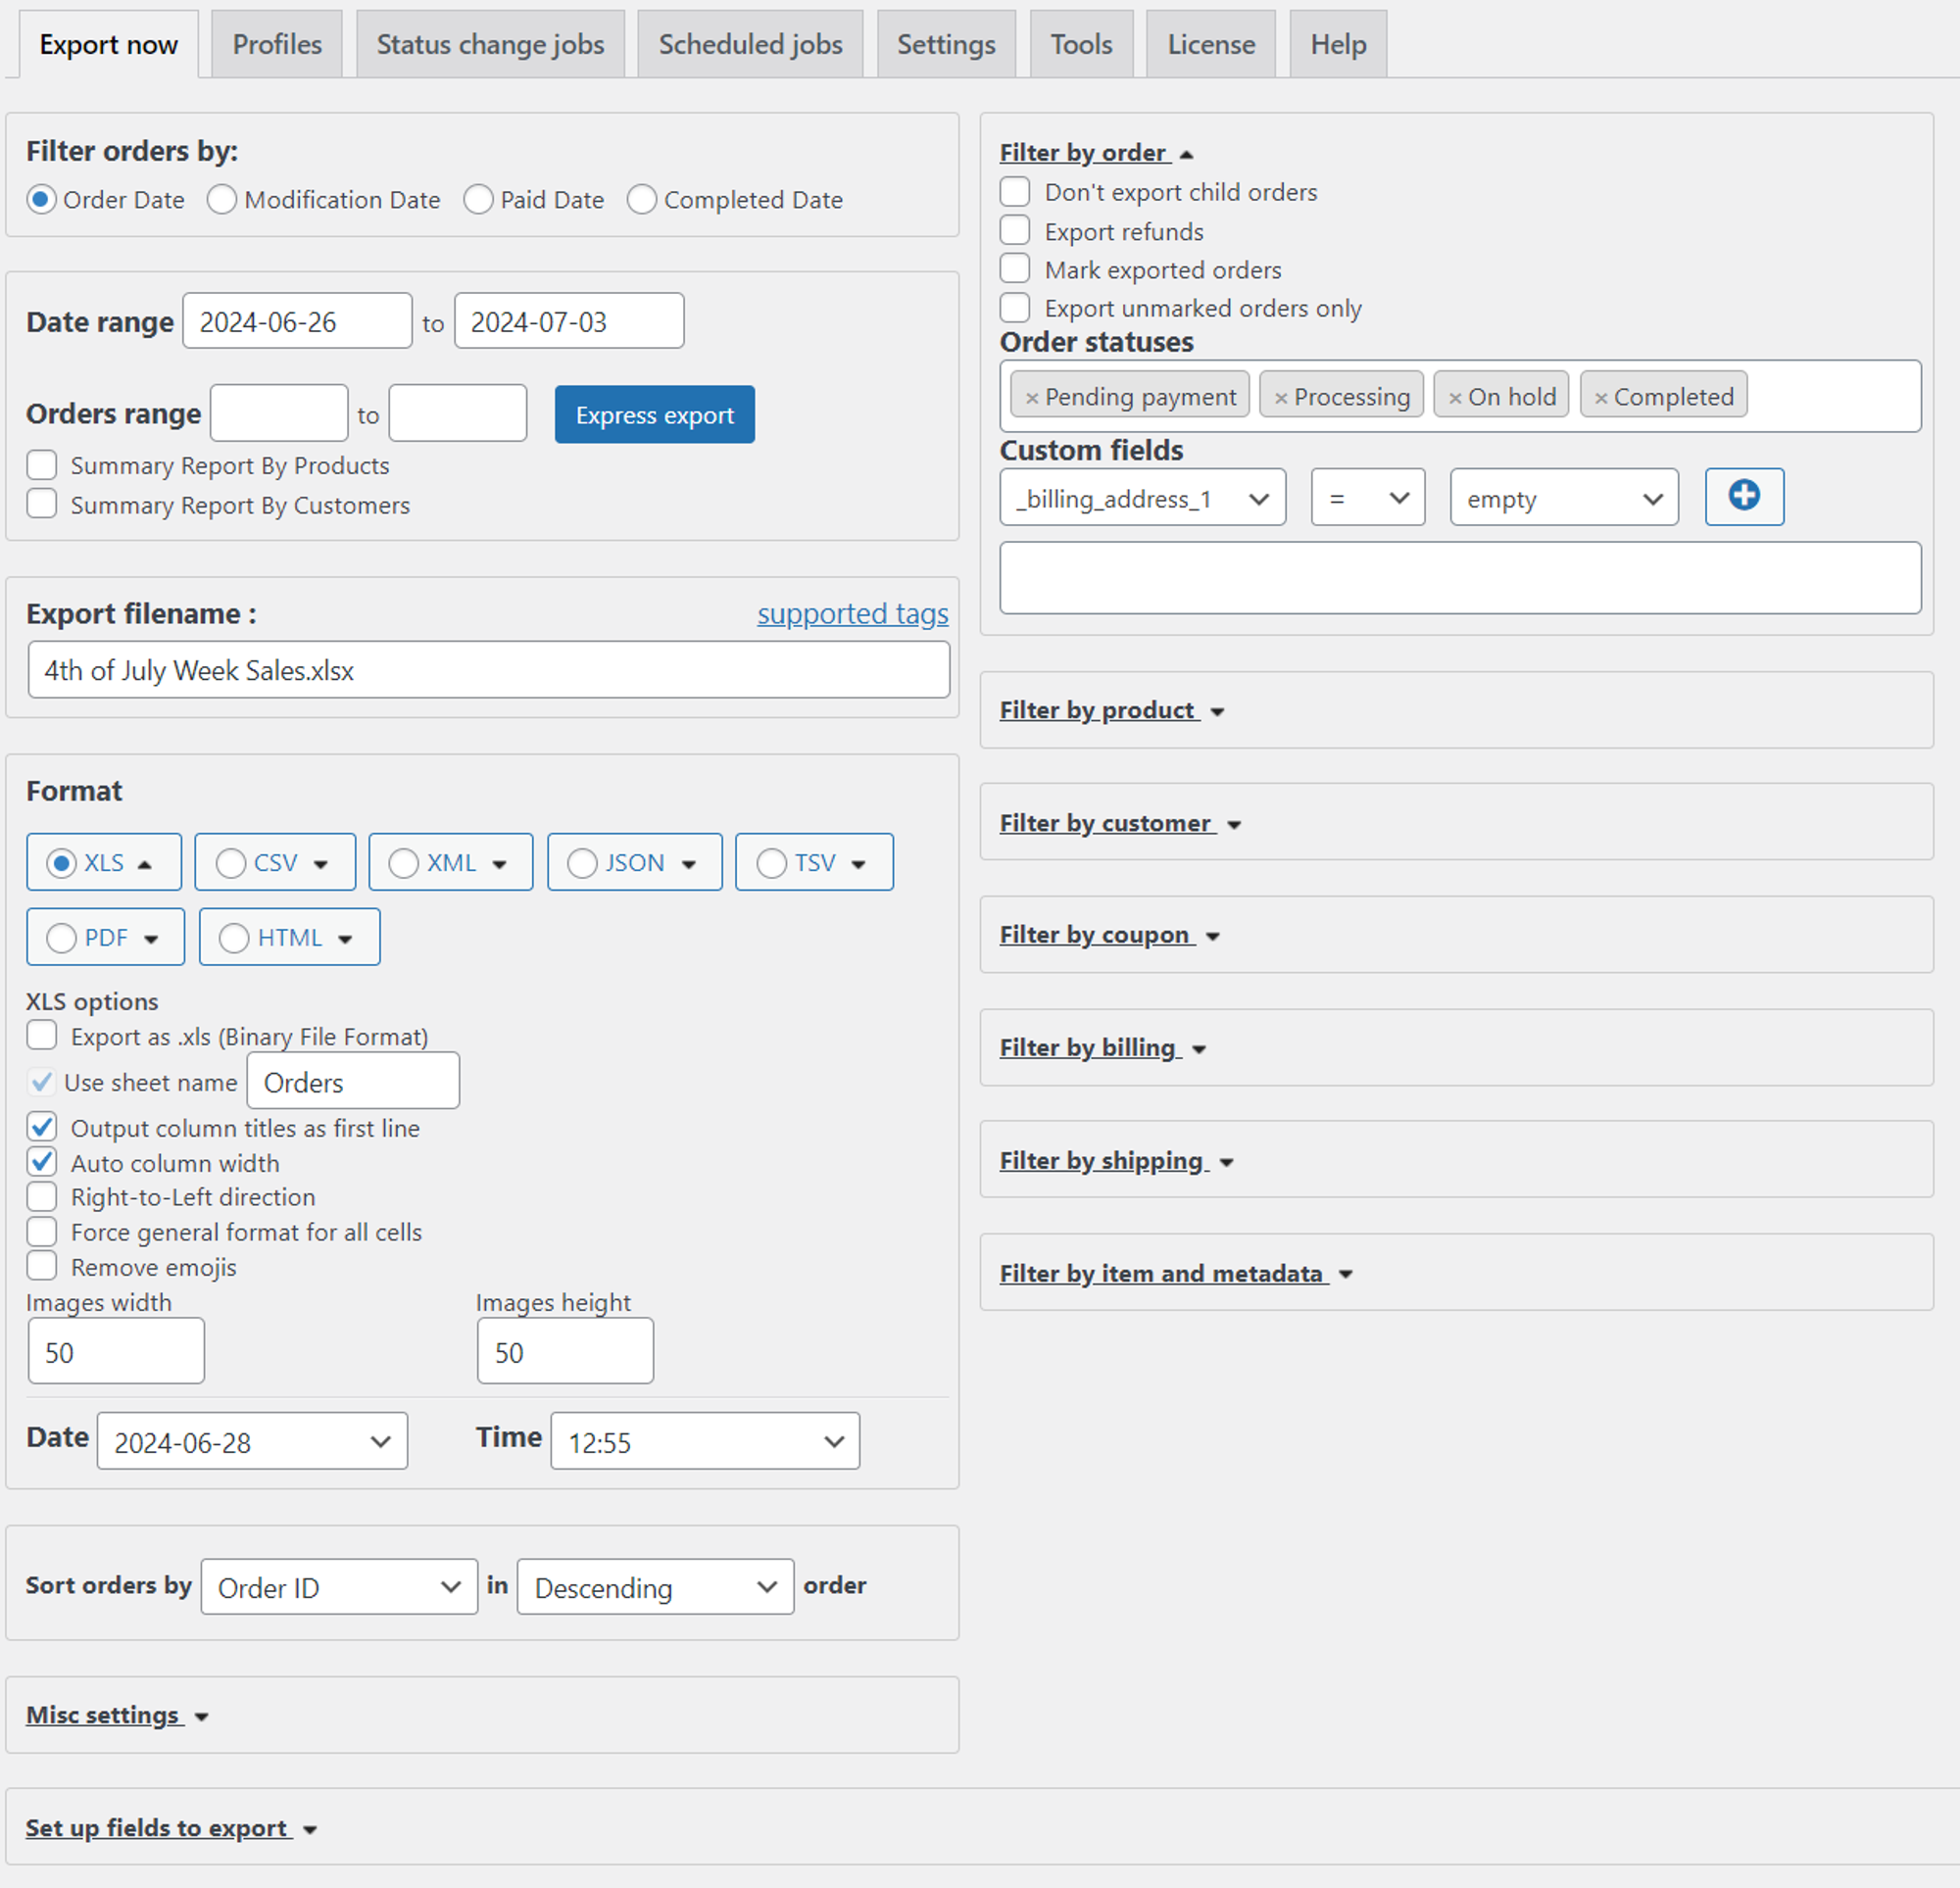
Advanced Order Export for WooCommerce
The Advanced Order Export plugin is not just a tool for simplifying your fulfillment process; it’s also a powerful instrument for statistical analysis. With its ability to export detailed order information, store owners can track and analyze sales data over time. This can be especially beneficial during the 4th of July sales when you want to understand consumer buying patterns.
For instance, you can export sales data for the week leading up to the 4th of July and use it to identify which products are the most popular, what times of day see the most orders, and which promotions are driving the most sales.
Example:
Export Data: “4th of July Week Sales”
Analyze: Identify peak ordering times, top-selling products, and most effective discounts.
Action: Adjust stock levels, staff scheduling, and marketing strategies accordingly.
Conclusion
Preparing your WooCommerce store for the 4th of July doesn’t have to be a daunting task. By utilizing the Algol+ plugins, you can offer enticing deals, streamline your order processing, and provide personalized customer service. These examples illustrate just a few ways you can use these powerful tools to make the most of the holiday rush and ensure your customers have a memorable shopping experience.
Remember, the key to a successful holiday sale is preparation. Start setting up these plugins well in advance to ensure a smooth operation when the 4th of July arrives. Happy selling!
Halloween is in less than a week! I hope you are well prepared for it. If not, then read all about how to properly organize a marketing strategy during this period and get the maximum effect from its analysis.
Most purchased products and popular coupons
It’s no secret that on the eve of the holiday, the following products will be relevant:
Costumes. Who doesn’t want to dress up as their favorite hero? Thanks to the Barbie movie, many people will want to become the main character or Ken. A lot of revenue will come from this position.
Candies. Giving out candy has become a tradition on Halloween. Almost 70% of people definitely do this. Give customers discounts on buying candy in bulk to attract them.
Decor. Home decorating competitions are still a thing. Your competitors have already lowered their prices on terrible things. Do this too.
Create your own themed coupon and see how it affects your shopping habits. With Advanced Dynamic Pricing for WooCommerce plugin, this can be done with the snap of your fingers.
Specify which products will come with a discount, set its amount and come up with a name for the coupon. Find out which coupon names are the most common:
SPOOKY15
TRICKORTREAT
PUMPKIN
HAPPYHALLOWEEN25
MYCANDY20
Activate the coupon, inform your customers about it and wait for the peak of sales!
Why should you choose Advanced Order Export For WooCommerce for export?
Halloween is one of the most popular times of the year for retail stores. With the influx of shoppers and the high demand for costumes and decorations, it is important for store owners to keep track of their sales and analyze the data. Fortunately, Advanced Order Export for WooCommerce makes it easy to track your Halloween sales.
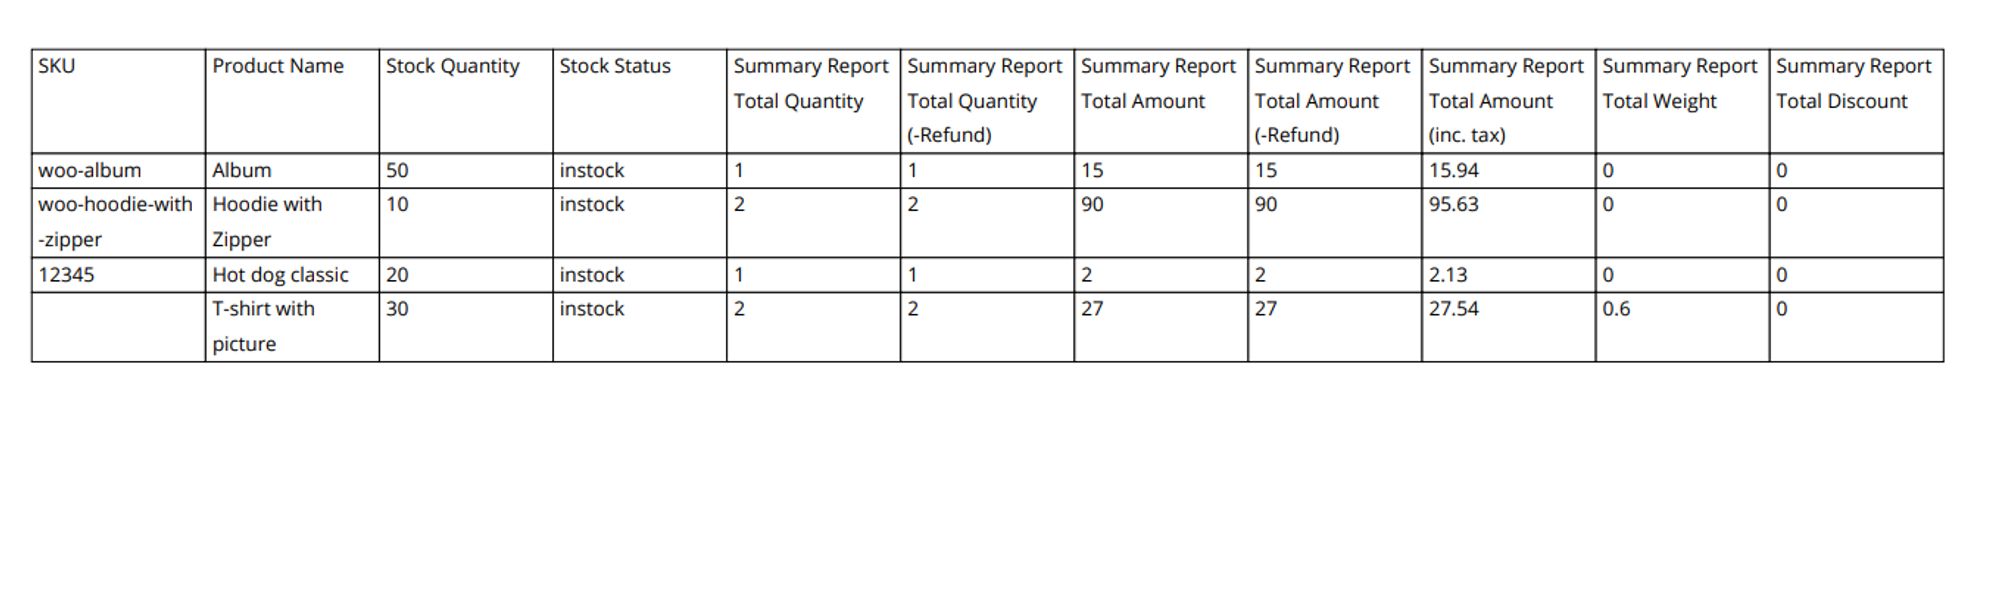
The plugin allows users to export customer data such as order IDs, customer names, billing and shipping addresses, order totals, and more. Additionally, the plugin also exports product data such as product IDs, product names, SKUs, prices, quantities, and discounts. This data can be used to analyze the store’s sales performance and gain insights into the most popular products.
Advanced Order Export for WooCommerce also provides you with a range of features that make it easy to customize your reports. You can choose which fields to include in your reports and even add custom fields that can be used to track specific metrics.
Note: To set up a coupon report, you need to add the following fields – Coupon Code and Discount Amount.
Note: Read our article for a detailed guide on exporting.
Finally, Advanced Order Export for WooCommerce allows store owners to export their sales data to other applications. With this feature, store owners can connect their WooCommerce store to third-party applications such as Google Docs and Dropbox. This allows them to easily view and analyze their sales data in different formats.
By what parameters should you analyze the data?
Halloween is over and you’ve received your sales reports. What to do next? Check whether your marketing hypothesis is confirmed. There are different indicators for this:
CTR (Click-through Rate)
CTR shows how accurately an ad responds to a user’s query and how attractive it is to the user.
The higher the CTR, the higher the ad quality score. Increasing ad quality while maintaining the same maximum bid increases the chances of getting a higher position. In other words, ads with a high CTR save money.
CTR = Clicks 100% / Impressions*
CPL (Cost per Lead)
A lead is a user who has shown interest in a product or service and sent his contact information (ordered a quote, requested a price list, asked for detailed advice, etc.).
CPL = Contextual Advertising Costs / Leads
CPC (Cost per Click)
The cost that an advertiser pays for clicking on an advertisement and then going to the site. CPC helps us evaluate the effectiveness of an advertising campaign and adjust bids. The CPC indicator is influenced by several factors – the ad itself, its quality score (CTR), the region of display, time, competitors showing ads for the same key phrases.
CPC = Advertising Cost / Clicks
CPA (Cost per Action)
Cost Per Action is used as an indicator of the cost of attracting one client or performing a targeted action.
CPA includes payment models such as: CPL (Cost Per Lead), CPV (Cost Per Visitor), CPI (Cost Per Install), CPC (Cost Per Click), CPS (Cost Per Sale), CPO (Cost Per Order ) and CPM (Cost Per Mile). This is due to the fact that CPA involves attracting customers with the ability to pay for any user action.
CPA = Advertising Cost / Targeted actions
LTV (Lifetime Value)
LTV is an indicator of the profit that a business receives over the entire period of working with a client. Customer Lifetime Value is considered one of the key values in marketing and e-commerce in general. The metric shows how much is spent on attracting, retaining, engaging and how much income the company receives from all this.
LTV = Average bill × Average operating time
ROAS (Return on Ad Spend)
It shows how profitable an investment in advertising is and allows you to measure the effectiveness of both an entire campaign and individual ads or a group of them, as well as keywords. Using it, you can determine the degree of payback according to the following principle:
ROAS is less than 100% – the campaign is at a loss;
ROAS is equal to 100% – the advertising paid for itself, but did not bring any profit (it went to zero);
ROAS is more than 100% – the campaign was successful and brought profit.
Employees typically compare these metrics across multiple campaigns to determine the most profitable source. And all this is not calculated for a specific period, but for the entire time that the advertising was active.
This metric shows the return on marketing costs: advertising, website, SEO promotion, email campaigns, blog, and so on. ROMI takes into account only marketing costs, and does not include the costs of producing goods, employee salaries, or renting premises.
The indicator demonstrates how profitable or unprofitable a project or product is.
Investments are a contribution directly to the business, that is, expenses for employee salaries, rent of premises, marketing, purchase of raw materials and materials, purchase of software and services necessary for work.
ROI = (Revenue – Cost) / Cost × 100
It is impossible to determine which of these parameters is best. The choice depends on the level of competition in the niche and the positions you want to occupy. Some indicators are not indicative for analytics in isolation from the context, so they must be calculated together with other metrics.
Testing and analysis the marketing hypothesis
The theory is over. Let’s start practicing!
In the previous paragraphs, we created a coupon in Advanced Dynamic Pricing for WooCommerce and uploaded a sales report using export. What data do we have? From the report we know information about our customer, his/her purchases and coupons. Let’s say our marketing hypothesis was:
“If you give a coupon for subscribing to the newsletter, your income will increase by 20%.”
Let’s take a look at the data from the report:
Order Number
…
Order Total Amount
…
Coupon Name
…
12345
1302
SPOOKY15
12346
590
SPOOKY15
12347
436
12348
2098
12349
377
SPOOKY15
Total amount:
4803
Let’s imagine that last Halloween the income was 4000 dollars, then the percentage by which the income increased will be as follows:
(4803 – 4000) / 4000 × 100% = 20%
Our hypothesis is confirmed and income actually increased by 20% thanks to the coupon. But, as stated above, indicators do not work in isolation from each other, so let’s calculate other metrics to find out how effective our marketing hypothesis is.
How do users find out about the subscription coupon? Obviously, a simple ad on your site is not enough to achieve this. That’s why we launched contextual advertising in Google Ads. We also set up a goal in this application – a paid order.
The advertising cost was $200, there are 1000 impressions, there are 20 clicks, and there is 1 targeted visit. Based on this, we calculate CTR, CPC and CPA:
CTR = 20 / 1000 × 100% = 2%
CPC = 200 / 20 = 10
CPA = 200 / 1 = 200
There aren’t many impressions, but the CTR is excellent. 2% is an average value that shows that our advertising is relevant to users.
The CPC is $10, which is quite high for a cost per click. This means that advertising is carried out using popular keywords, where there is a lot of competition. But don’t panic. With the help of advertising, we attracted one client who carried out the targeted action – made an order. We don’t know who it was, but even so we can say with confidence that the advertising paid off and brought us at least $177 (we subtract the CPA value from the cheapest order with a coupon).
Let’s find out how profitable our hypothesis turned out to be.
ROI = (4803 – 200) / 200 × 100% = 2301.5%
Note: For simplicity, we do not include many types of expenses. In real life, you won’t get such a large percentage.
An ROI above zero indicates that the hypothesis is actually profitable. But is it more profitable than last year? In 2022, Halloween revenue was $4,000. Expenses included advertising our store – $50.
ROI = (4000 – 50) / 50× 100% = 7000%
Last year’s ROI is significantly higher than this year’s. However, this does not mean that the current marketing strategy is completely ineffective, since the net profit from it is:
4803 – 200 = 4600
and from the previous one:
4000 – 50 = 3 950
Thus, ROI should not be taken as an indicator of profitability. It only shows whether your investment is paying off. It is only important that its value is positive. As for the effectiveness of the marketing hypothesis, it turned out to be successful. Thanks to advertising, income increased by 20%, and 1000 users learned about our store! If we added other fields to the report, many more hypotheses could be analyzed. The possibilities for customizing reports in Advanced Order Export for WooCommerce are endless.
In this article, we examined in detail the process of analyzing Halloween sales using Advanced Dynamic Pricing for WooCommerce, Advanced Order Export For WooCommerce and various metrics. We wish you high results!
Efficient order management is a critical component of running a successful WooCommerce store. As your business grows, so does the need to handle large volumes of customer orders quickly and accurately. One of the most time-consuming tasks store owners face is extracting the right order data at the right time. Whether you need to prepare a sales report, share order details with your logistics partner, or analyze payment trends, filtering and exporting WooCommerce orders by status, date, or payment method becomes essential.
WooCommerce offers basic export capabilities, but they rarely meet the needs of stores dealing with thousands of orders or custom workflows. This is where the Advanced Order Export for WooCommerce plugin by AlgolPlus provides a robust and scalable solution. Designed for store owners, accountants, warehouse managers, and developers, the plugin enables deep customization of exports, giving you the flexibility to extract only the data that matters to your operation.
Why Precise Filtering Makes a Difference
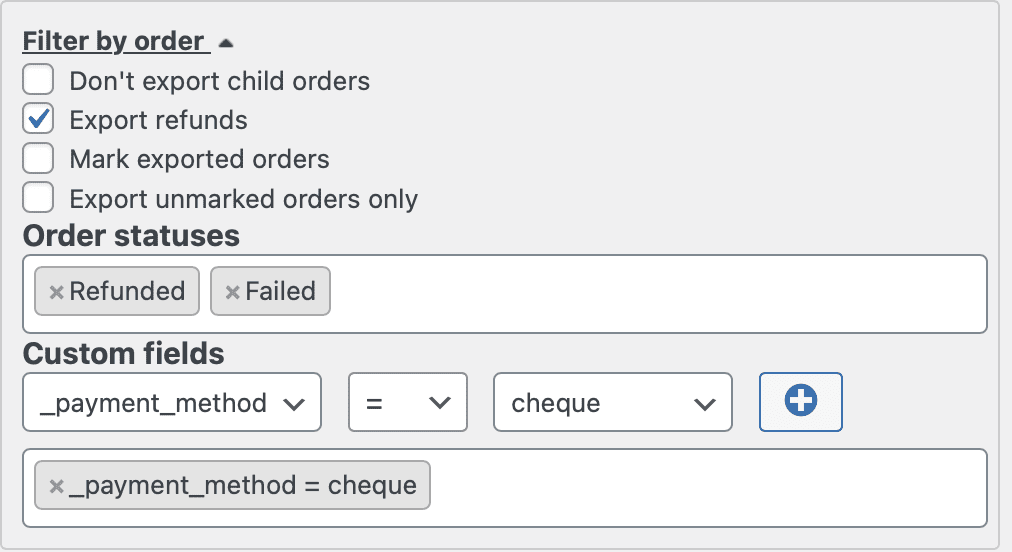
In WooCommerce, not every order carries equal importance. You might want to export only completed orders for invoicing, or filter out pending orders when preparing shipment data. Similarly, when handling refund requests, failed transactions, or subscription renewals, exporting orders by payment status or gateway becomes a necessary part of your workflow. With the ability to filter by date range, you can also generate time-sensitive reports for monthly sales reviews or tax calculations.
Using the Advanced Order Export plugin, you gain access to a powerful filtering engine that supports these use cases and more. You can select specific order statuses like completed, pending, or failed. You can narrow results to a custom date range, whether it’s today’s orders or an entire quarter’s worth. Additionally, you can filter by payment methods such as credit card, PayPal, or bank transfer, allowing for detailed financial breakdowns or payment gateway reconciliation.
Filter by the order status and additional filter by the payment method
Automating Exports to Save Time and Reduce Errors
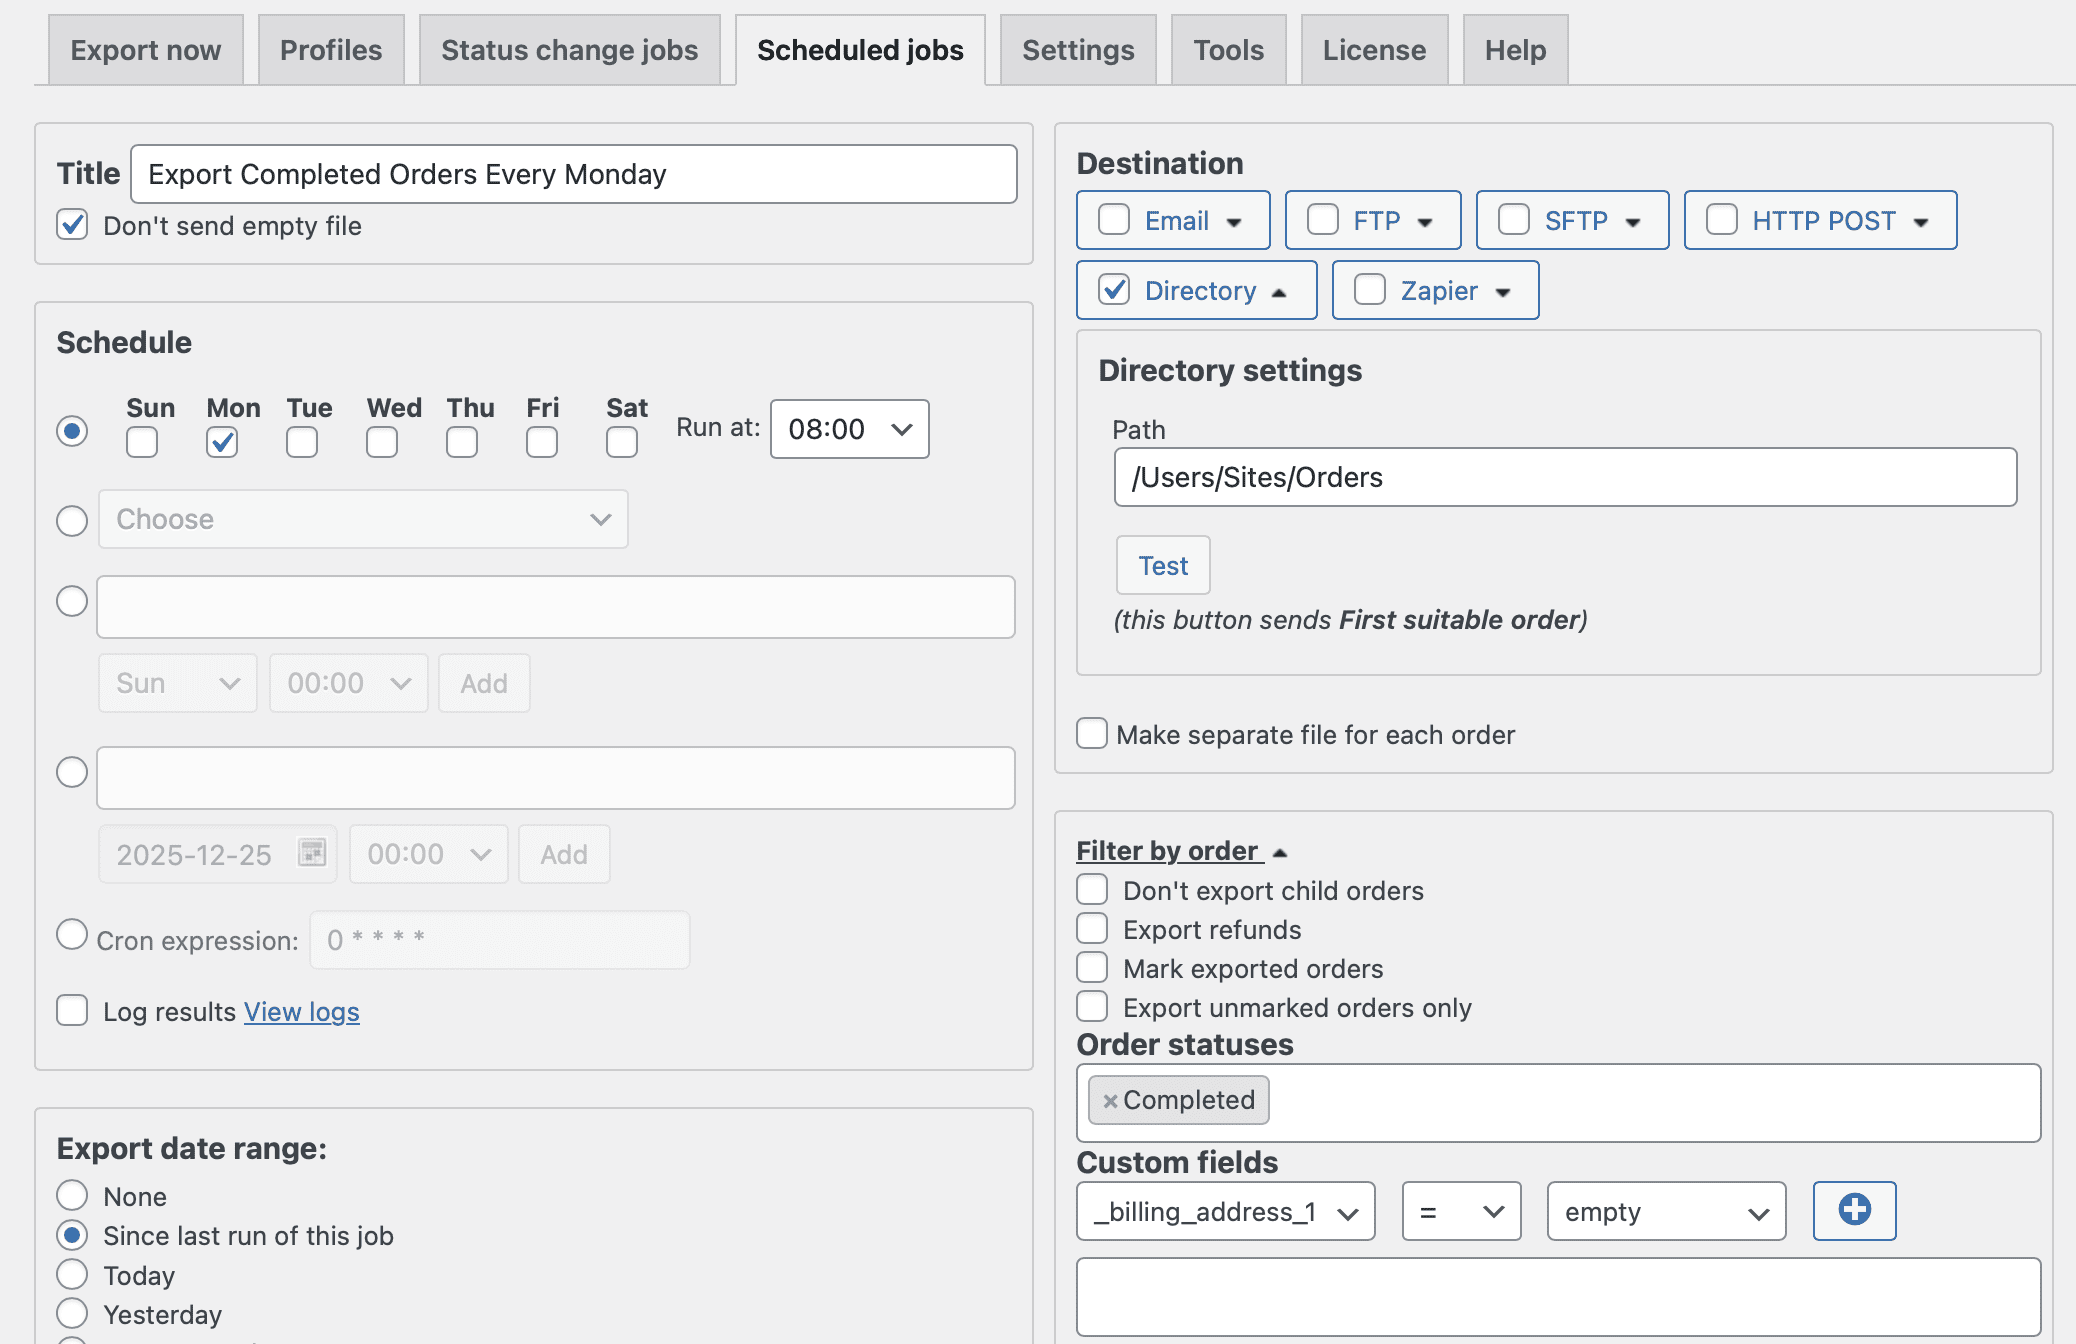
What sets this plugin apart is not only its ability to filter but to schedule and automate exports. Once your filters are set, you can define export jobs that run on a fixed schedule or are triggered by order status changes. For instance, whenever an order moves to “processing,” it can automatically be included in a real-time export sent to your warehouse team. Or, each Friday, you might schedule a report of all orders paid via PayPal within the past week. This automation ensures that your data is always current and eliminates the need for manual intervention.
The example of the scheduled export of the completed orders every Monday on the local directory
You can also send the filtered exports directly to destinations like email addresses, FTP servers, or third-party services via webhooks or Zapier. This is especially valuable for businesses with external teams or integrated systems that rely on real-time order data for fulfillment, billing, or analysis.
Designed for Flexibility and Custom Business Logic
AlgolPlus has engineered this plugin to support a wide range of eCommerce scenarios. Whether you’re exporting WooCommerce orders with custom fields, managing international orders, or filtering by shipping methods or product types, the plugin adapts to your business model. Its user-friendly interface allows even non-technical users to build complex export rules, while developers benefit from compatibility with custom code and integration points.
For businesses that rely on structured data, the ability to export orders in multiple formats like CSV, Excel, XML, and JSON ensures compatibility with CRMs, ERPs, and accounting software. You’re not limited to rigid export templates – instead, you can tailor every column, format, and rule to fit your specific operational needs.
Choose one of the most popular file format for exported order and adjust it as you need it
Turning Export Data into Business Value
When you can quickly export WooCommerce orders by status, date, or payment method, you gain more than just efficiency. You get better insights, faster response times, and stronger alignment between departments. Your support team gets the data they need to resolve issues, your finance team has the numbers for accurate accounting, and your logistics partners always have up-to-date delivery instructions.
By using Advanced Order Export for WooCommerce, you turn raw data into actionable intelligence while reducing the risk of human error. Whether you run a small niche store or a multi-channel enterprise, this plugin empowers your team to move faster, work smarter, and serve customers more effectively.
In the ever-evolving world of eCommerce, control over your data is not a luxury – it’s a necessity. With this plugin, you get exactly that.