In this video you will find out how to use Backup tool in Avanced Dynamic Pricing For WooCommerce.
19
Oct, 2023
In this video you will find out how to use Backup tool in Avanced Dynamic Pricing For WooCommerce.

Table of Contents
Black Friday is a quite busy time! To serve your phone orders even faster on this hot day, use bar code scanner mode. This mode allows you to scan the bar code of any item you wish to purchase, and it automatically adds the item to the customer’s order. The ability to connect a scanning device helps to optimize and reduce service time for each client.
Prepare in advance for the holiday and enable this mode!
Note: this feature is available in the pro version.
All you have to do is buy a scanner, connect it to your computer and activate the bar code scanner mode:


After you have activated the mode, the following message will appear on the order creation page:
Barcode mode enabled! Product search works only after pressing the Enter key

Let’s try to find a product.

If you are unable to scan an item, it may be due to the following common reasons:
If the problem still persists, then write to our support. We will resolve the situation.
Now you can activate the scanner, bring it to the barcode and in a second it will determine what product it is, its price, and then it will all go to the receipt. Adding products to an order will no longer take much time. This Halloween, no one will be left without good service!
Table of Contents
As an online store owner, it is crucial to have a smooth and efficient order export process in place. This process involves exporting orders from your WooCommerce store to a file that can be easily shared with third-party platforms or fulfillment services.
In recent years, the use of order export plugins for WooCommerce has become increasingly popular among store owners. These plugins offer a range of features that can simplify and streamline the order export process. However, like any other technology, there are some common mistakes that store owners make when using these order export plugins. In this article, we will discuss these mistakes and how to avoid them.
The first and most crucial mistake that store owners make is not selecting the right plugin for their needs. With a plethora of order export plugins available in the market, it can be overwhelming to choose the right one. However, it is essential to do thorough research and select a plugin that meets your specific requirements. Some plugins may have features that you do not need, while others may lack critical functions. Take your time to evaluate different options and choose the one that best suits your store’s needs.
You can read a review of the plugins in this article.
Another common mistake is not checking the export format before exporting data. WooCommerce offers various export formats, such as CSV, Excel, and PDF. Each format has its own advantages and limitations, and choosing the wrong format can result in data being exported in an unusable or unreadable format.
Advanced Order Export for WooCommerce has even more formats, such as TSV, HTML, XML and JSON. Moreover, you can export your orders to other services using Zapier.
Many merchants make the mistake of not scheduling regular exports and instead only exporting data when needed. This can lead to missing out on important data and insights that can help improve their business. Regularly exporting data allows merchants to track trends and identify patterns, which can be used to make data-driven decisions.
To avoid this mistake, merchants should set up a schedule for regular exports, depending on their business needs. This can be daily, weekly, or monthly, depending on the volume of orders and the frequency of changes in their data.
Watch our video on how you can schedule your exports in Advanced Order Export for WooCommerce.

Another mistake that merchants make is not filtering the orders before exporting them. By default, WooCommerce exports all the orders, including cancelled and refunded orders. This can lead to confusion and inaccurate data analysis. Therefore, it is crucial to filter the orders based on their status, date, and other criteria before exporting. This will ensure that you only export the orders that are relevant to your purpose.
Merchants often make the mistake of not regularly backing up their data. This can result in losing crucial data in case of system crashes, accidental deletion, or other unforeseen circumstances.
To avoid this mistake, merchants should make it a habit to regularly back up their data. They can also use backup plugins or services to automate this process and ensure their data is always safe.
You might have missed it: a video about the backup tool function, with which you can copy your export settings.

We shows you the most common mistakes that users make when choosing and using an export plugin. They are often caused by inattention and can be corrected manually. However, if you have a problem and you don’t know how to solve it, then feel free to write to our support. The Advanced Order Export for WooCommerce plugin team is always ready to help you!
Table of Contents
Advanced dynamic pricing is an innovative and ever-evolving pricing strategy that is used by businesses to maximize profits and competitiveness. As the name suggests, dynamic pricing involves changing prices based on market conditions and customer demand. This strategy can be incredibly effective in increasing revenue and profits, but it requires a lot of creativity to be successful.
The human brain processes visual data 60 thousand times faster than text. Therefore, creative ads allow you to convey information about your brand and products to customers more effectively than just text.
Creative advertising:
Interesting advertising is most often created using tropes. Tropes are a concept from literature that denote the expressive means of language. Tropes include metaphor, hyperbole, allegory and others.
At the heart of any marketing campaign is concept. A concept is not just an illustration of an object; the emphasis is on its characteristics. Creative advertising of services and products should demonstrate the competitive advantages of the product.
Therefore, attention should be focused on a couple of advantages and talked about them using tropes. The rule is: for each property – one trope. How it works will become clear from the following examples.
Exaggeration (hyperbole)
The Nikon S60 camera promotion used exaggeration. The main feature of this technology – the face detection function – was chosen as a competitive advantage. Nikon marketers exaggerated this property: the poster shows how the camera recognizes, in addition to humans, the figures and faces of ghosts in a hotel.

Obviously, the new Nikon model cannot recognize ghosts, especially as demonstrated on the poster, and the very question of the existence of ghosts is controversial. However, the goal of the campaign was achieved: the advertisement turned out to be unusual and catchy.
Understatement (litote)
It turns out that not every advantage of a product is important to exaggerate in order to get attention. You can go backwards and downplay the shortcomings. Or turn properties undesirable for the buyer into almost advantages using a trope called litotes.
Siemens has an advertisement that shows that the new model of vacuum cleaner is so quiet that it does not distract from watching the opera. Of course, this is a clear understatement. But the idea itself is interesting and creative.

Comparison
This trope involves comparing one object to another based on their common properties. In advertising, a product is compared with an analogue. Since the promoted product looks better than the abstract product, it creates the feeling that it is better than all competitors.
A well-known Duracell batteries used comparison in advertisement, which compares the operation of a toy on two types of batteries. Of course, devices run longer on Duracell than on conventional batteries. Advertising slogan: “Duracell – nothing lasts so long.”

The above image is considered one of the most successful in the history of creative advertising. It has been used with constant success for several decades, demonstrating the main property of batteries – durability. Moreover, it does this in an ironic and visual manner.
Metonymy
This technique consists of designating an object through its attribute or another closely related object. An example would be an advertisement for baby diapers that shows parents sleeping peacefully. This restful sleep is a metonymy for excellent quality diapers, with the use of which the child sleeps for a long time and allows mom and dad to rest.
Metonymy is one of the important advertising tropes, despite the fact that it is not a direct tool with the help of which an image is created.

It is obvious that ideas for non-standard promotion are the product of hard work, the ability to use special tools and the result of the correct presentation of the main characteristics of the product. The main thing is to correctly highlight competitive advantages and know the tools to interpret these properties so that you get the most creative advertising.
Try creating your own marketing company in an unconventional way. Our plugin Advanced Dynamic Pricing for WooCommerce will help you with this. It allows to set up many different types of discounts for each situations.
Especially for our readers, we have selected the most innovative pricing rules and provided instructions for them.
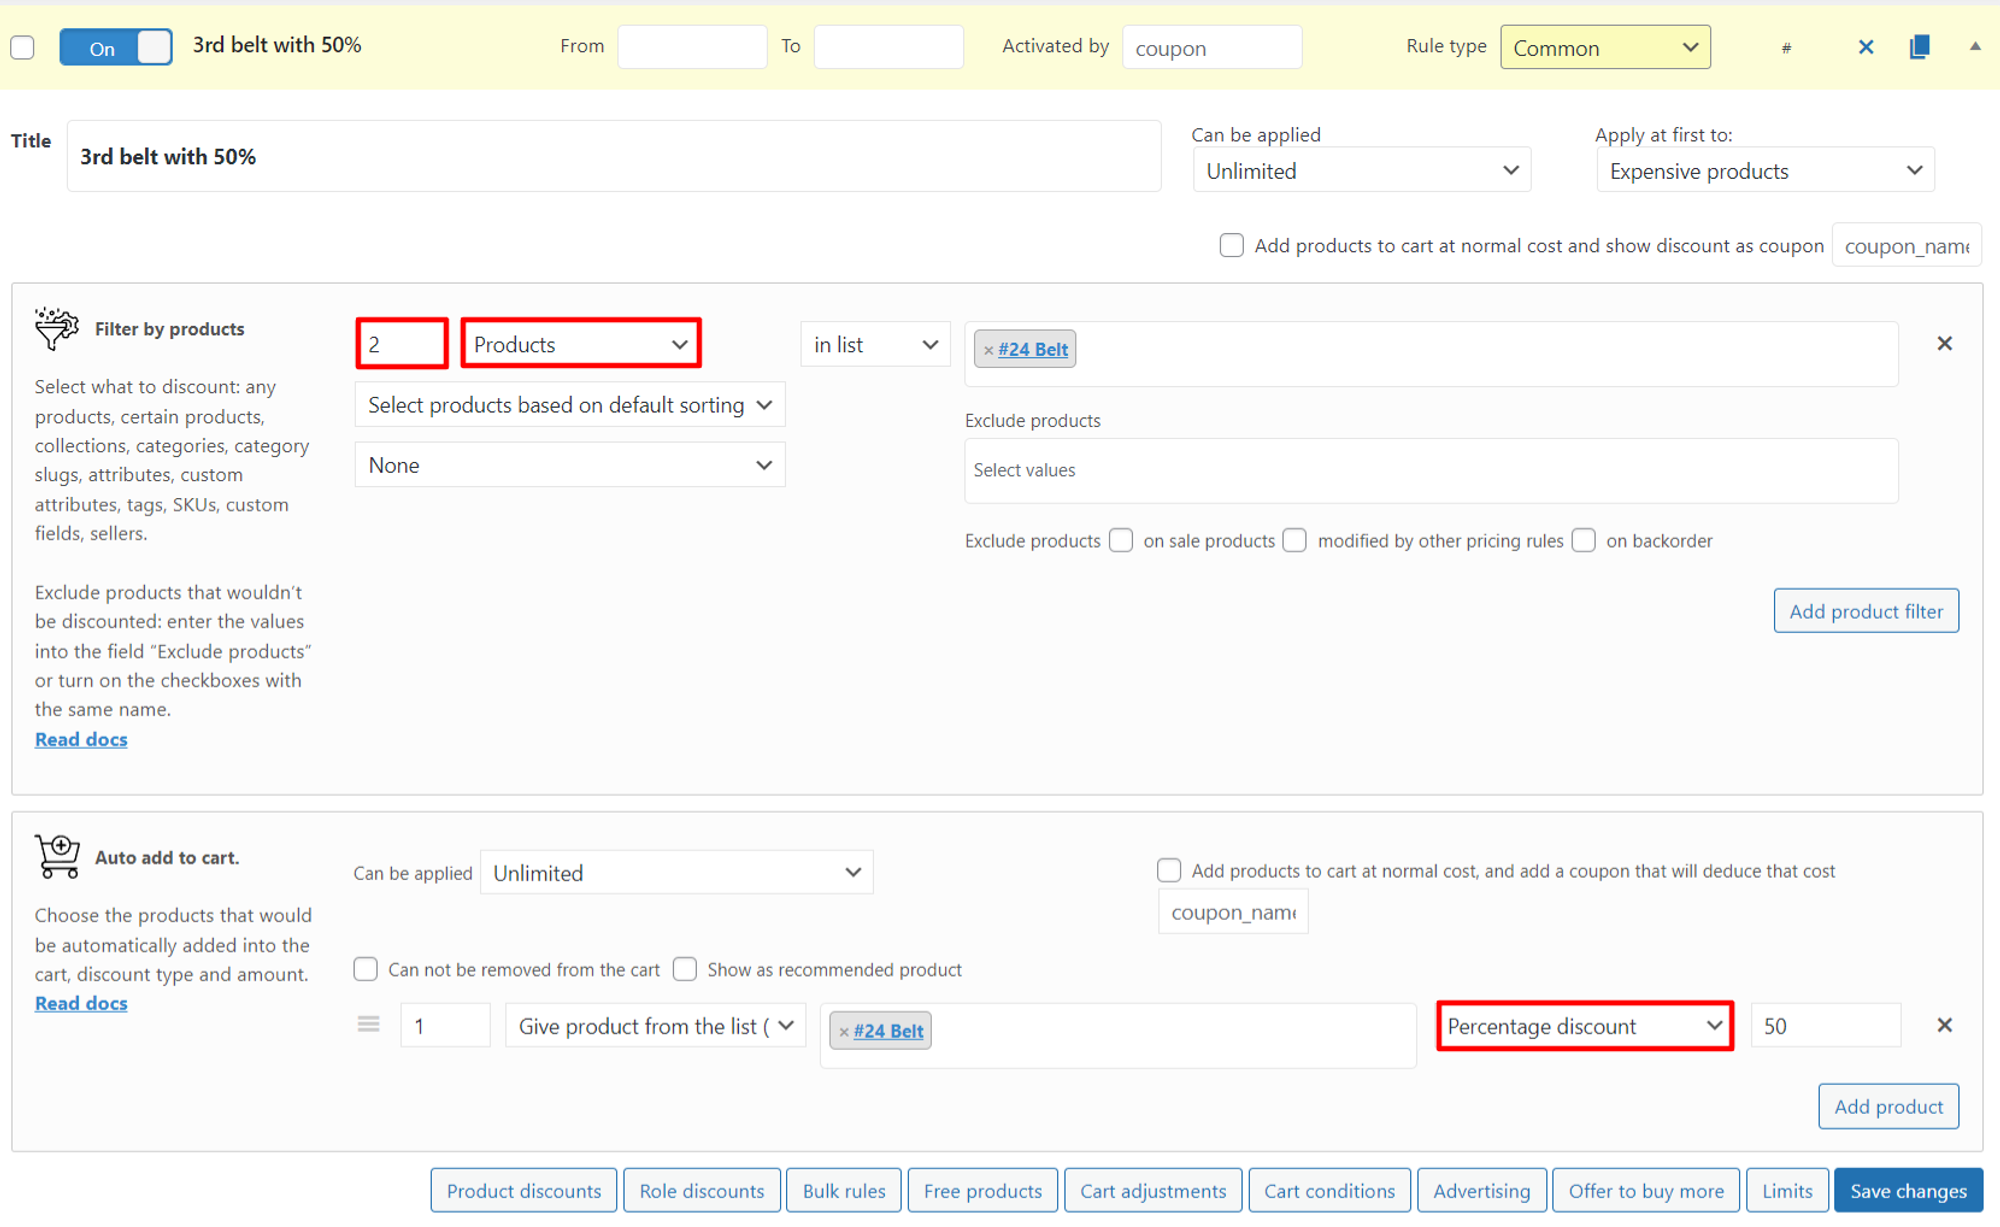
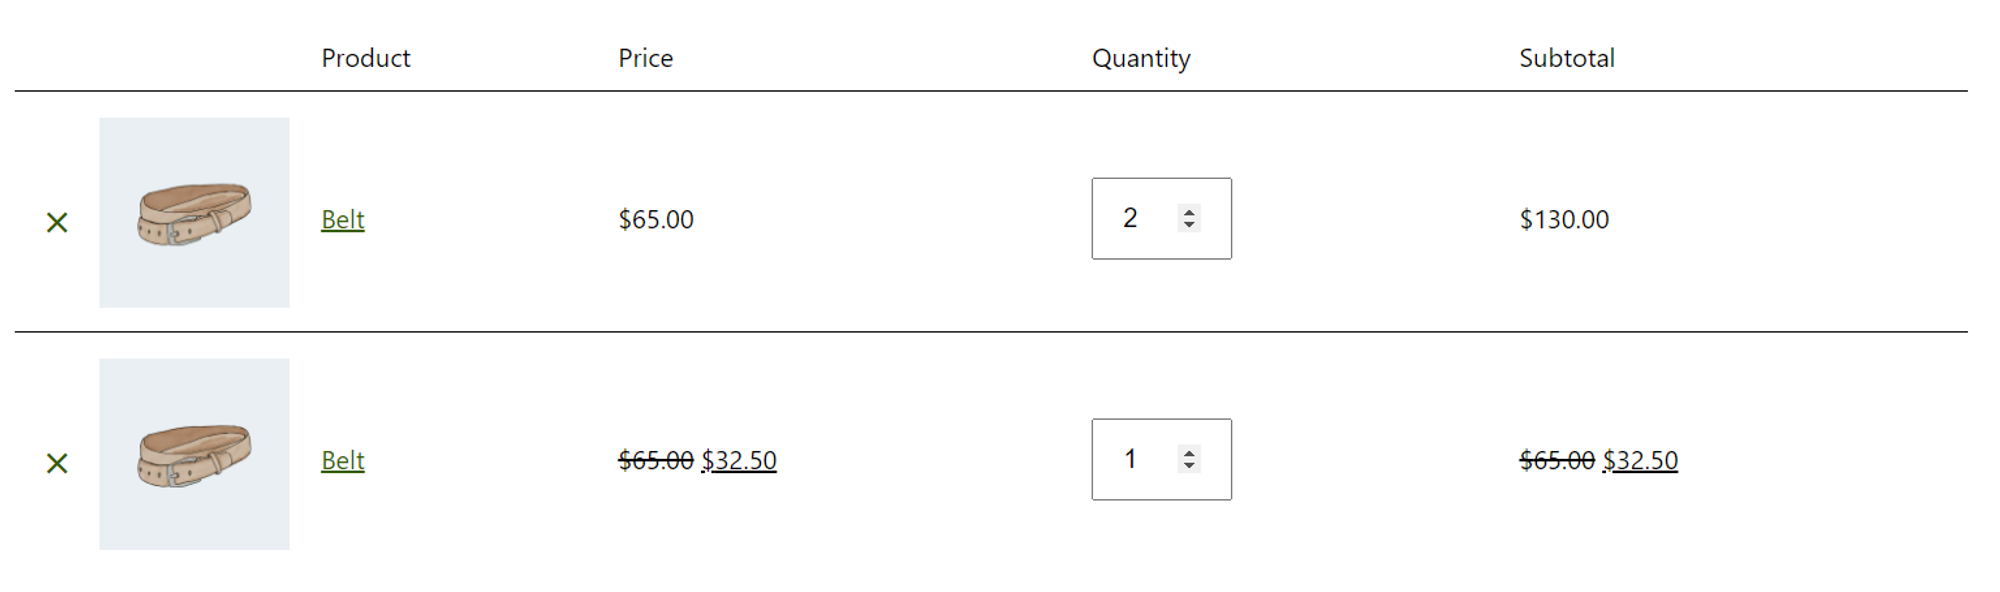
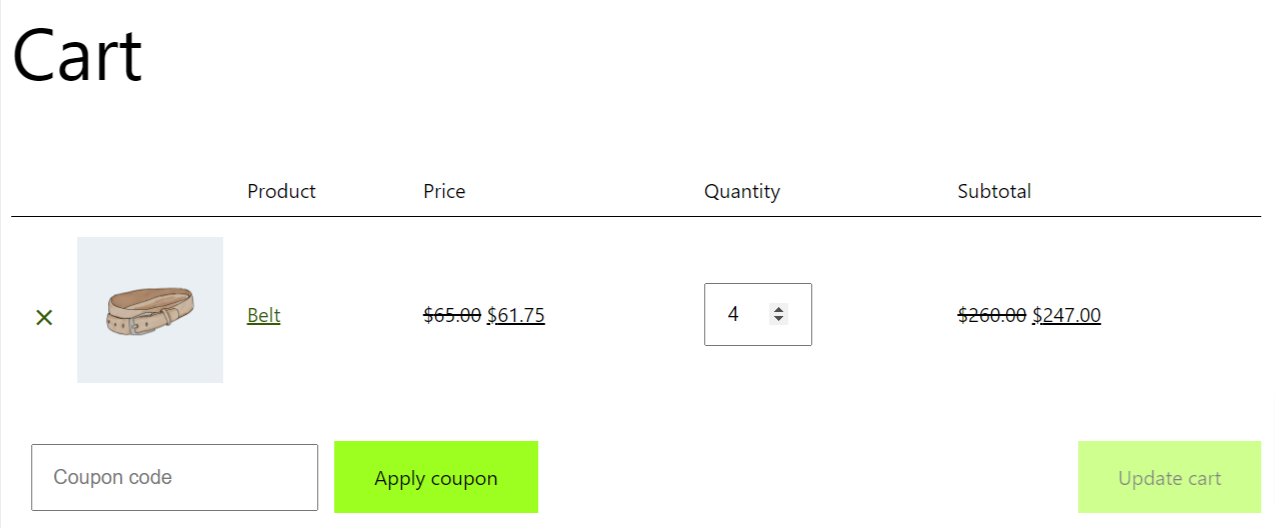
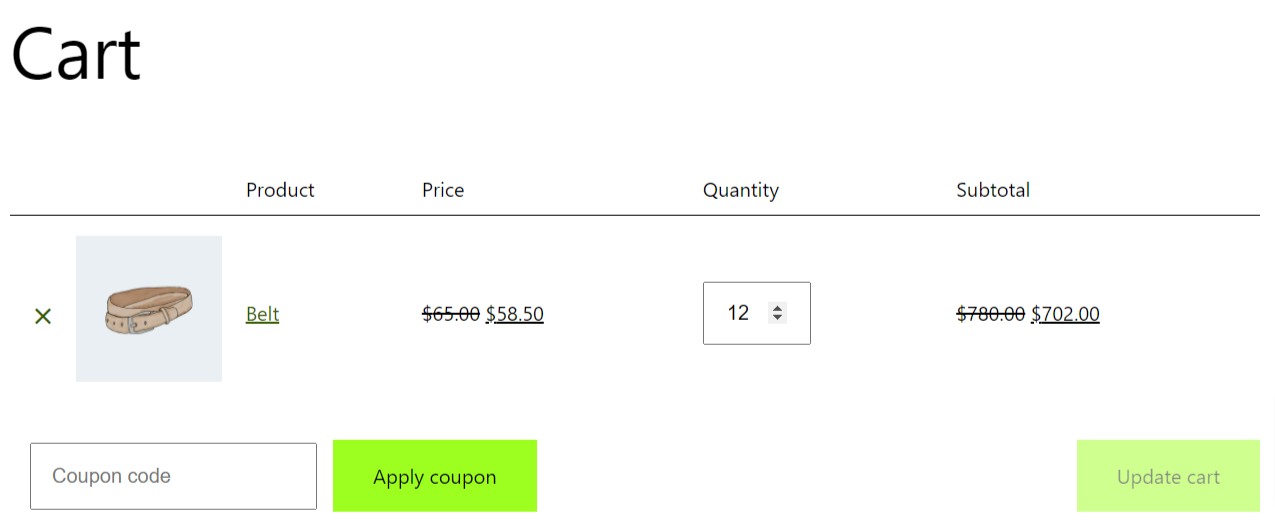
Let’s look at the next rule – buy 2 belts and get 3 with a 50% discount.
Create a rule (blank). Add Filter by products section. Select Products type and set the quantity to 2. Select the product – Belt. Add Auto add to cart section. Select the same product and set the discount for it.
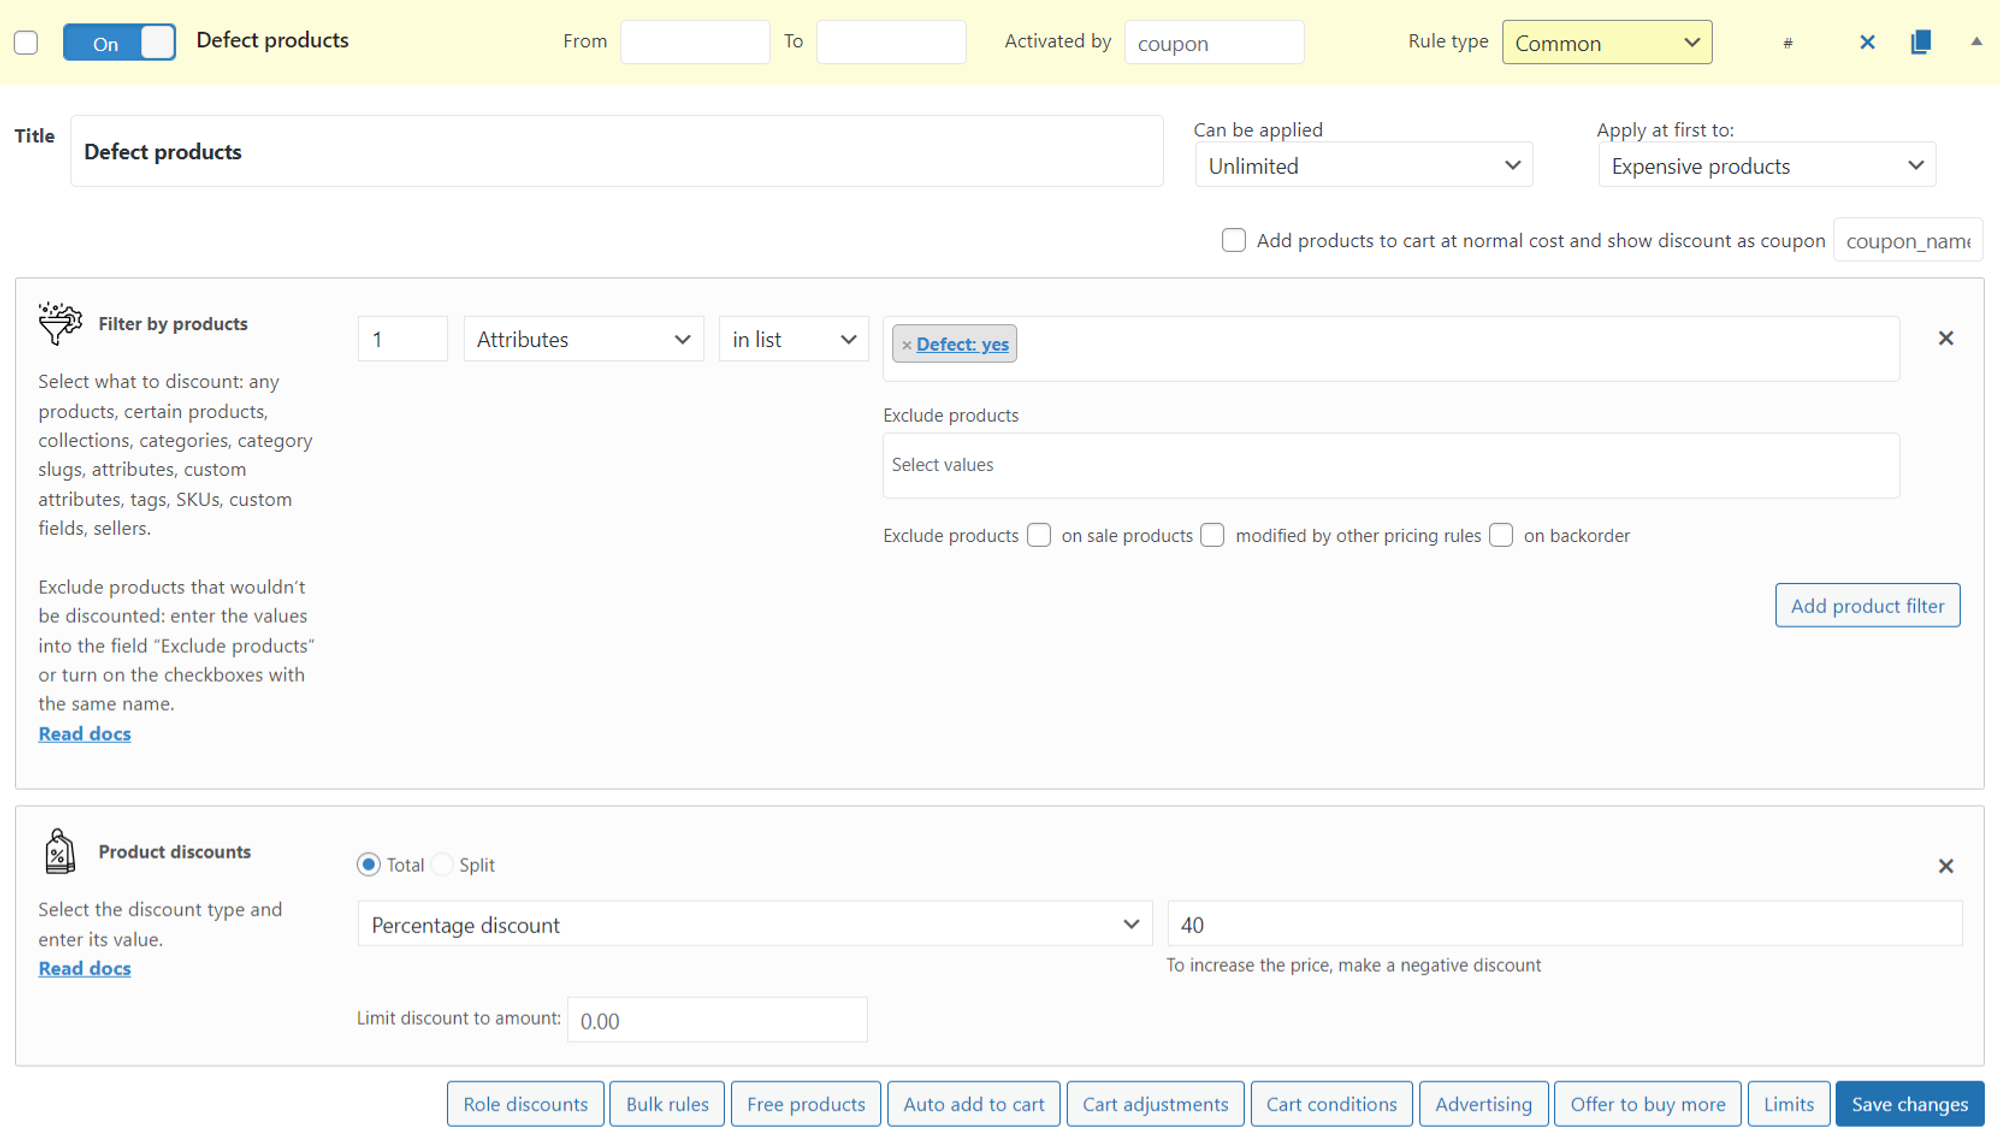
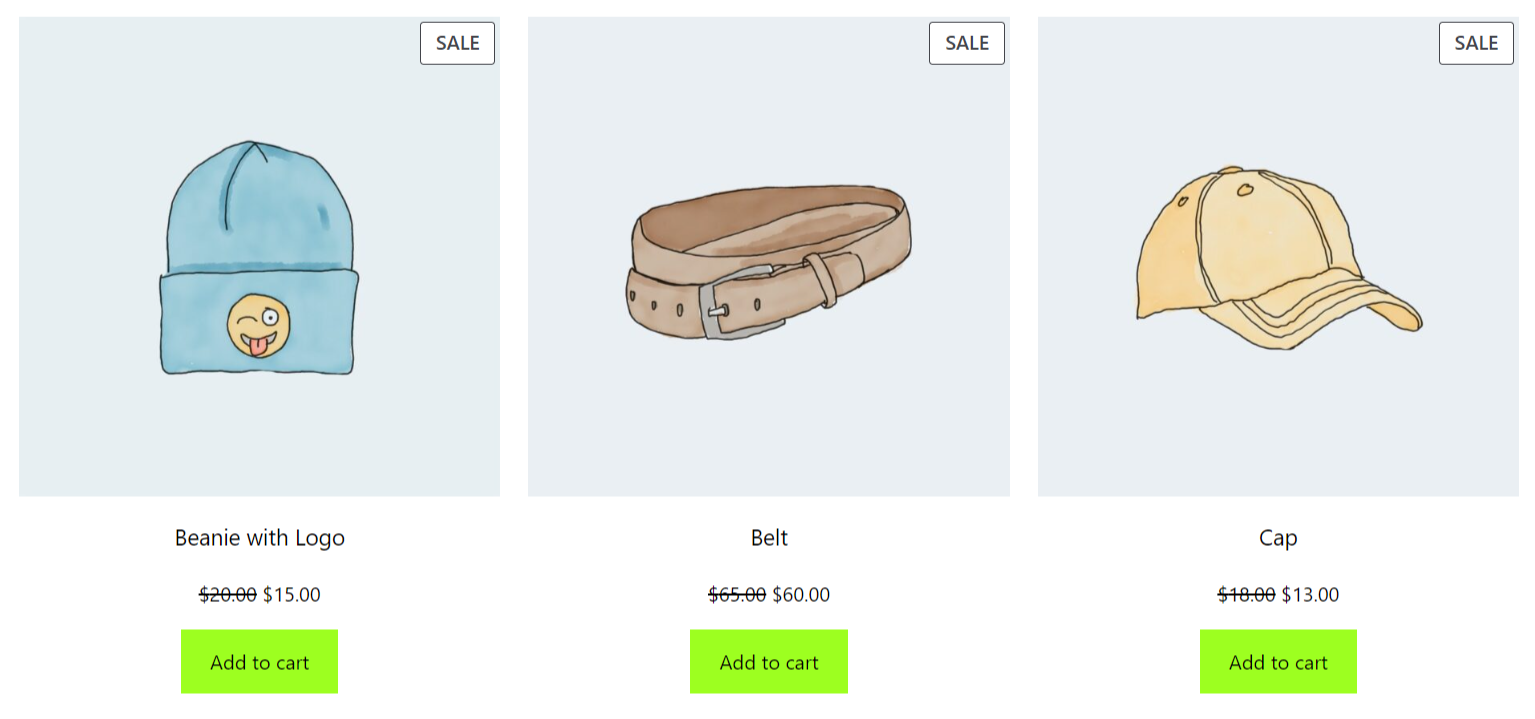
Do you have defective products? For, example it has scratches, abrasions or damaged packagings.
Sell them at a discount via Advanced Dynamic Pricing for WooCommerce!
Create a rule (Product discount). Choose the Attributes type in the Filter by products. Select the attribute. In the Product discount section choose the discount.

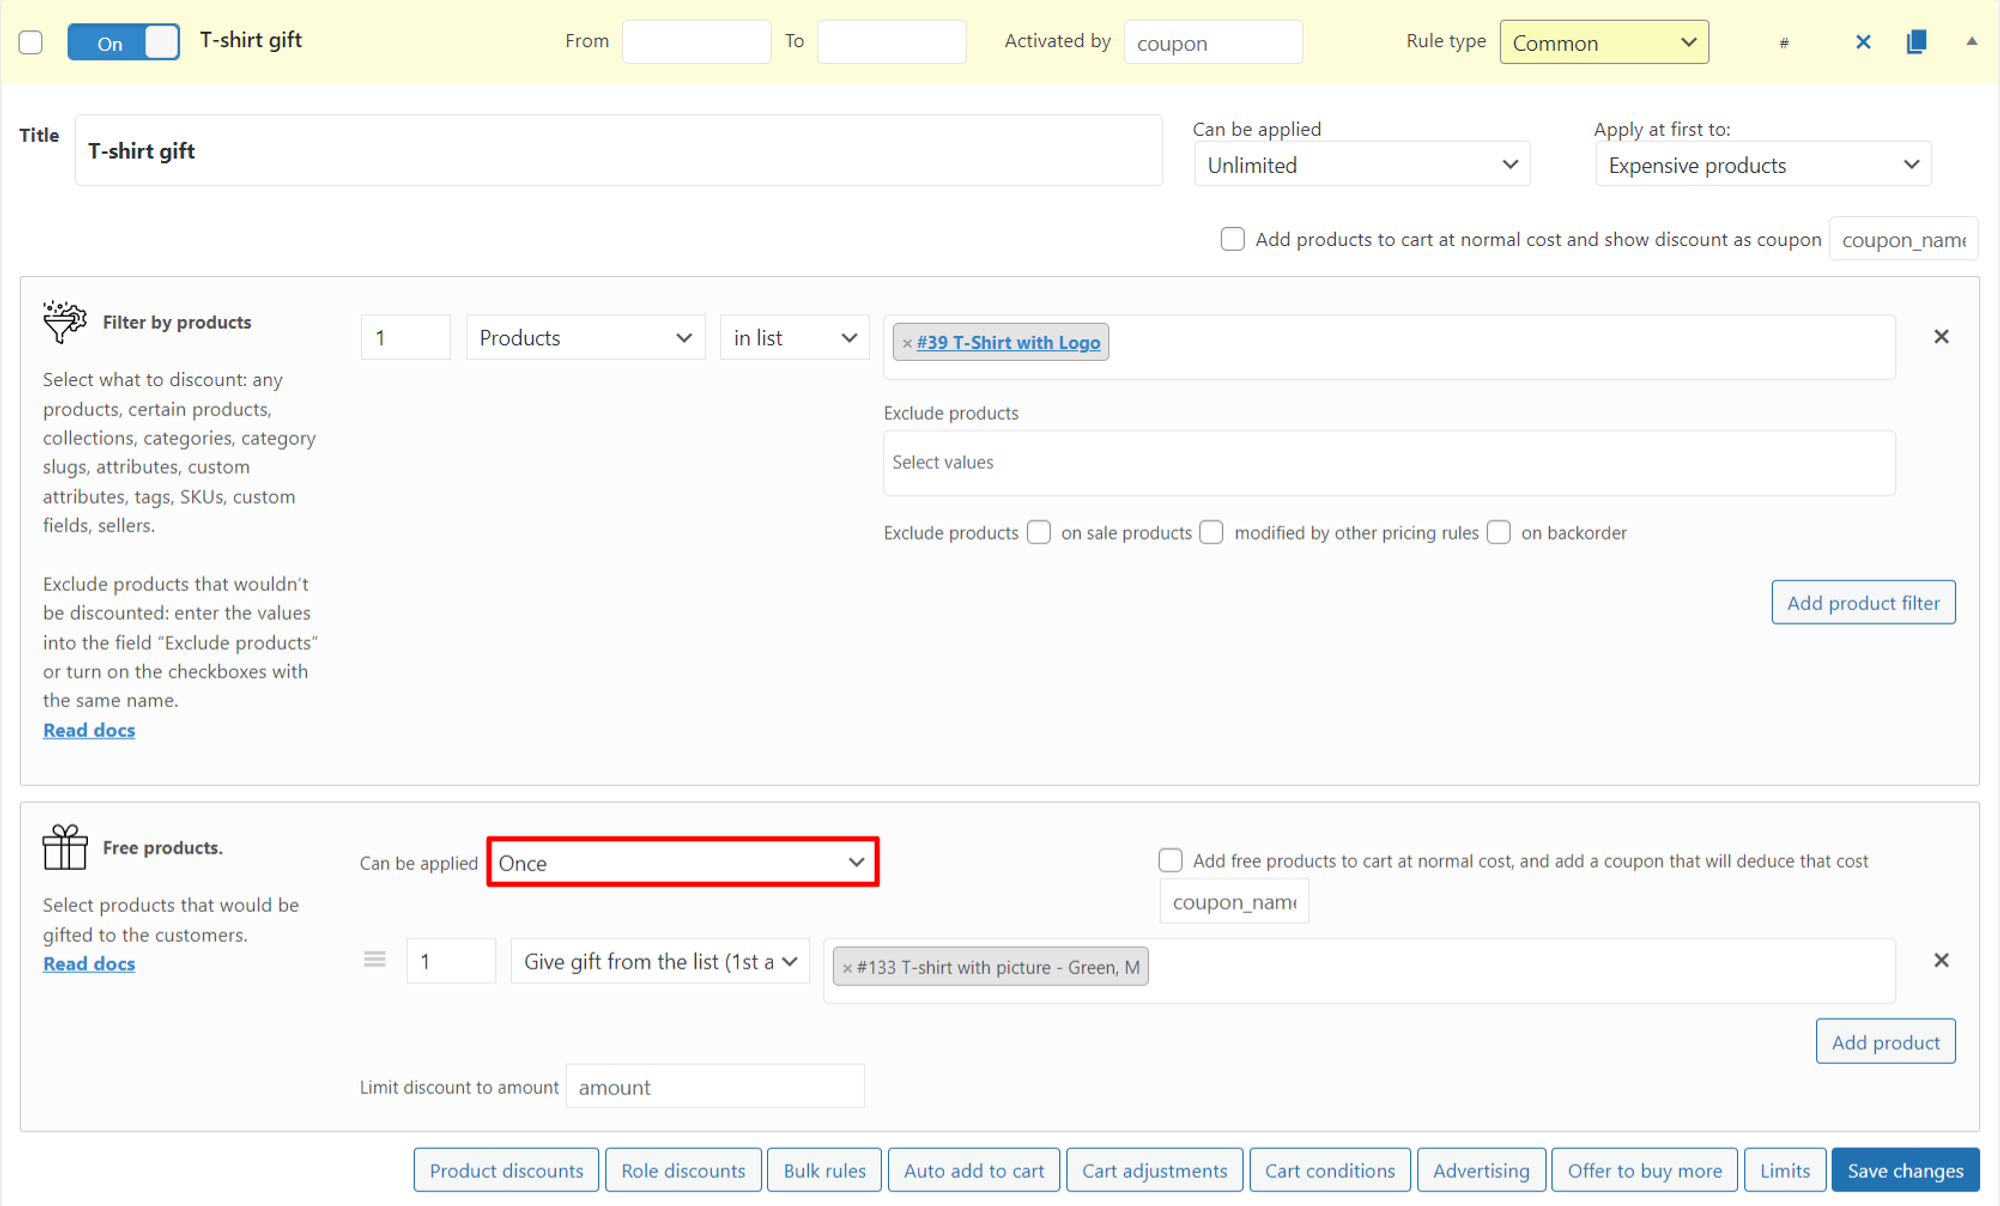
The “buy a partner’s product and we’ll give you our sample as a gift” rule perfectly illustrates the comparison. Obviously, after trying a sample of your brand, the buyer will be able to compare it with a competitive product and make a choice in your favor the next time he/she orders.
Create a rule (blank). Add Filter by products section. Select Products type and the product – Belt. Add Free products section. Select your product.
Note: if you want to give a sample only once, then set Can be applied — Once.

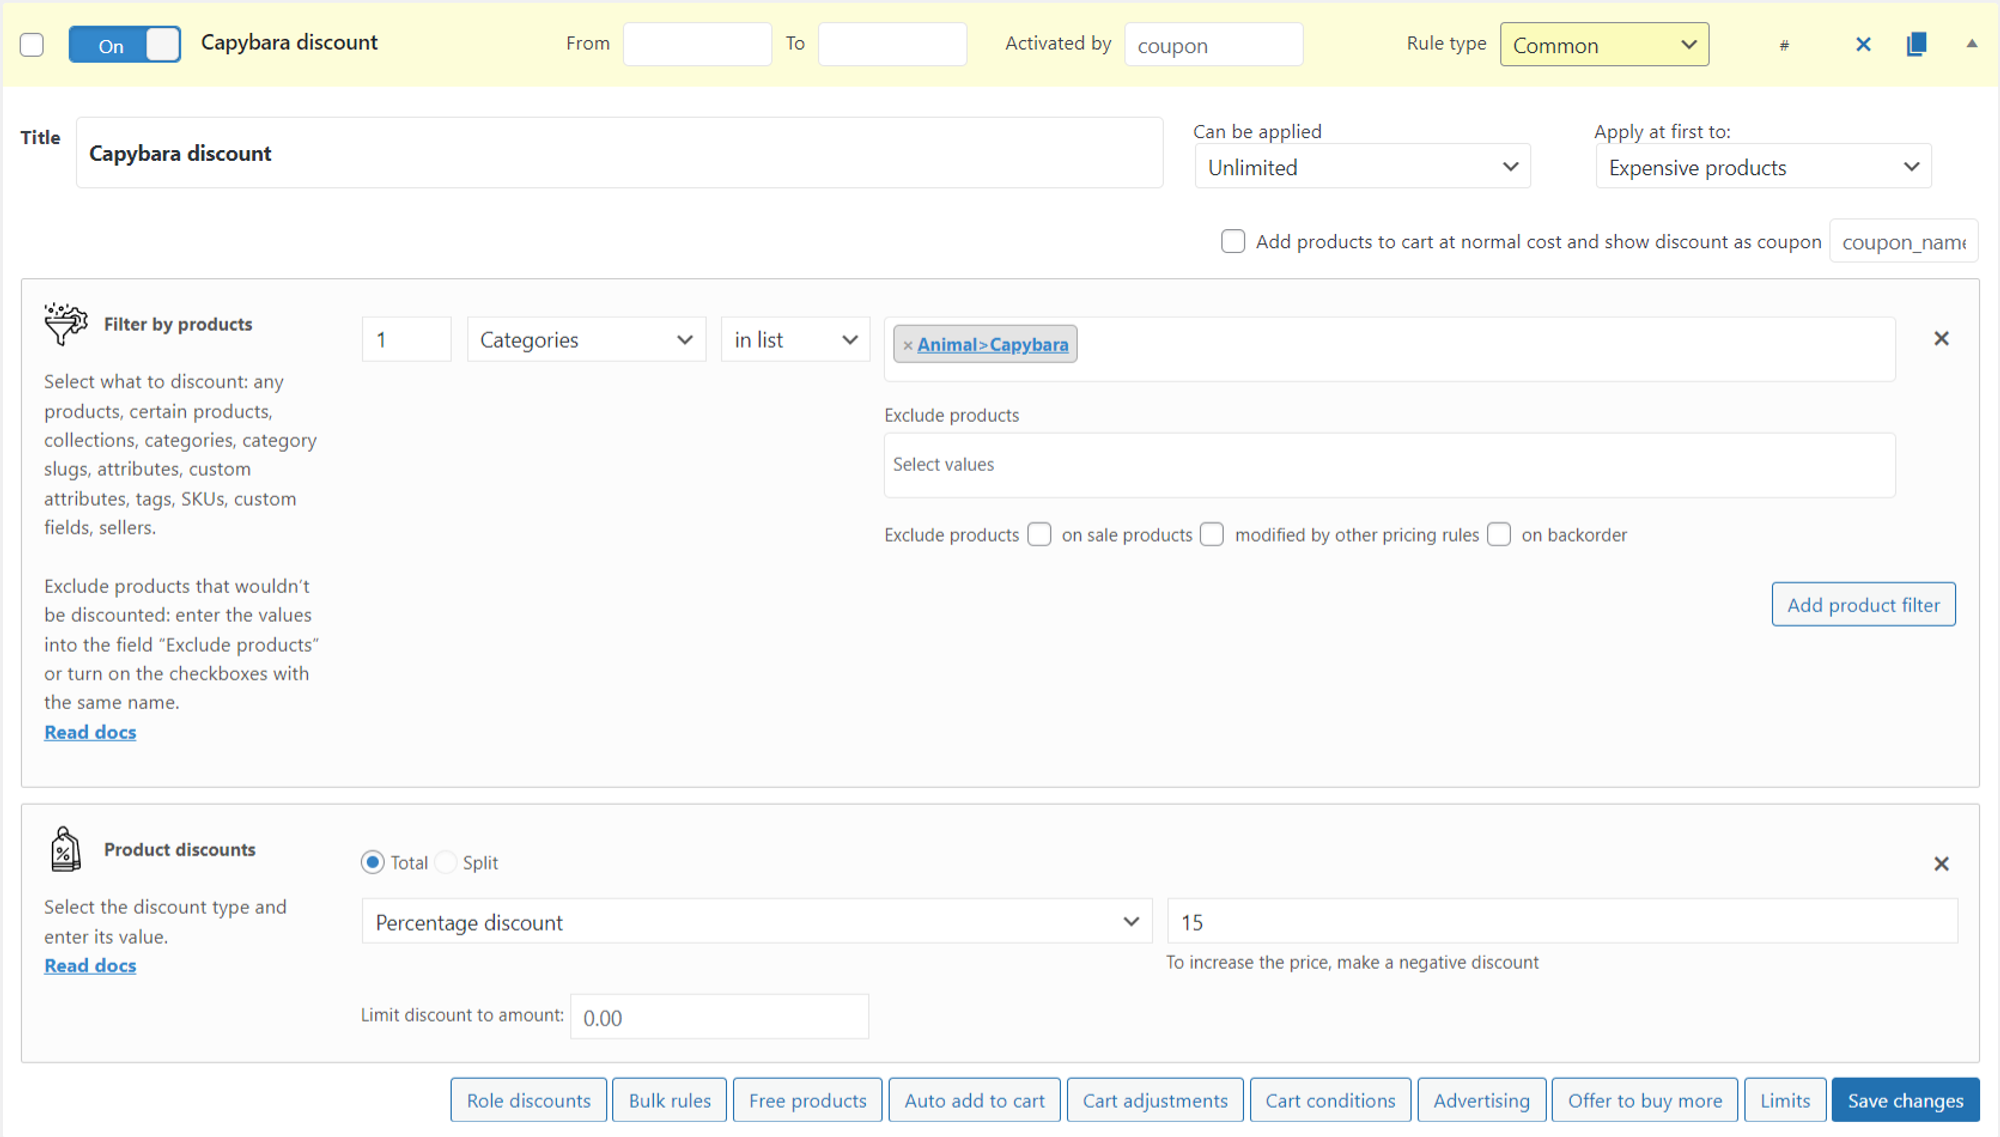
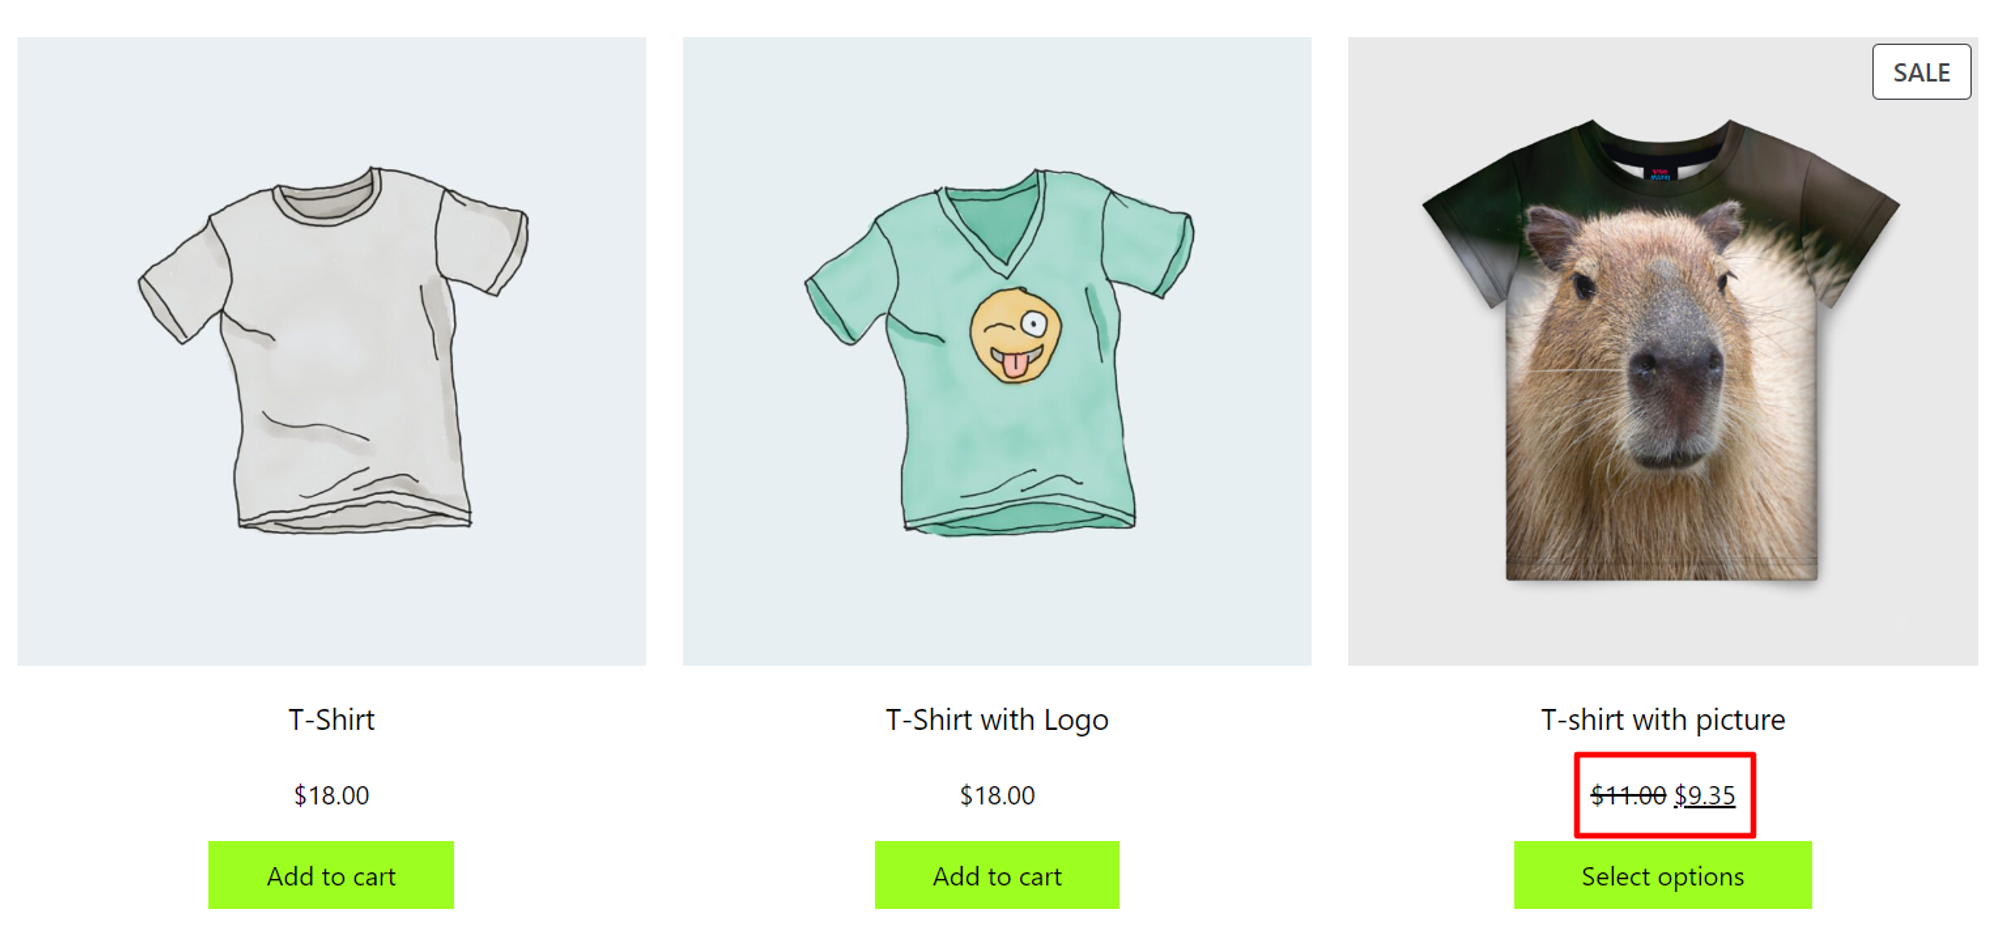
Do you want the client to think about your company first when he sees an object, emotion or animal? Link his purchases with associations. Give a discount for the category you belong to.
For example, your business calls “CapybArt”. You create custom T-shirts.
Create a rule (Product discount). Choose the Categories type in the Filter by products. Select the category. In the Product discount section choose the discount.
In conclusion, creativity is your way to present yourself as a brand. Don’t be afraid to stand out and make a statement. Experiment with different types of advertising and discounts. This is always possible with Advanced Dynamic Pricing for WooCommerce plugin.
Table of Contents
Customizing reports is an important part of any business, whether it be a small business or a large corporation. Reports are an effective way to track progress, analyze data, and identify areas for improvement. For businesses, customizing reports can help ensure that the right information is available to decision makers, leading to better decisions and improved performance.
Customizing reports can also help improve the accuracy of the data. By taking into account the specific variables and conditions of the business, the report can be tailored to provide more accurate and reliable results. This is especially important when dealing with complex data sets.
In addition to improving accuracy, customizing reports can also help save time. Since the reports are tailored to the specific needs of the business, they can be quickly generated. This can help save time and resources that would otherwise be spent on manually creating reports.
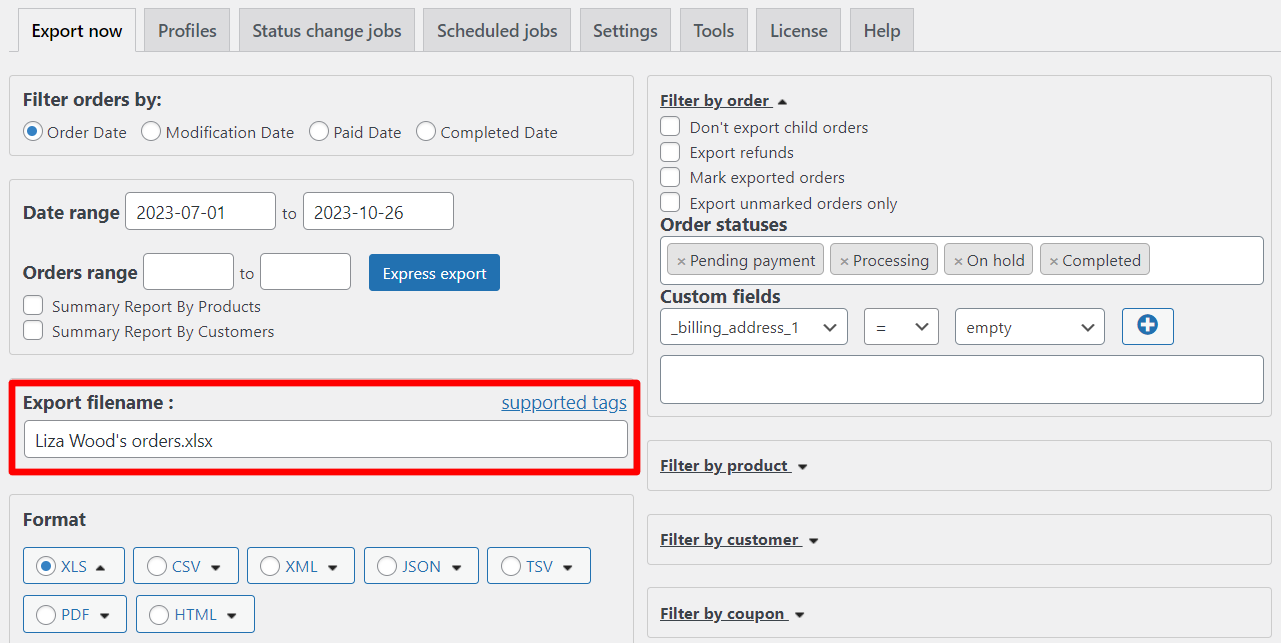
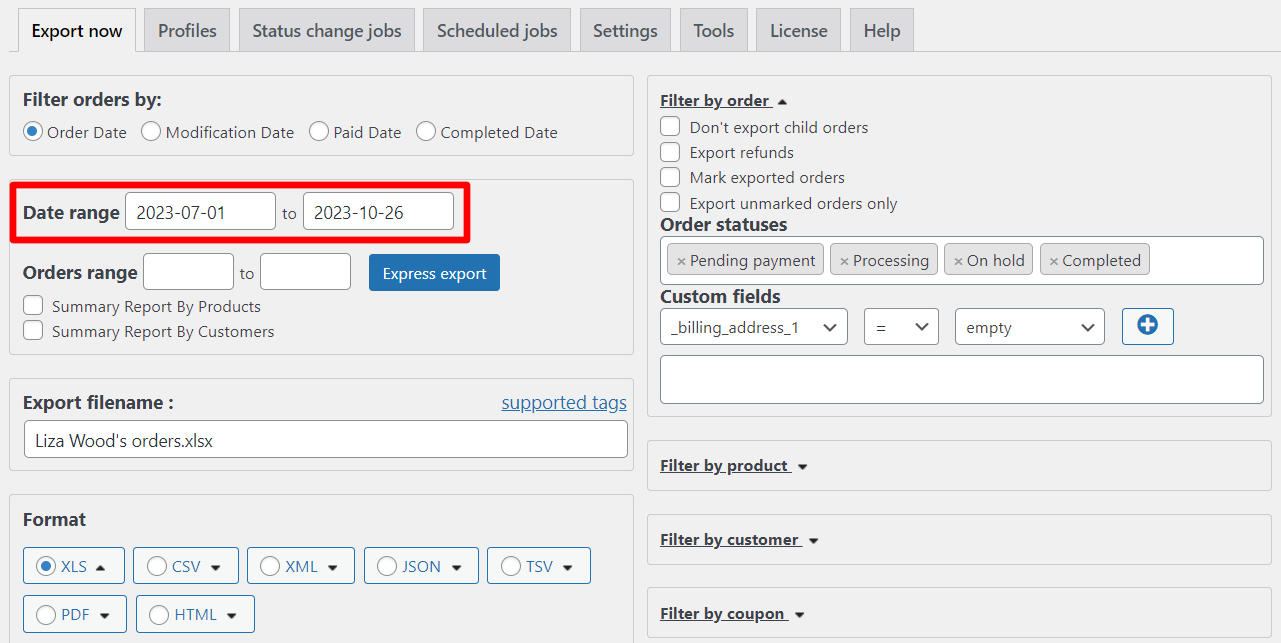
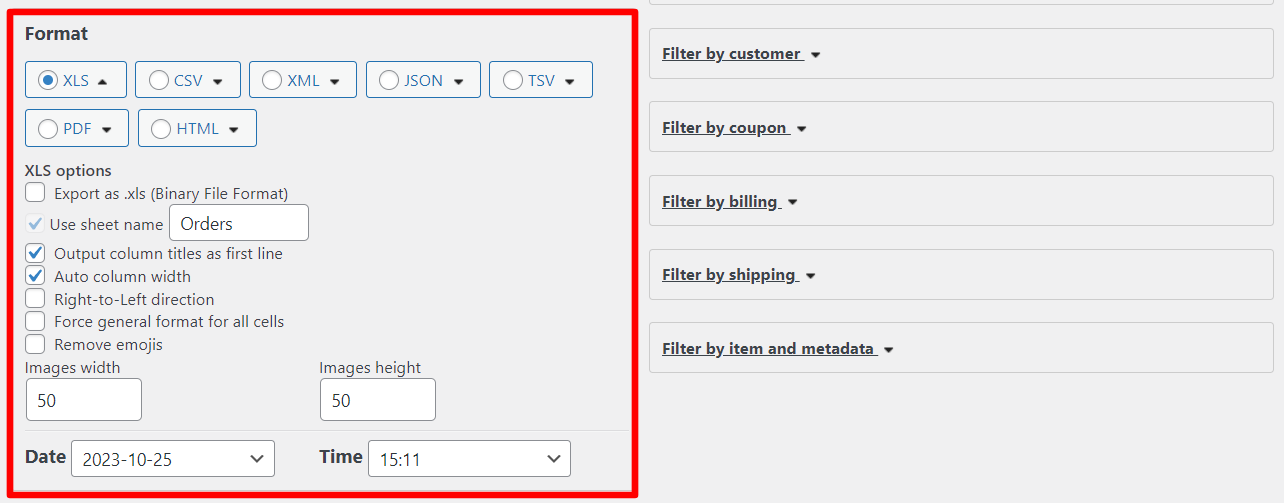
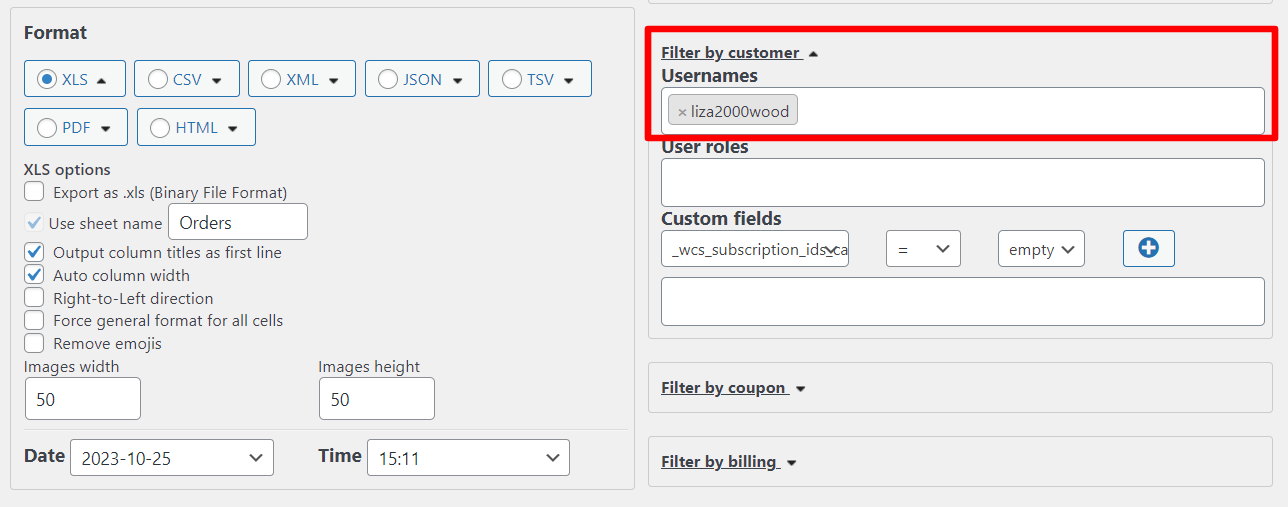
When it comes to exporting data, creating a customized export report can be a daunting task. The good news is that there are several steps you can follow to make the process easier. This little guide will provide an overview of how to create a customized export report.
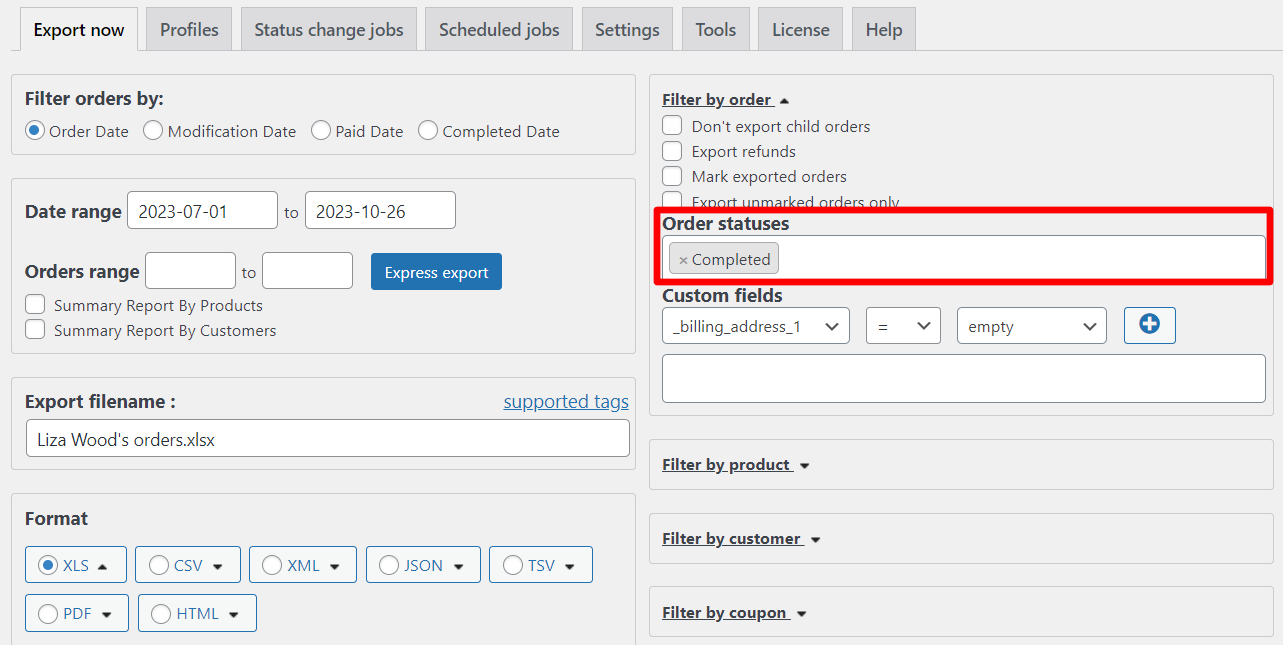

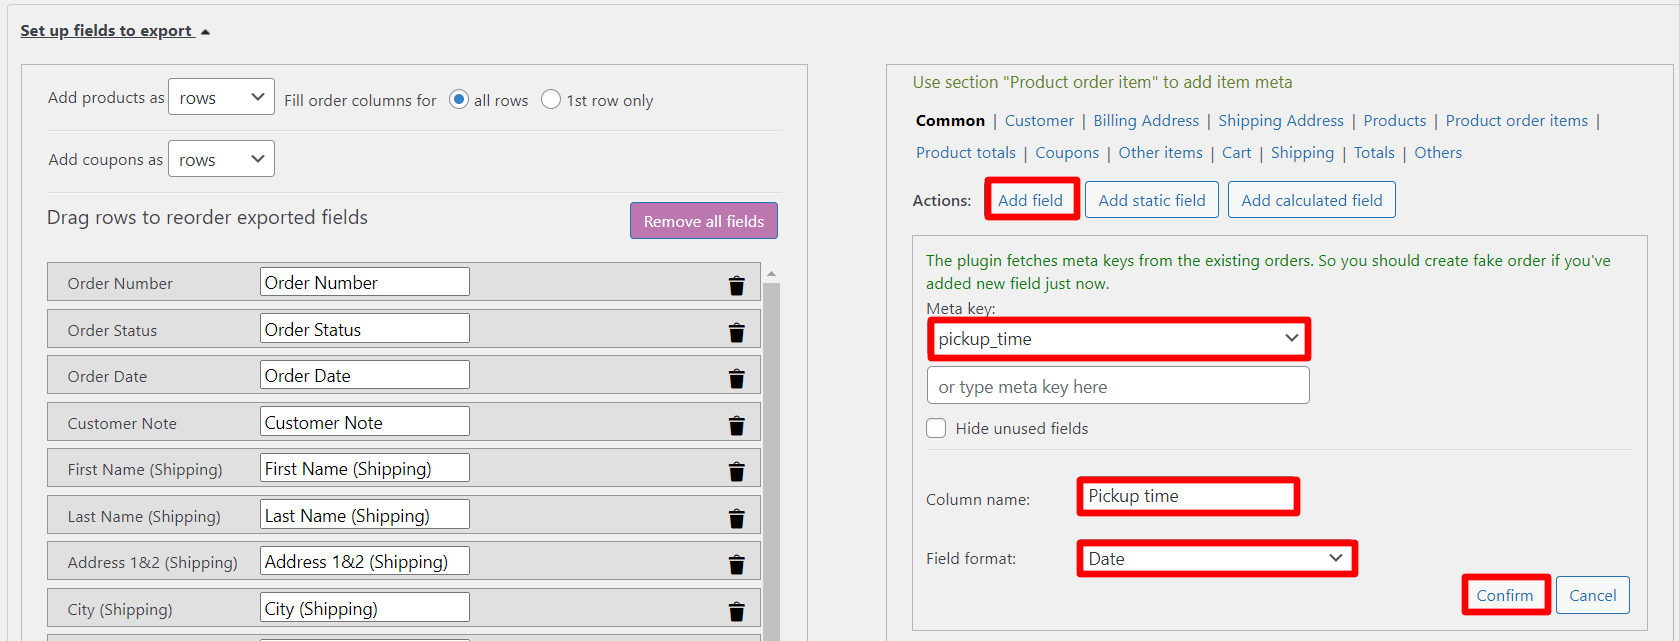
Note: This field was previously created as part of this article.
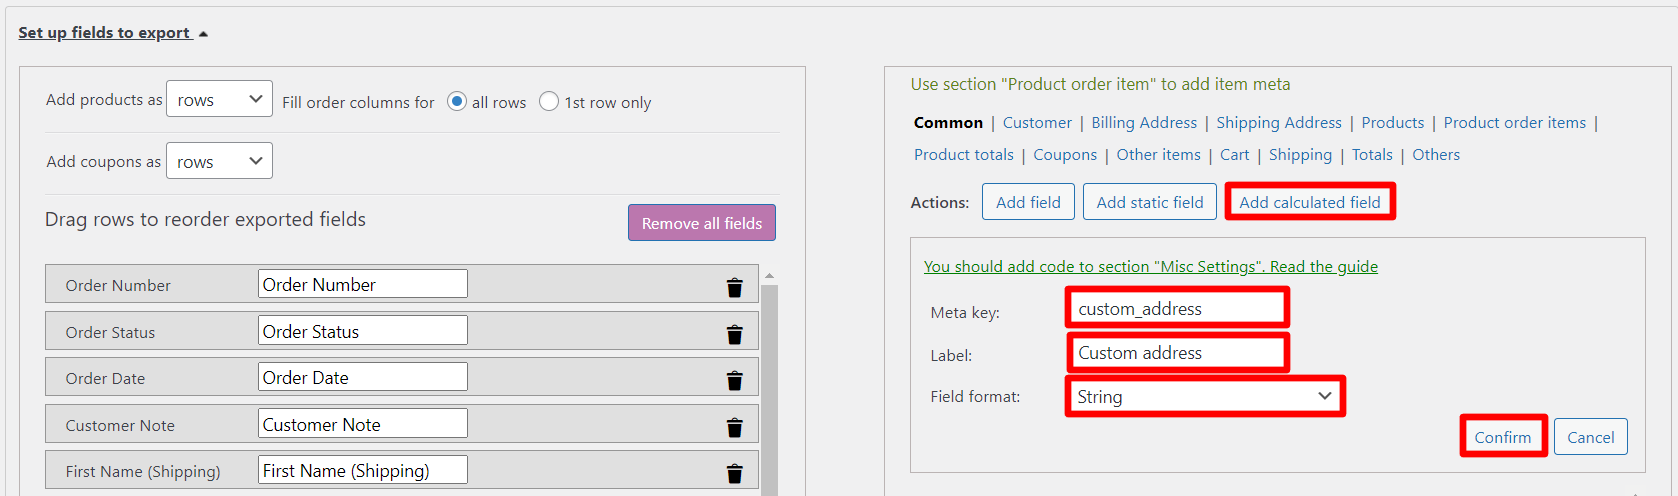
Next, let’s create a calculation function. In the Misc Settings section, check the “Custom PHP code to modify output” checkbox and paste the following rough function into the text field:
add_filter('woe_get_order_value_{FIELD}',function ($value, $order,$fieldname) { $value = "text"; return $value; },10,3);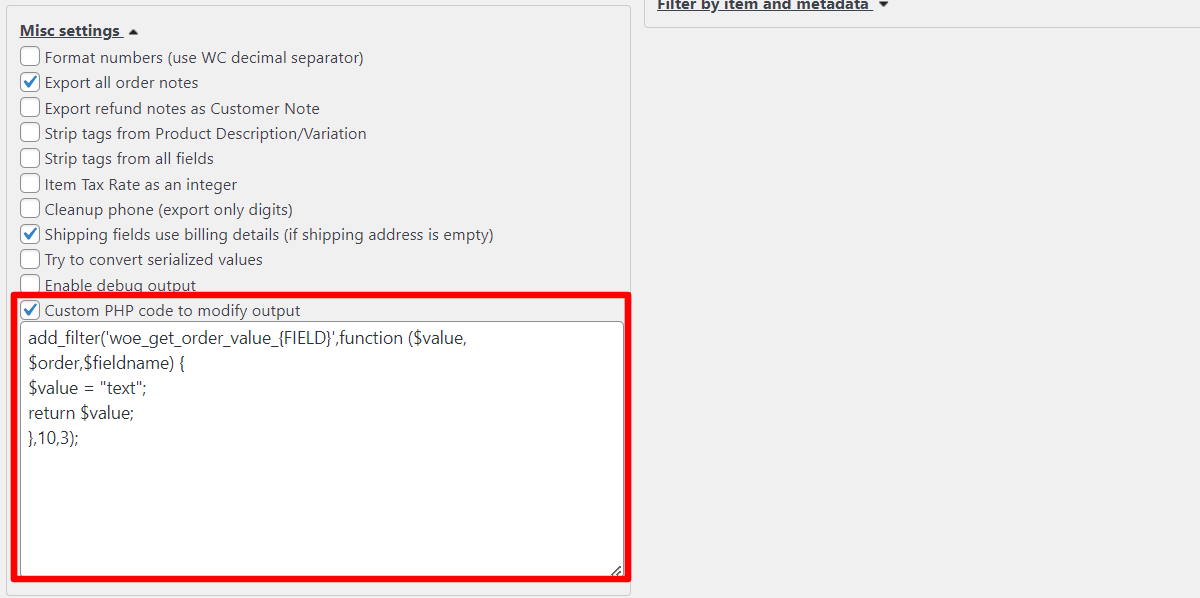
Let’s replace {FIELD} with the previously created metakey and replace $value = “text”; with the following code (this code combines state and postcode):
$value = $order->get_shipping_state() . '-' .$order->get_shipping_postcode();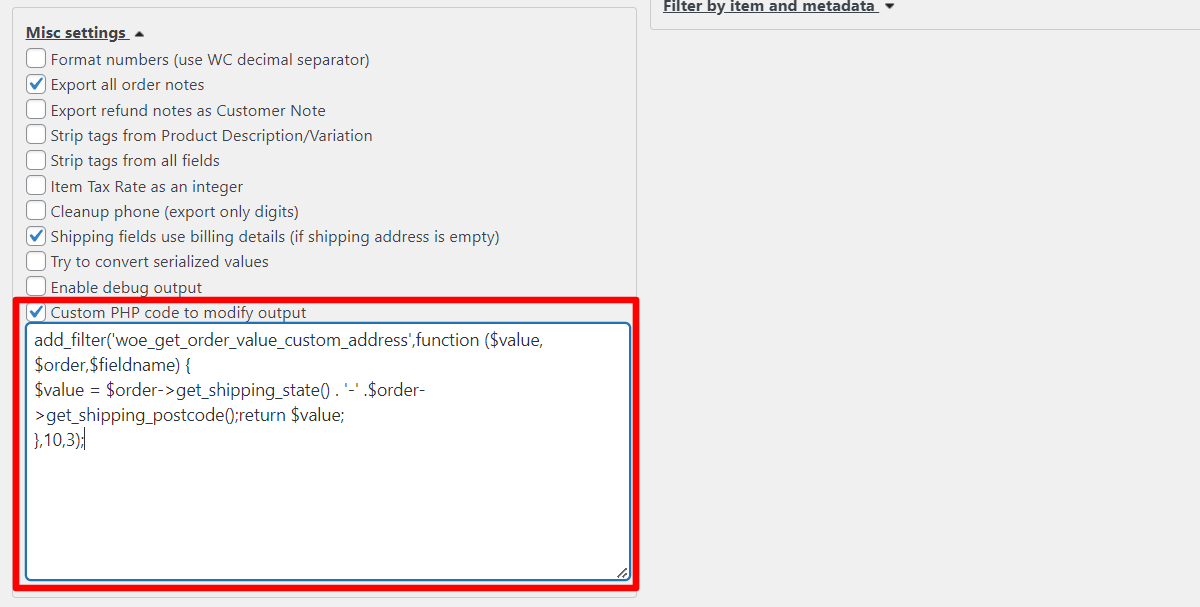
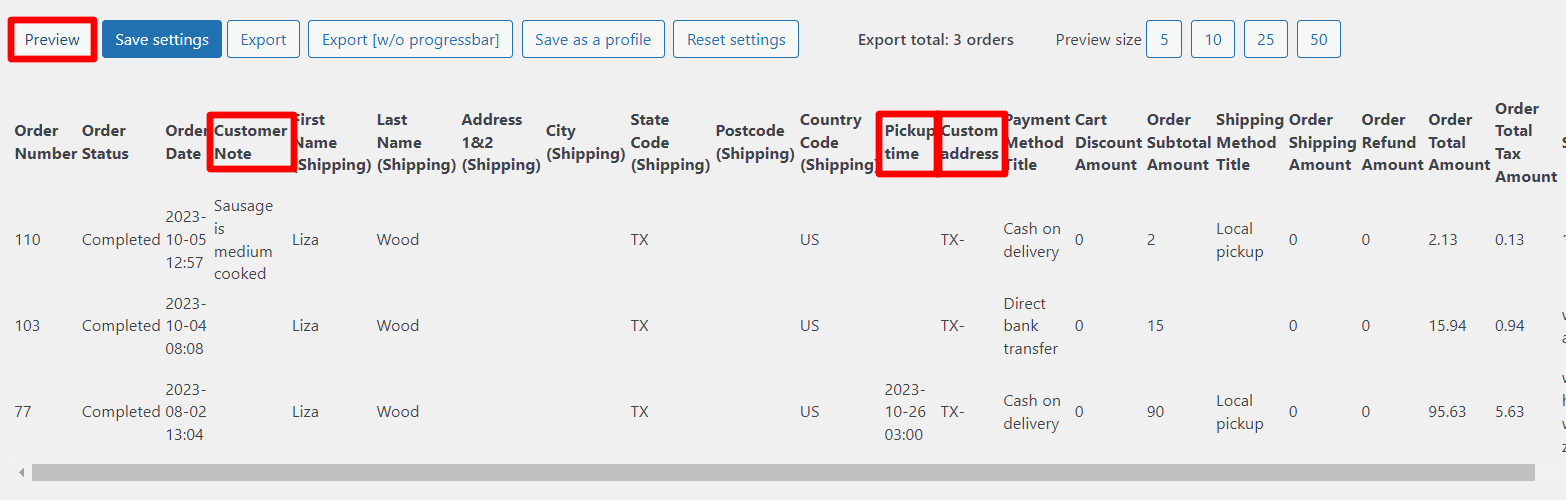
Note: there is not any postcode in Liza Wood’s orders, so report has only state in Custom address field.
Once the export is complete, you can then use the data to analyze your spending and income trends, create budget plans, and predict your financial future.
As a business owner, it is important to customize reports to get the most accurate information about your business. However, customizing reports can be a tricky process. To get the most accurate information, you must avoid common mistakes that can lead to inaccurate or unreliable reports.
First, you must choose the right data fields to include in your report. Too often, business owners choose data fields that are not relevant to their goals. For example, if you are trying to analyze customer spending, it would not make sense to include data fields related to employee productivity. To get the most accurate information, you must select data fields that are directly related to the goals of your report.
Second, you must ensure that you are using the most up-to-date data. Reports can quickly become outdated if you are not regularly updating the data. To get the most accurate information, you must regularly review the data and update it as necessary.
Third, you must make sure that your report is free of errors. Mistakes in data entry or calculations can lead to inaccurate information. To ensure that your report is accurate, you must double-check all the data and calculations.
In conclusion, customizing reports is an important and necessary part of any work environment. Provide more detailed insight into performance and identify potential areas for improvement with Advanced Order Export for WooCommerce!
Table of Contents
One of the most demanded type of the discount is a discount for the wholesalers. Most of the e-shops has a special wholesale price or discount for those who buy in large quantities. The shop owner can give a special price as a coupon or just when the purchase starts from the reasonable quantities.
By offering exclusive discounts to your wholesalers, you can incentivize them to make larger purchases and establish long-term partnerships. Advanced Dynamic Pricing for WooCommerce allows you to customize discounts based on factors such as order volume, product categories, or specific customers. This flexibility ensures that your wholesale pricing strategy is optimized for maximum profitability and customer satisfaction.
With the Role discount function you can set up wholesaler’s discounts. Read on to find out how to do this.
Role discount in Advanced Dynamic Pricing for WooCommerce is a powerful tool that can help retailers manage their pricing in a more efficient and effective way. It allows retailers to apply discounts to certain groups of customers as a guests, wholesalers or internal discount of the company for the staff.
To apply Role discount to a wholesaler, you must first create a rule.
We will set up 4 rules for different situations:
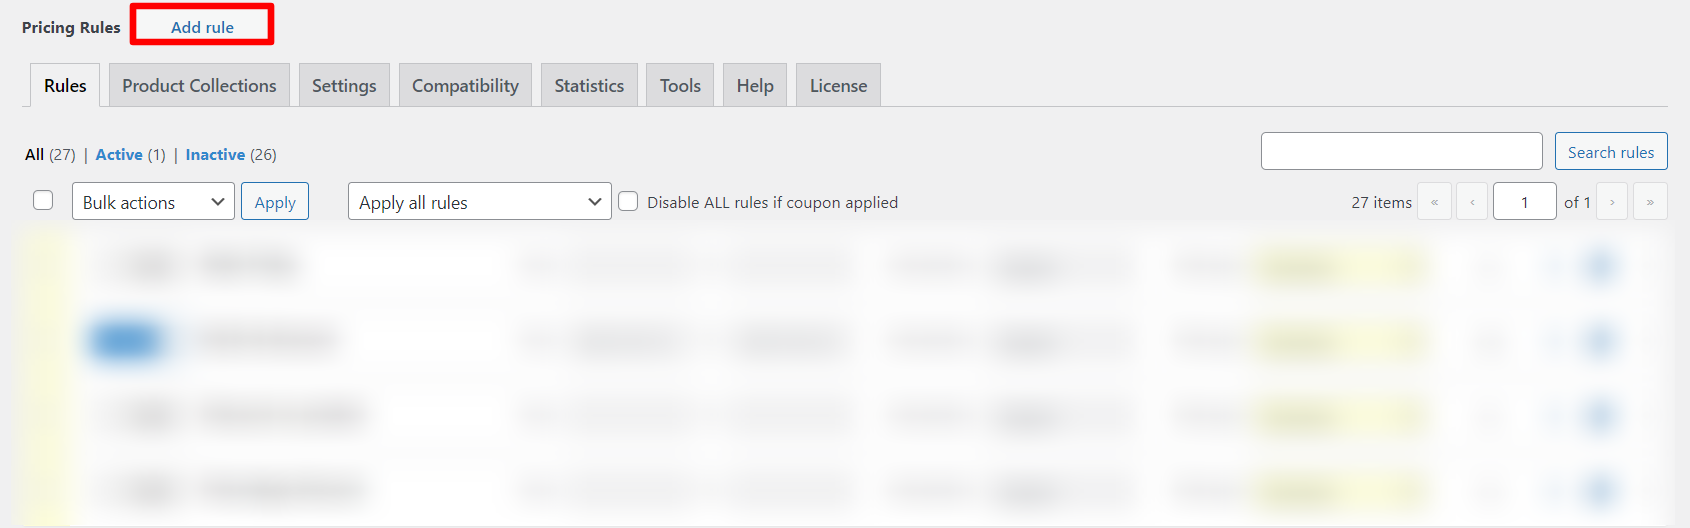
Click on the “Add rule” button and select “Role discount”.
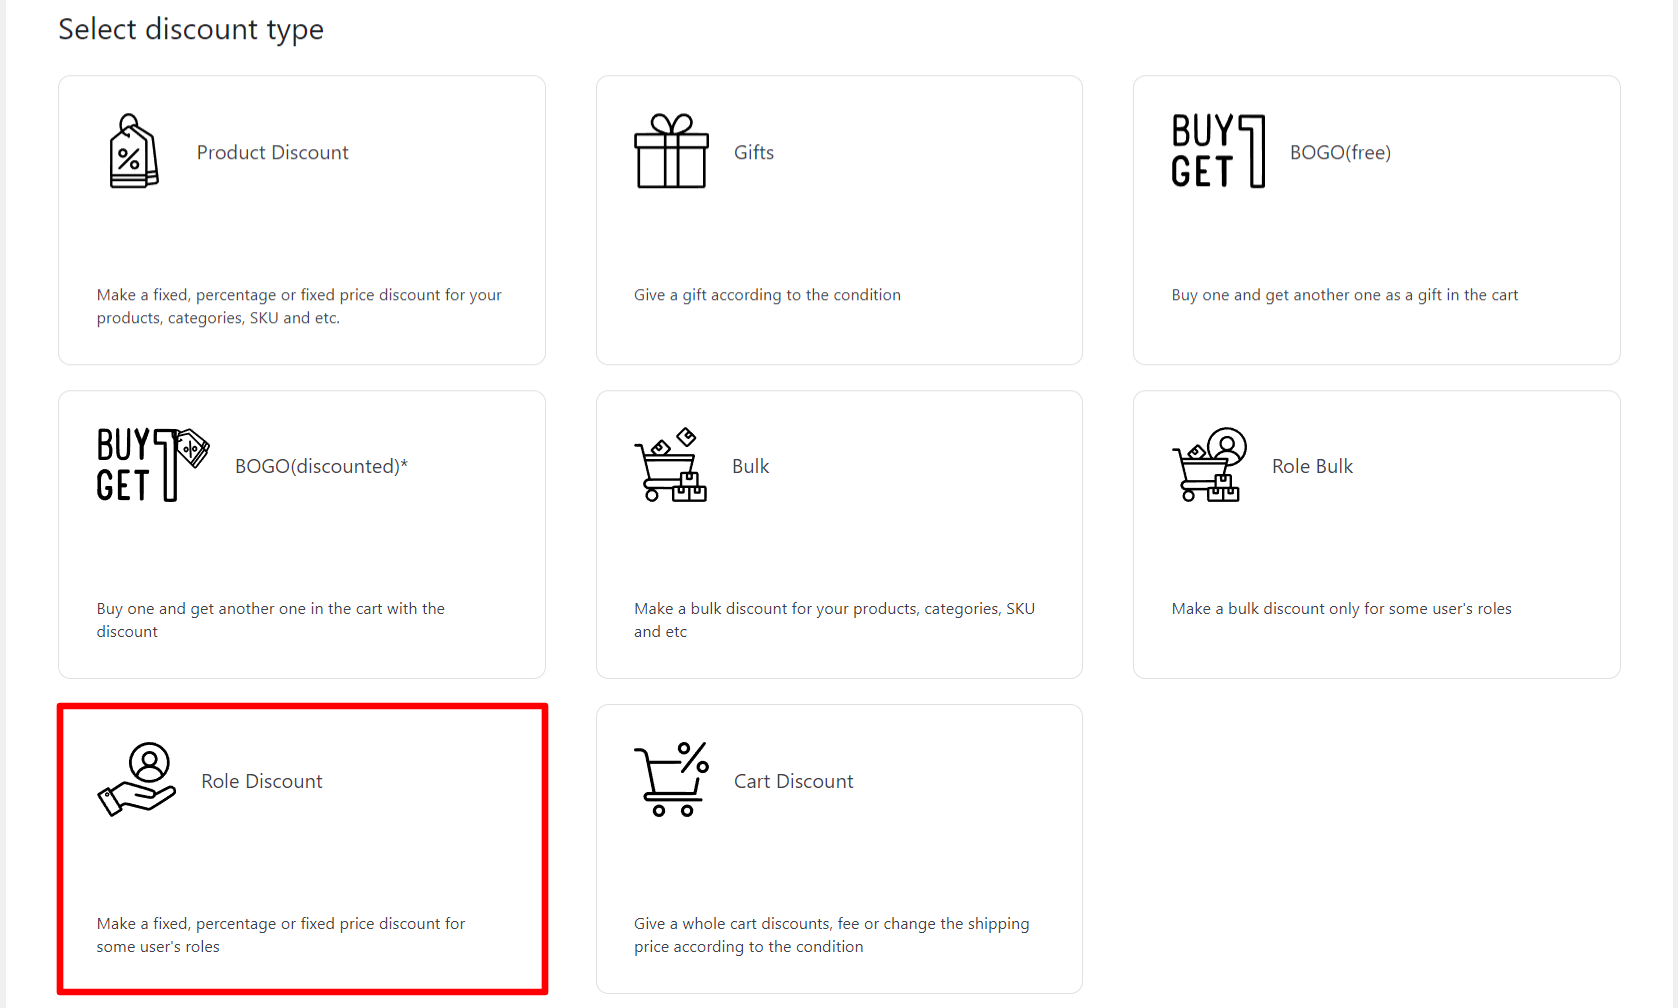
Specify Wholesaler as the role.
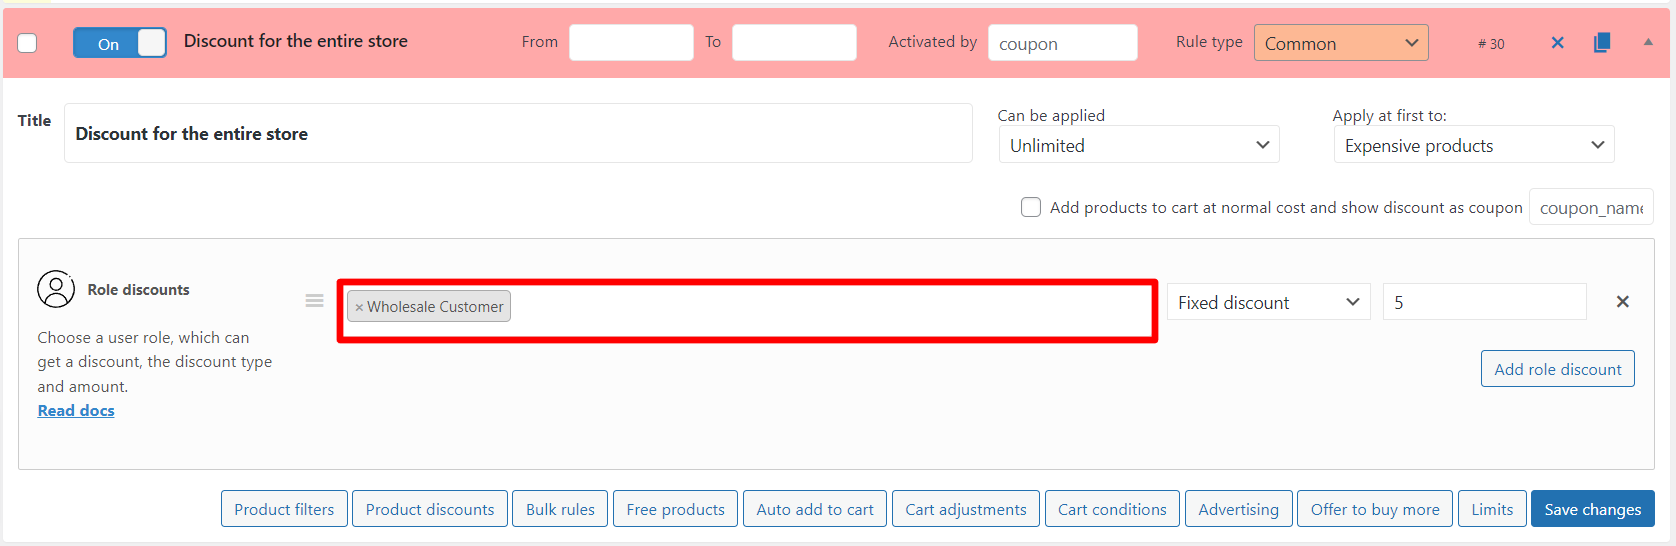
Select the discount type and amount.
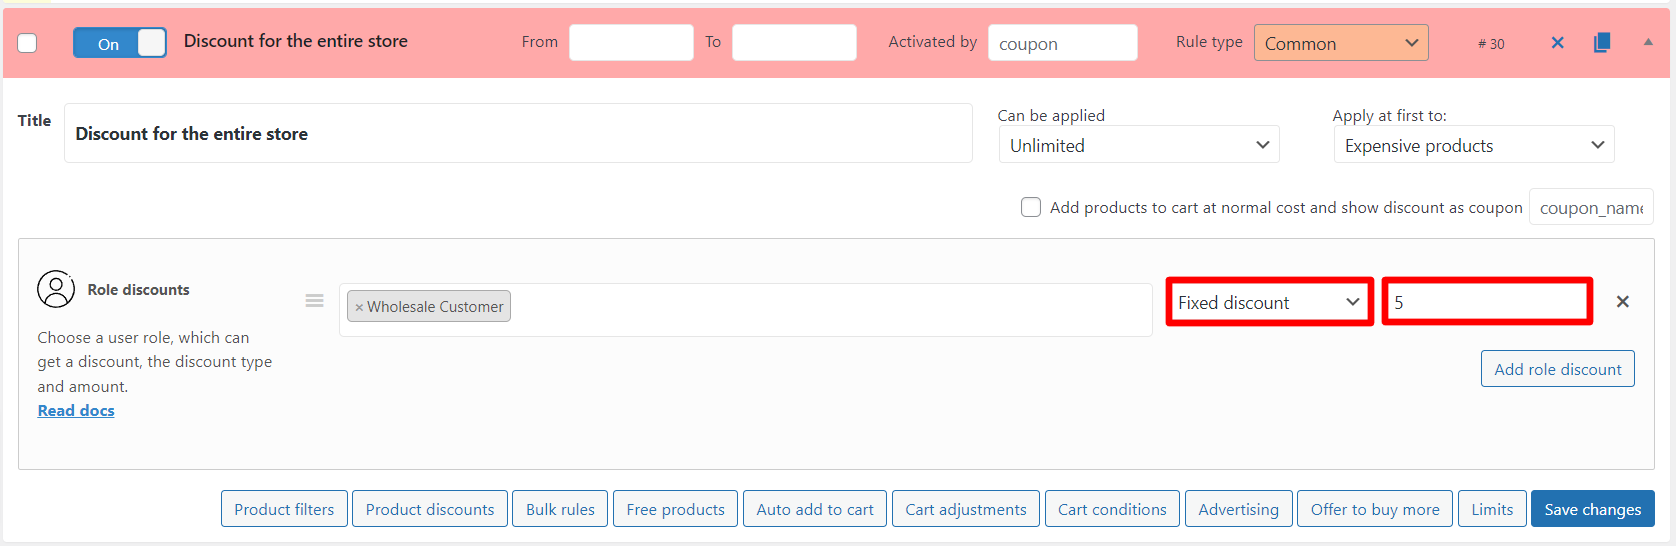
There is the discount for the entire store.
Click on the “Add rule” button and select “Role discount”.


Specify Wholesaler as the role.
Select the discount type and amount.
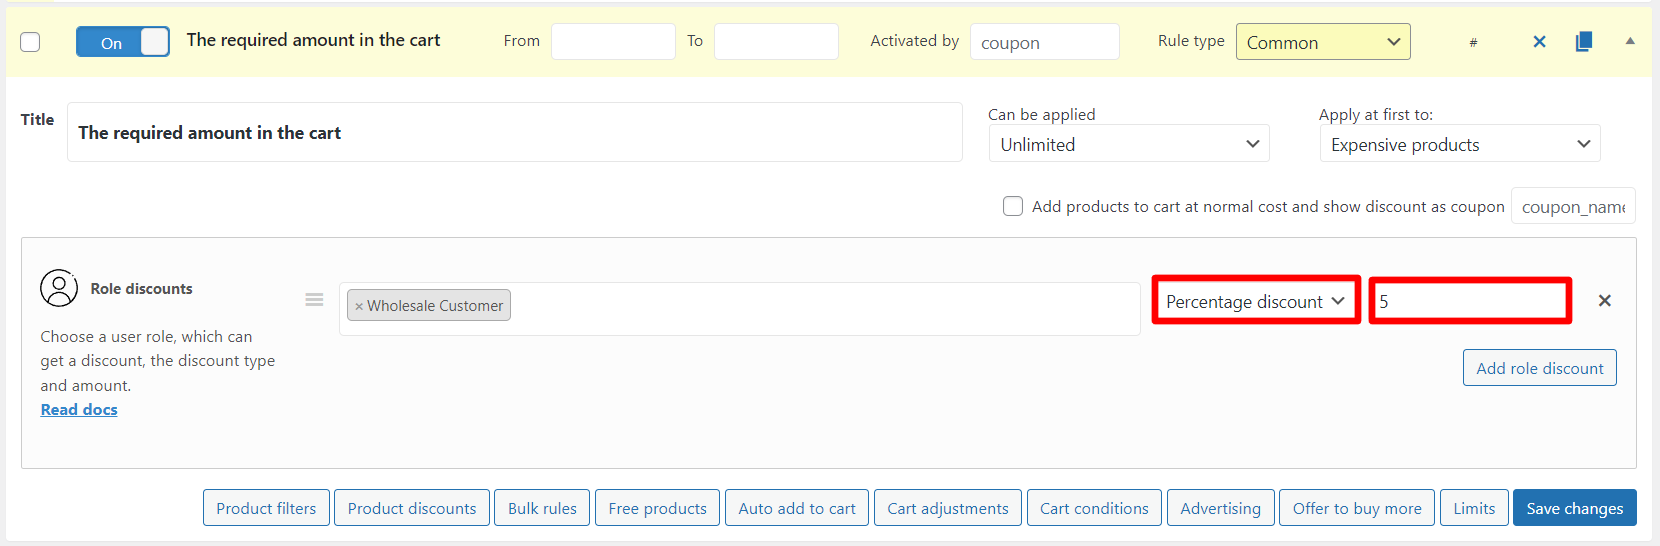
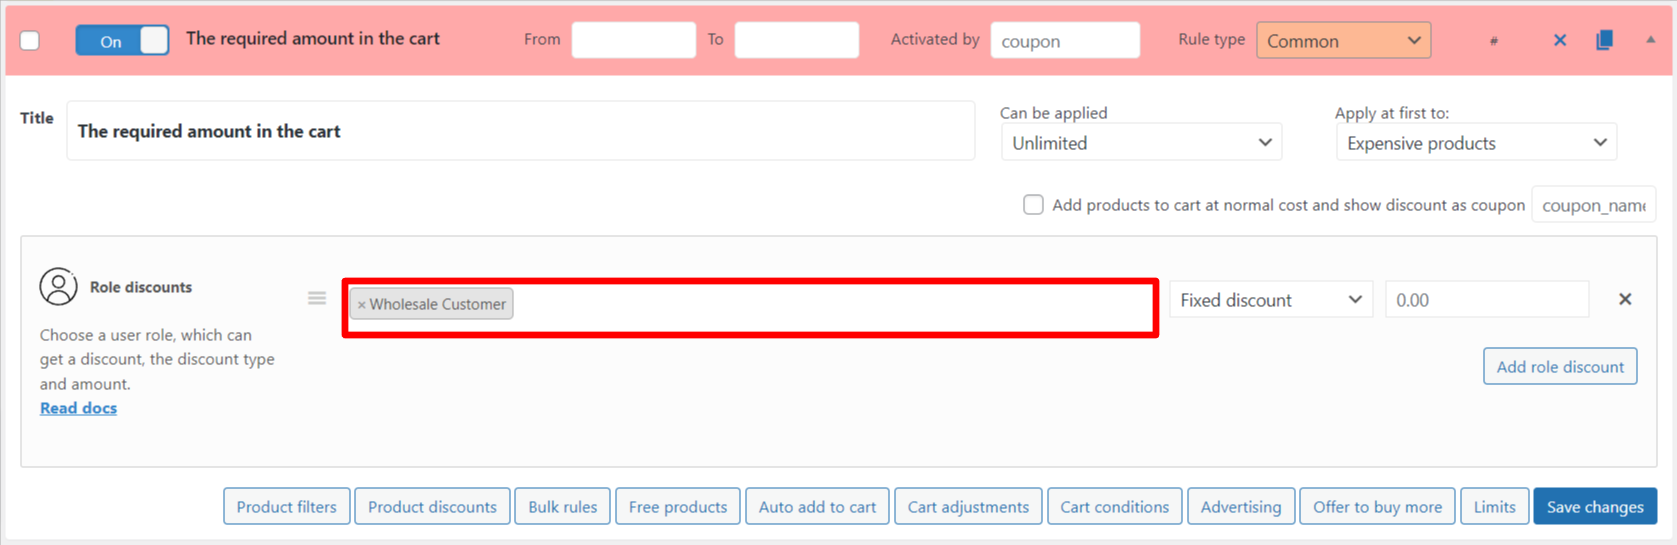
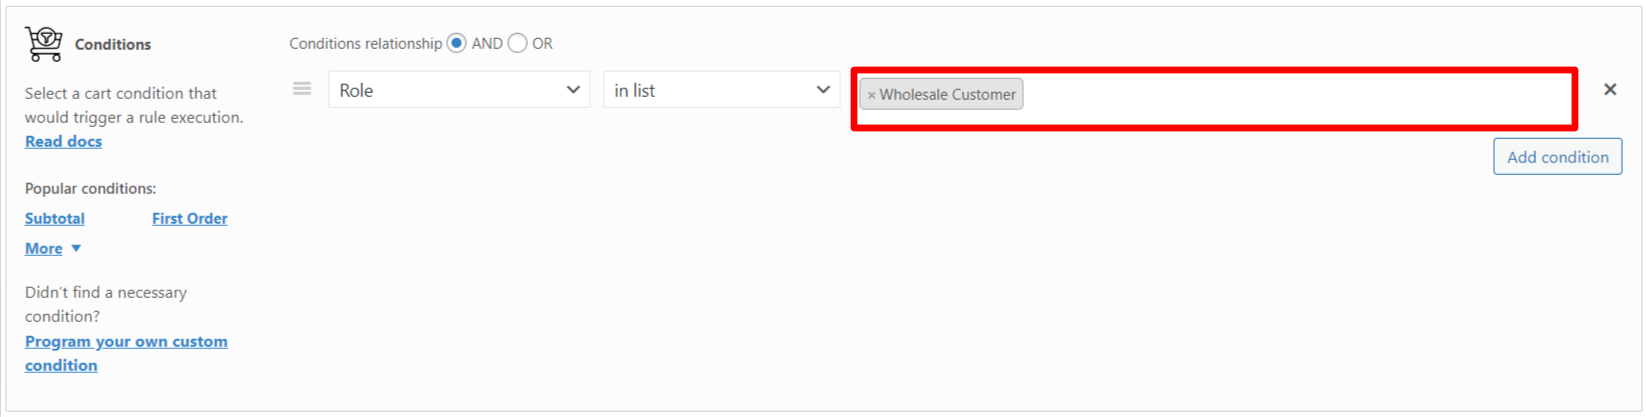
Click on the “Cart Conditions” button.
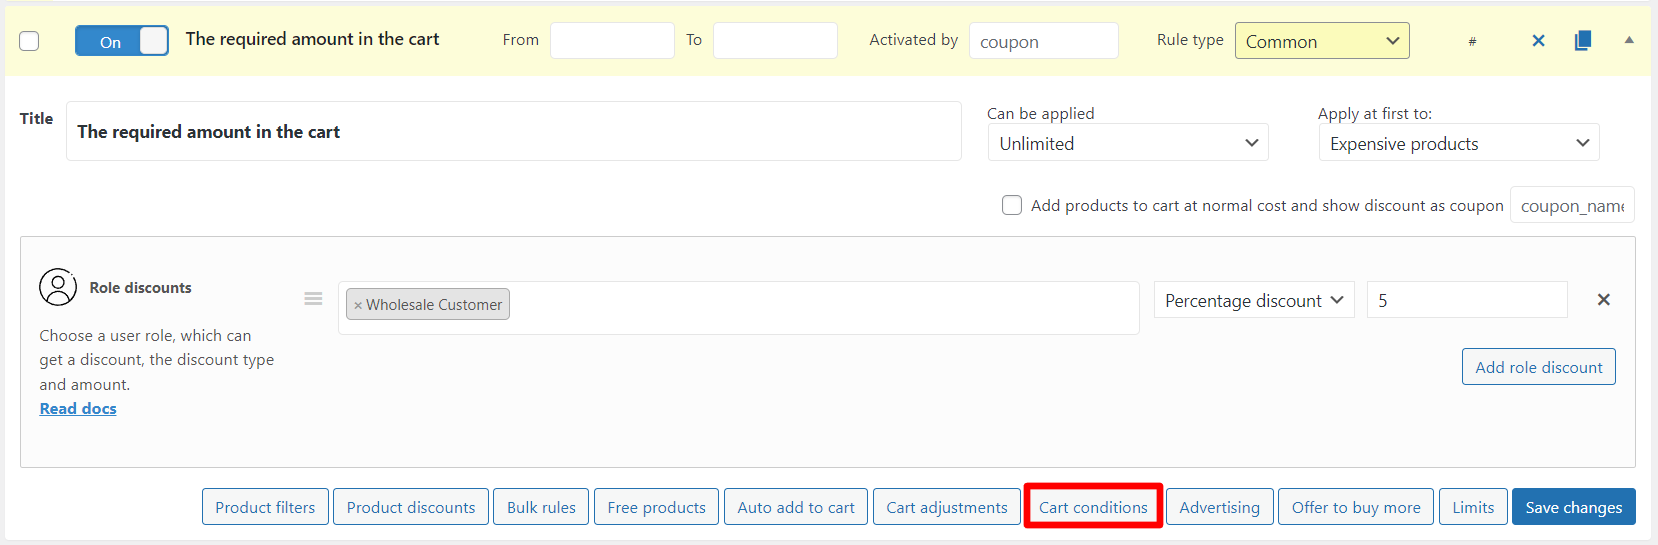
Specify amount of cart.
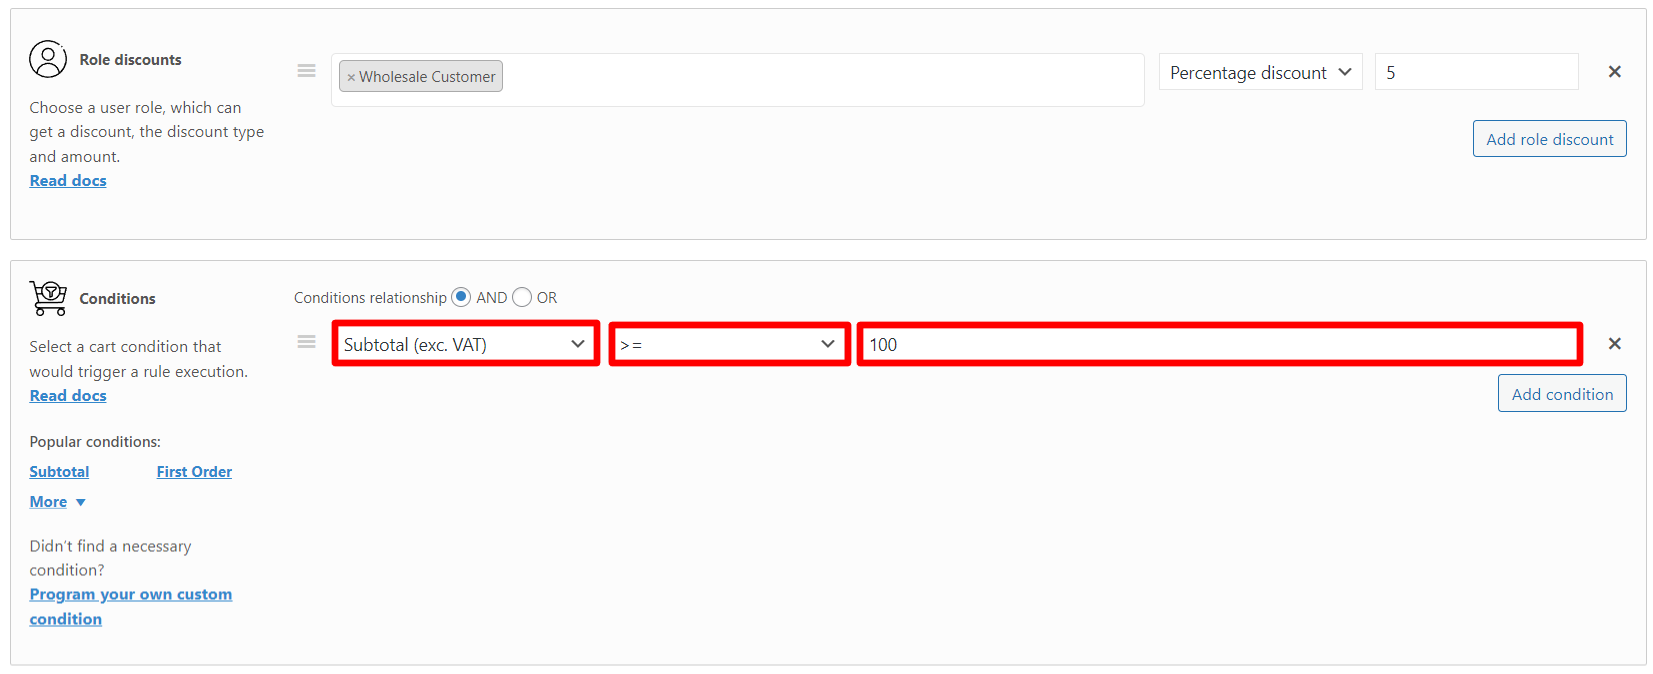
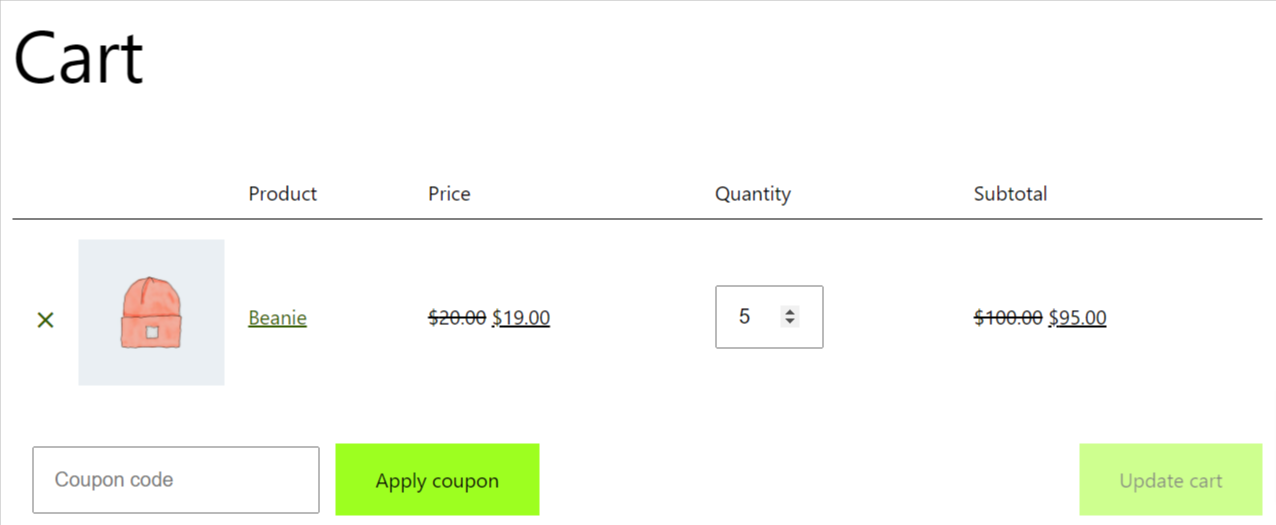
The discount is applied once the cart total reaches $100.
Click on the “Add rule” button and select “Role discount”.


Specify Wholesaler as the role.

Select the discount type and amount.
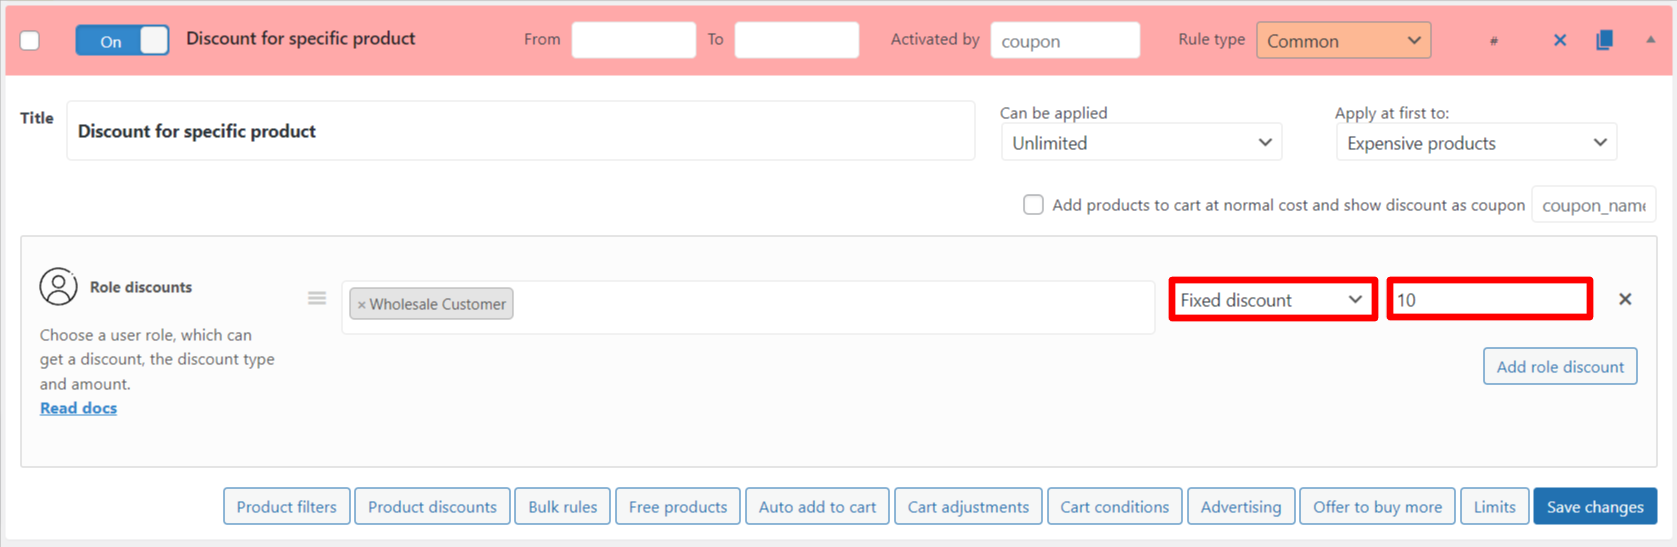
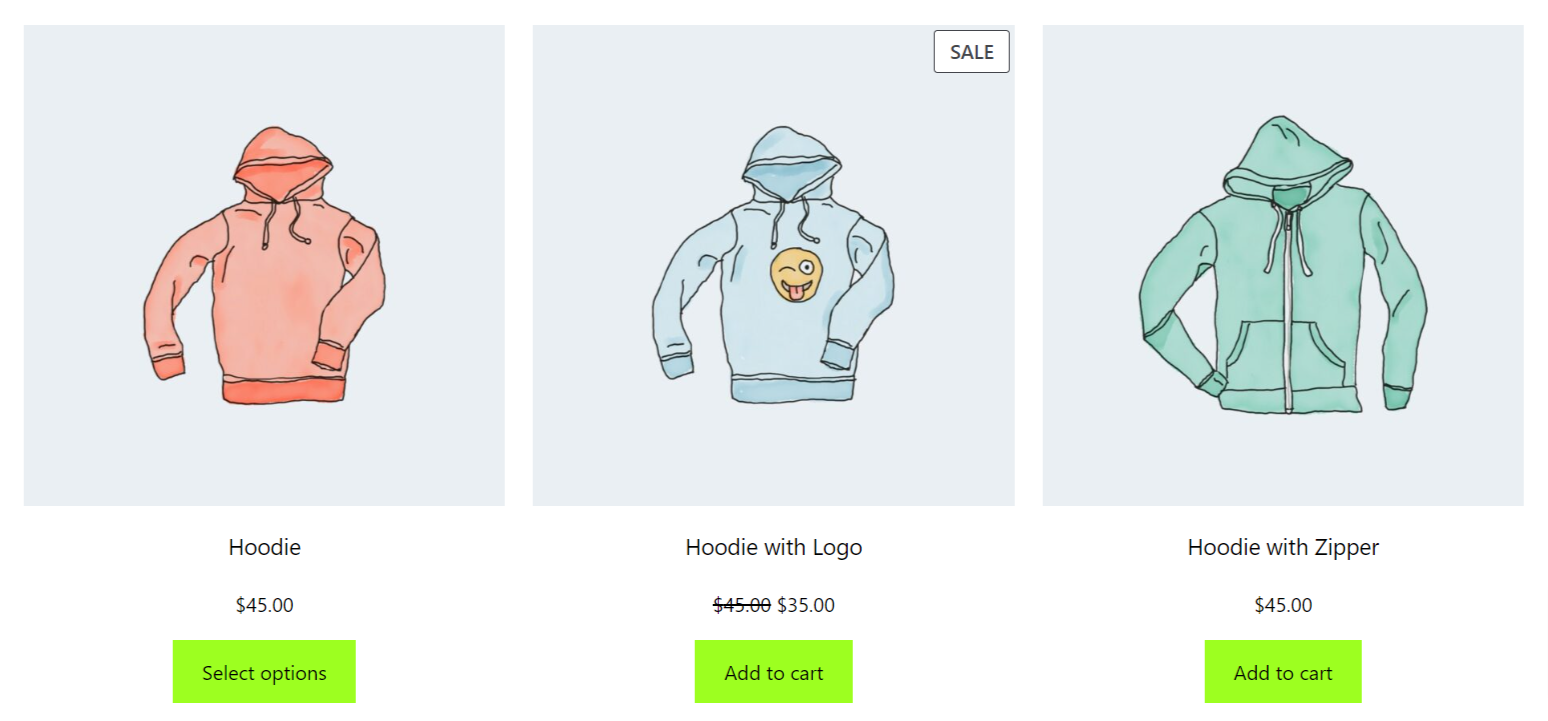
Click on the “Product filters” button.

Choose an item.
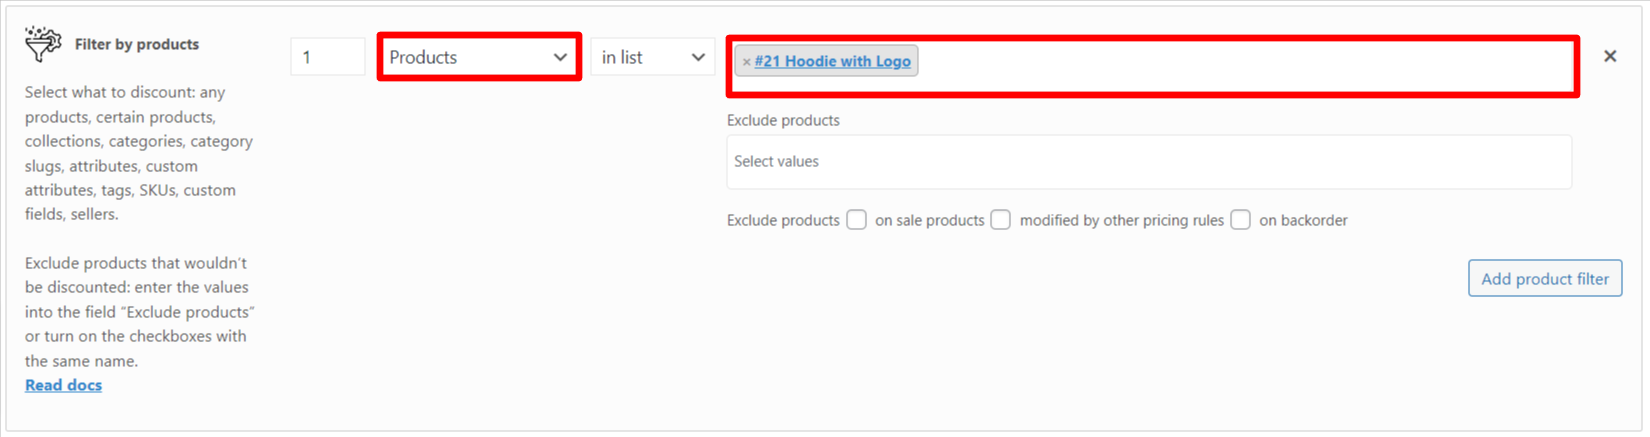
Only hoodie with logo has the discount.
Click on the “Add rule” button and select “Role bulk”.


Specify Wholesaler as the role.
Specify ranges and discounts.
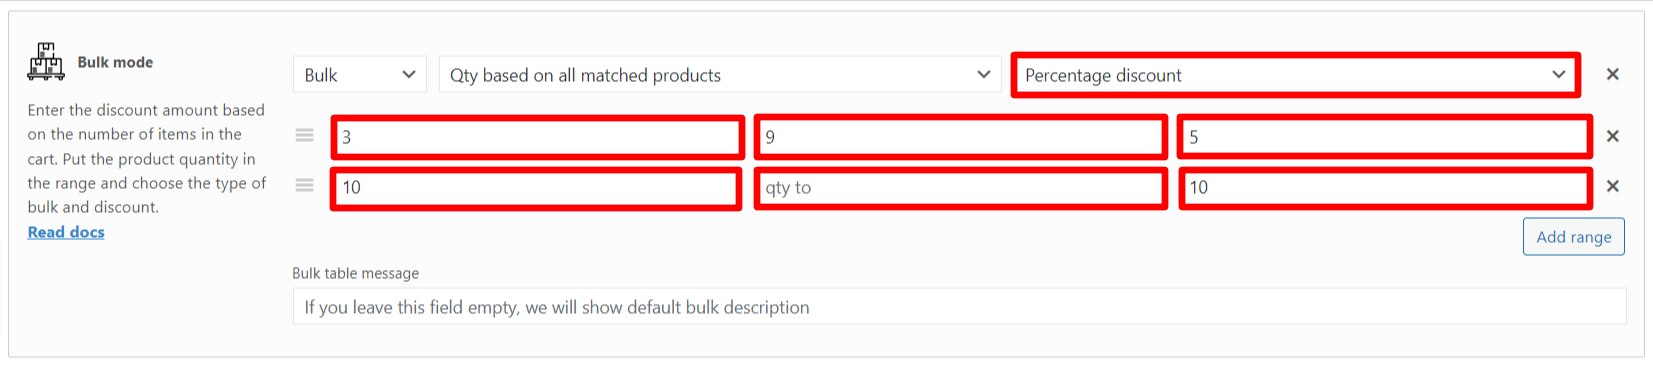
Product quantities from 3 to 9 receive a 5% discount, and quantities from 10 receive a 10% discount.
Look how easy you can make a discount for the wholesalers with Advanced Dynamic Pricing for WooCommerce.
But you can make your shop more powerful for the wholesalers with the analytics: use Advanced Order Export for WooCommerce to export the report about the wholesalers purchases. How to do it – read in our next articles.

Table of Contents
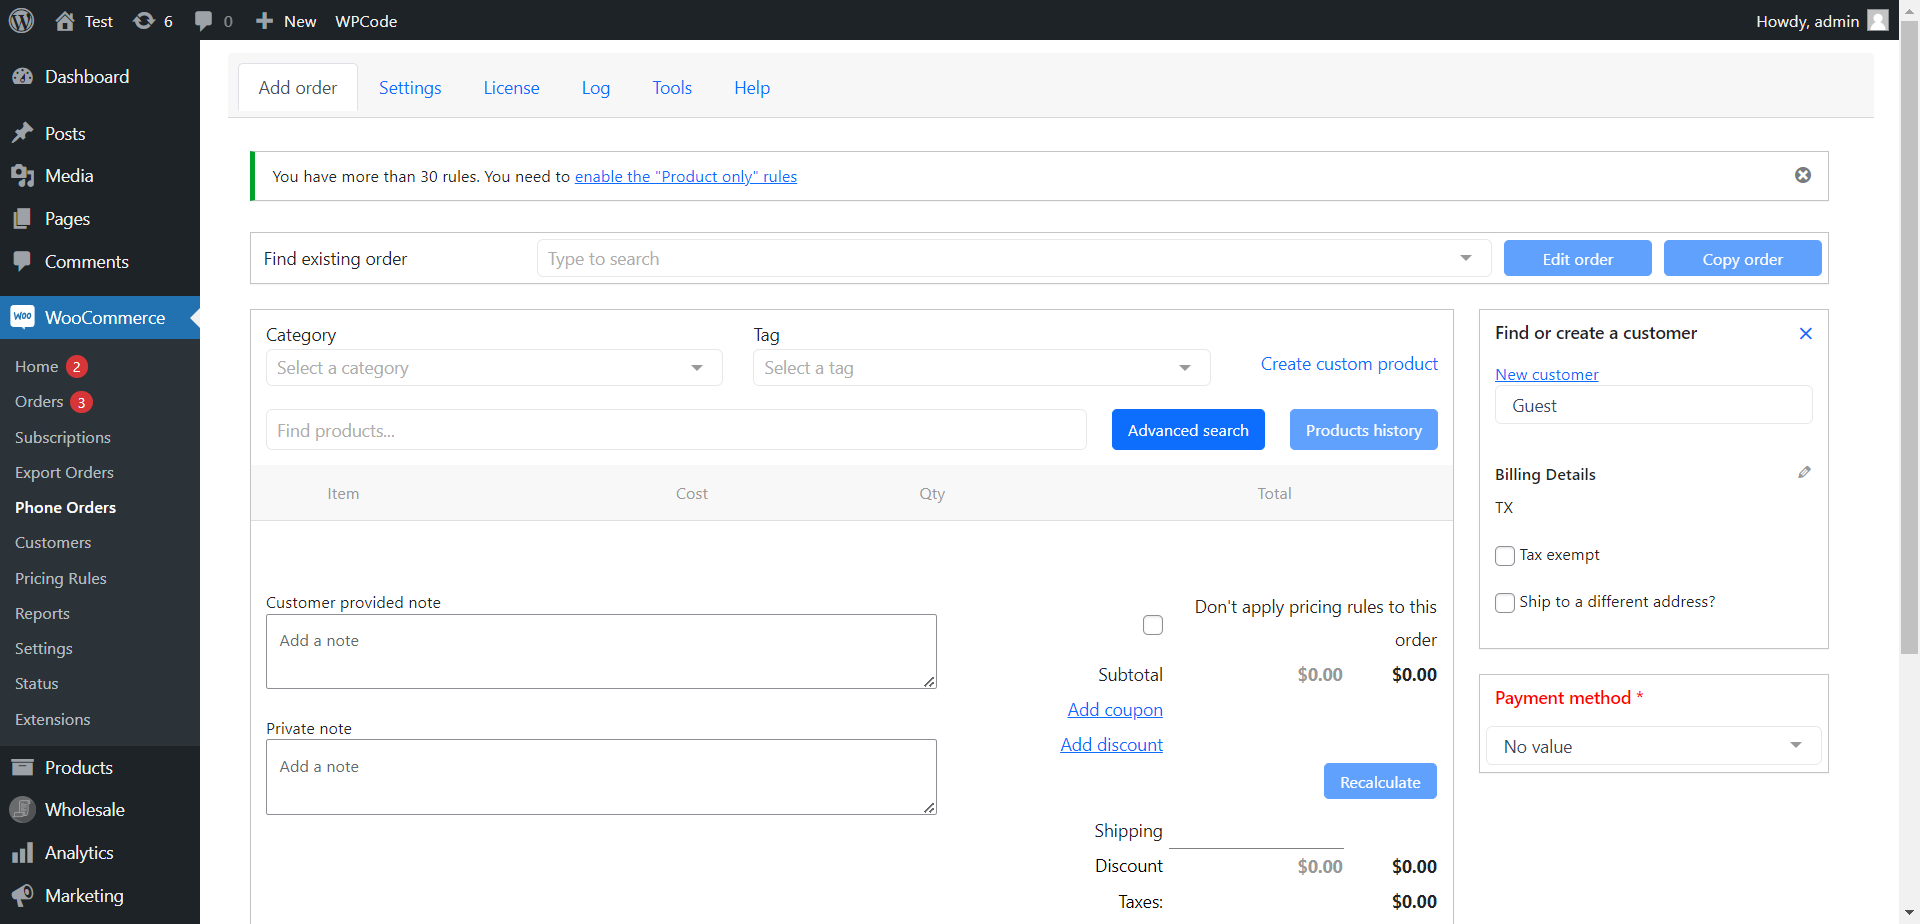
Phone Orders for WooCommerce is a plugin that allows customers to place orders over the phone. The plugin provides various features such as discounts, coupons, and fees to enhance the phone ordering experience. Customers can avail discounts on their purchases by applying coupon codes provided by the store. Additionally, the plugin allows store owners to add fees to orders, such as shipping fees or handling charges. These features make it convenient for customers to place orders over the phone. Moreover, it avails the same benefits and discounts as they would while ordering online.
Let’s look at how to manage discounts, fees and coupons in Phone Orders for WooCommerce.
Note: all settings described below are available only in the pro version.
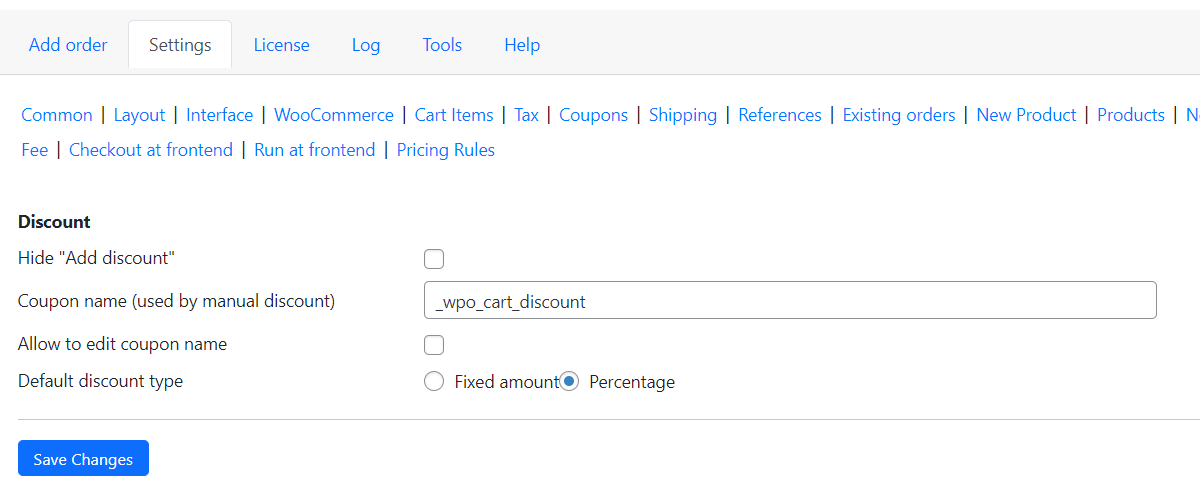
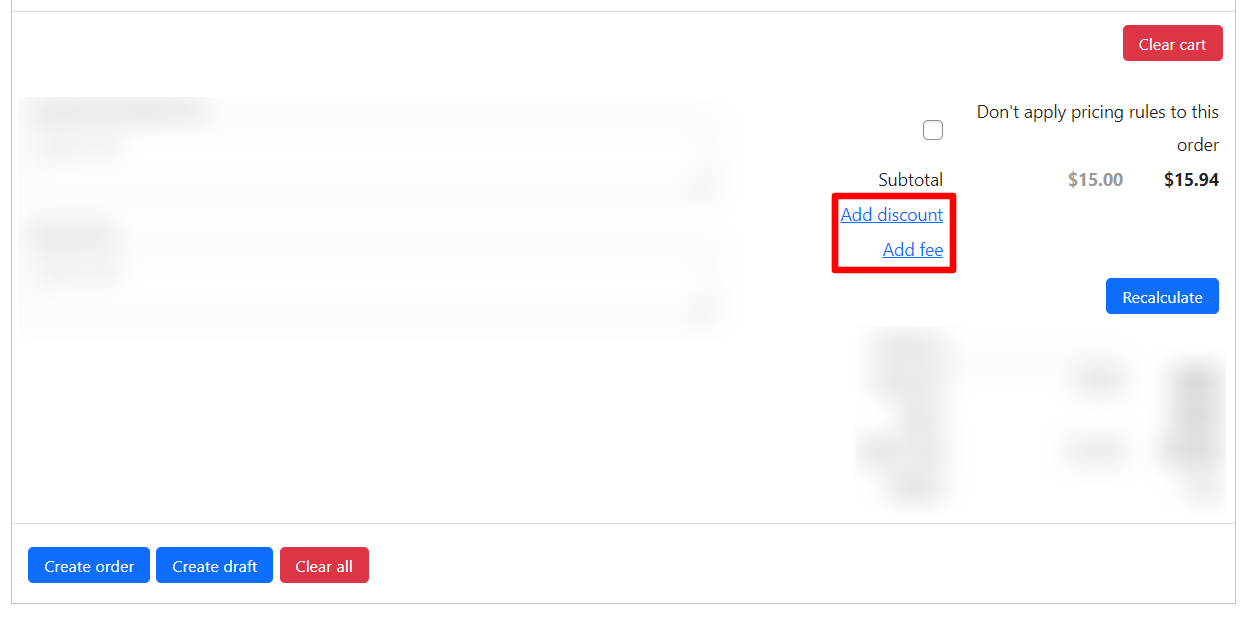
Discounts are located in Settings>Discount.
To remove the discount option, check the Hide “Add discount” checkbox.
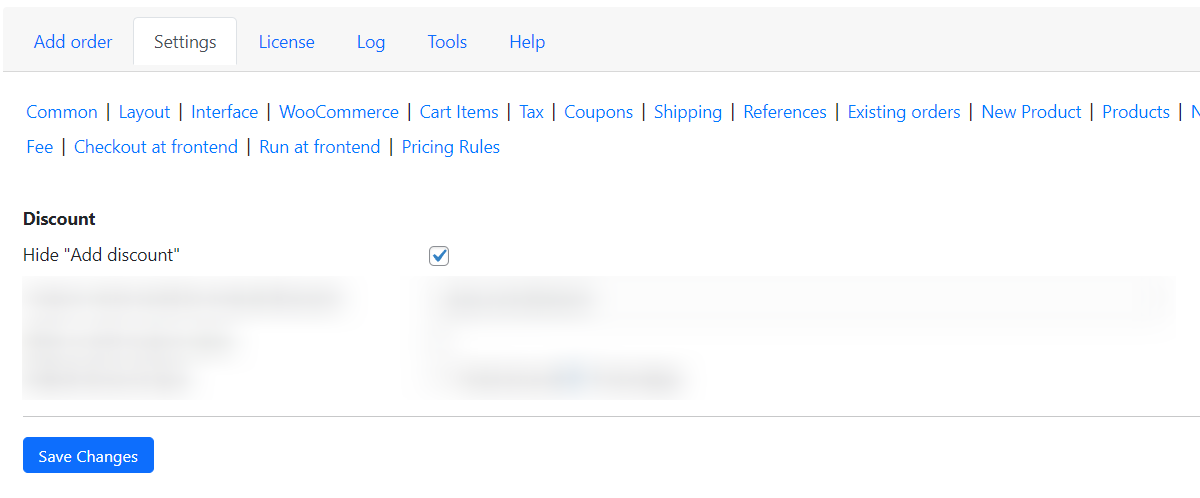
Now there is no Discount field in order creation.
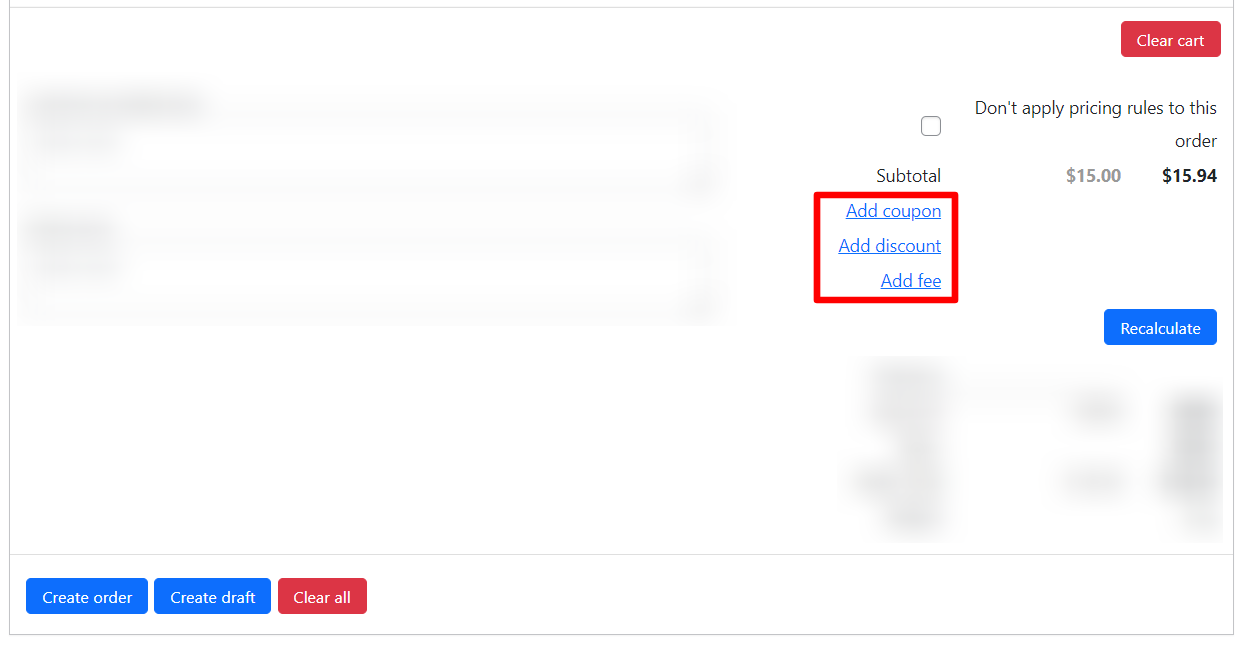

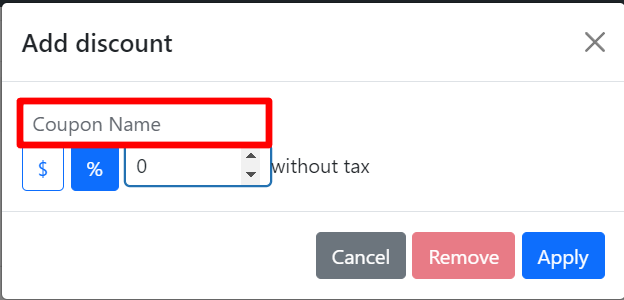
In the Coupon name (used by manual discount) field, enter the default coupon name.
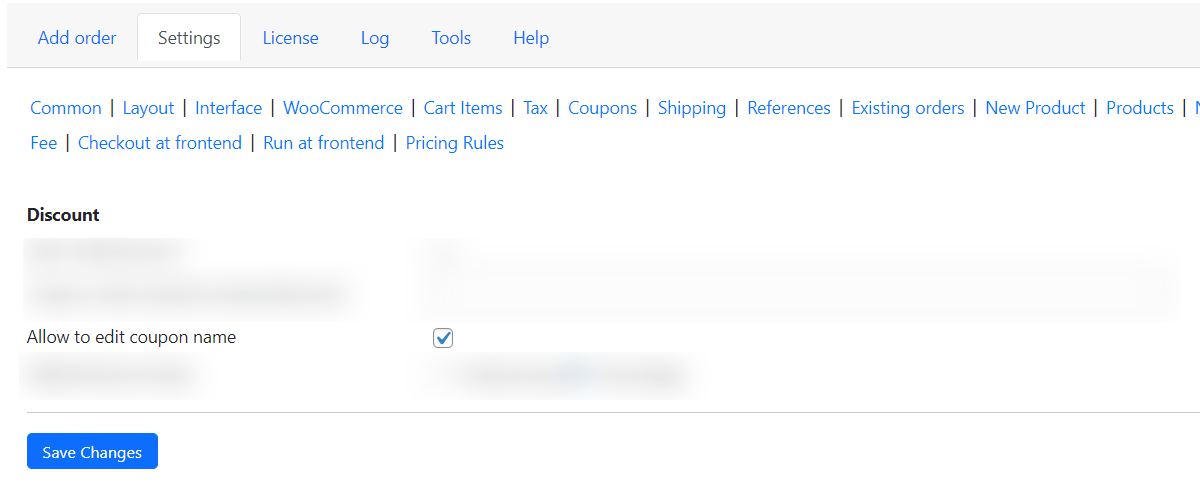
For additional convenience of creating orders, enable the “Allow to edit coupon name” option. This way you can change the coupon name in the order editor.
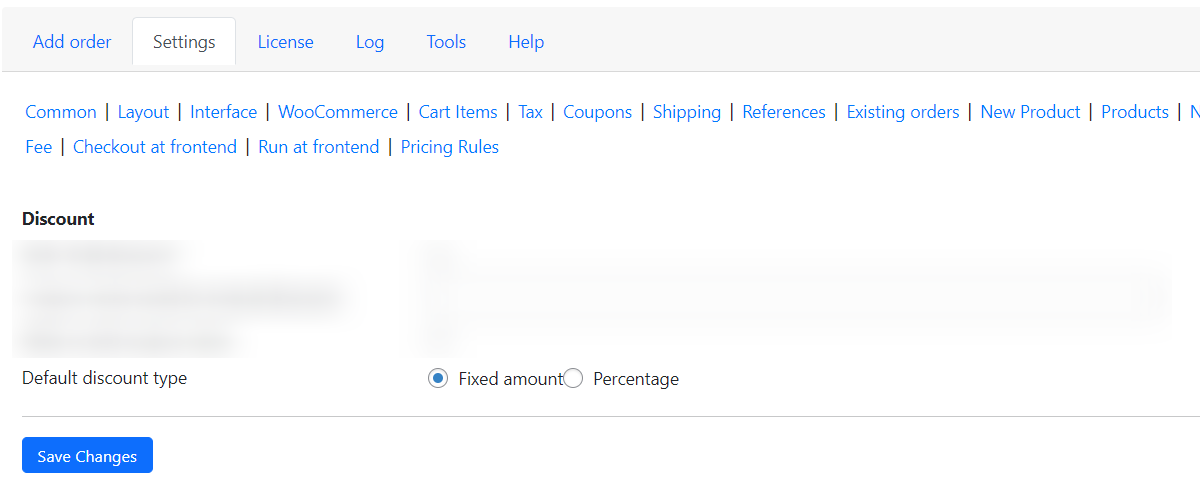
Set the default discount type (fixed amount or percentage) so you don’t have to spend more time choosing. Check the box next to “Default discount type”.
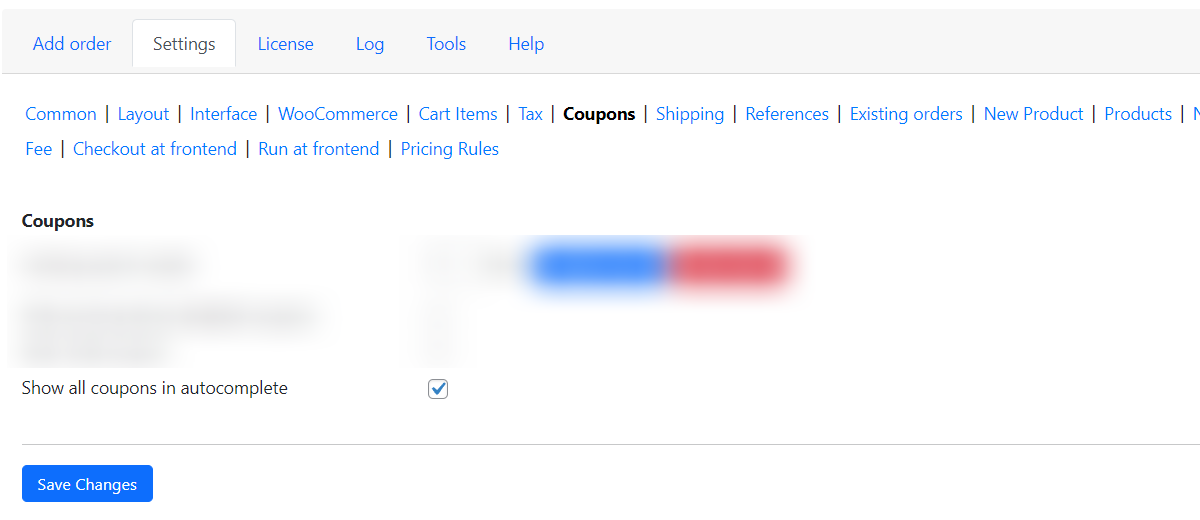
Coupons are located in Settings>Coupons.
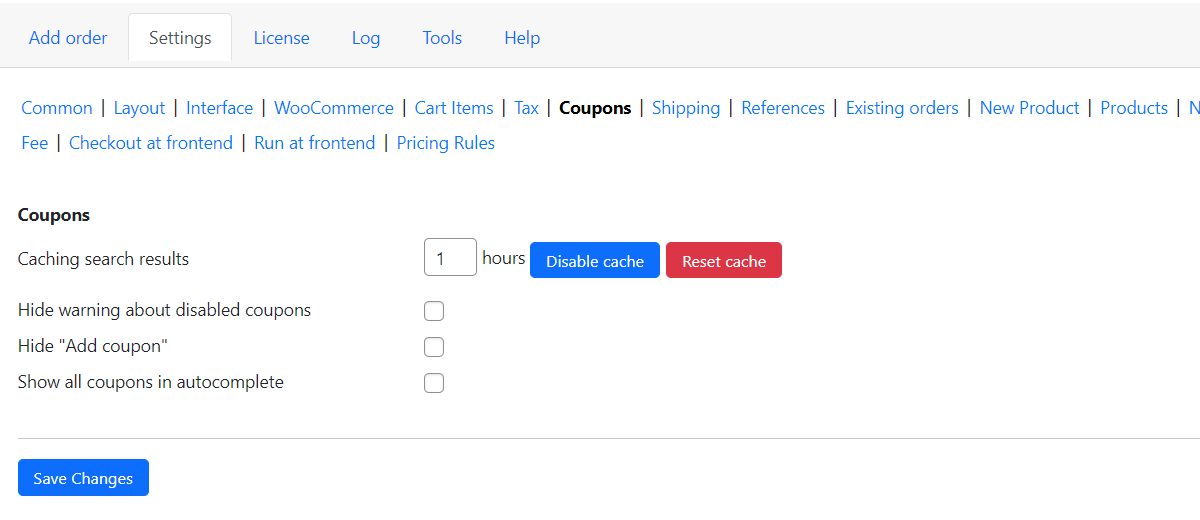
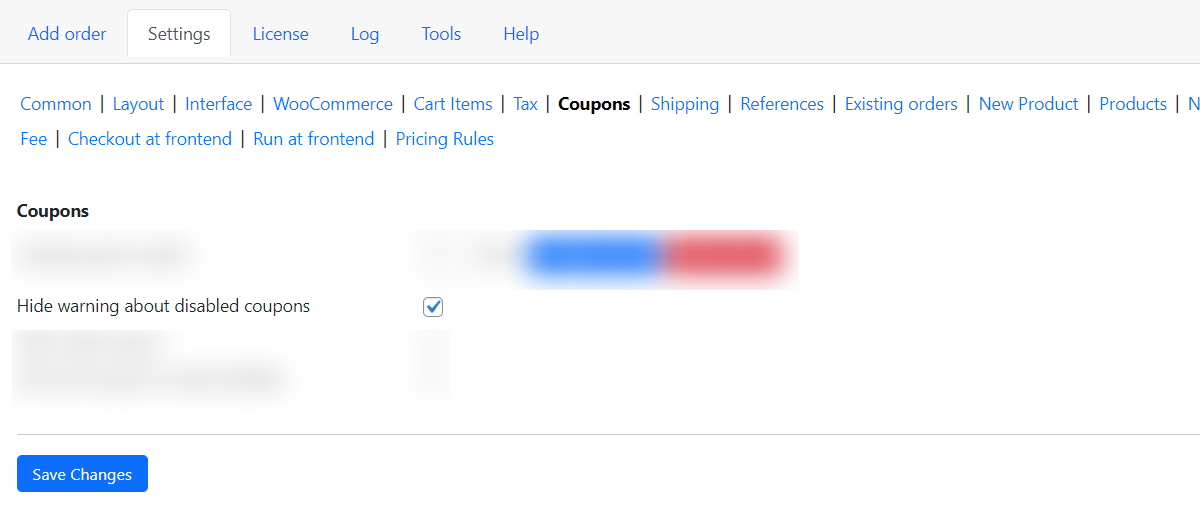
To hide the warning about disabled coupons, simply tick the box provided. This will prevent any notifications from appearing when a coupon is disabled. This feature is useful for users who do not want to be bothered by unnecessary warnings and prefer to manage their coupons independently.
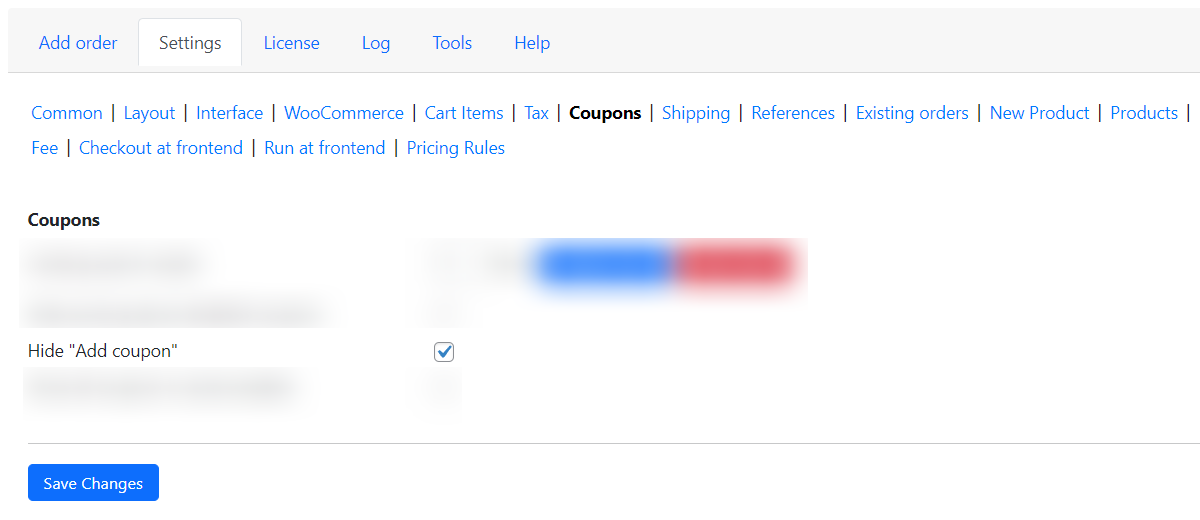
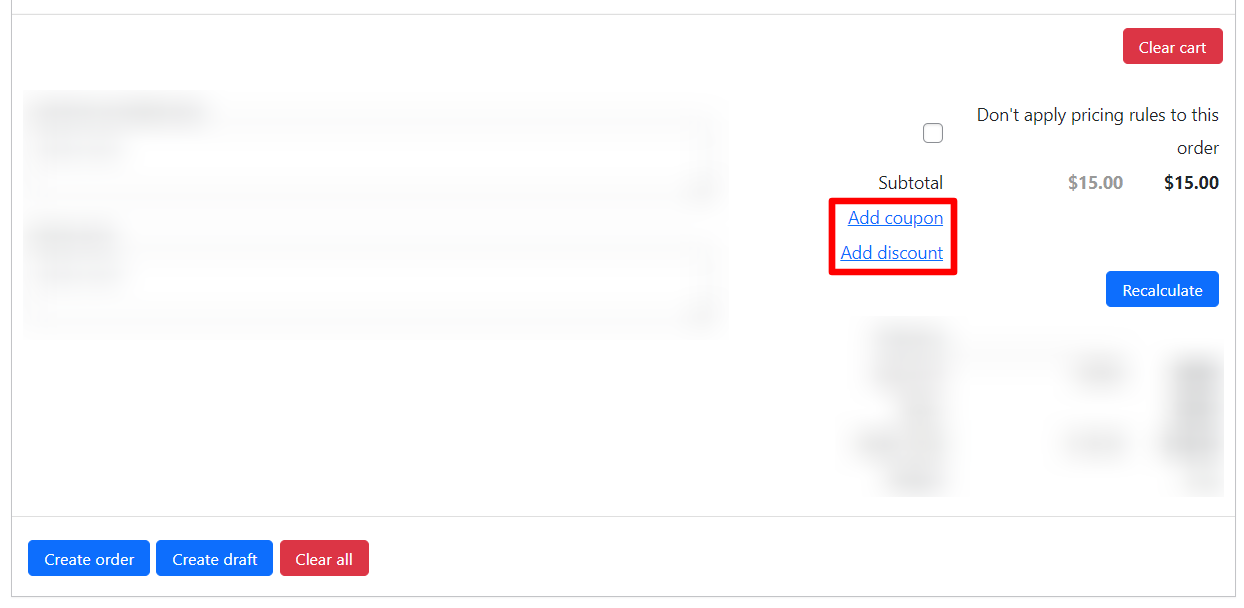
If your business does not have coupons, then check the Hide “Add coupon” option.

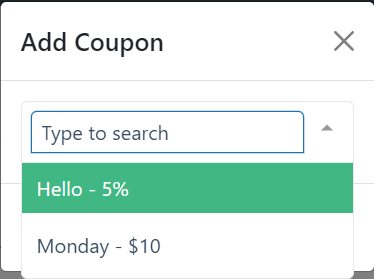
The “Show all coupons in autocomplete” option allows you to automate the manual search for coupons and optimize the time spent searching for the desired coupon.
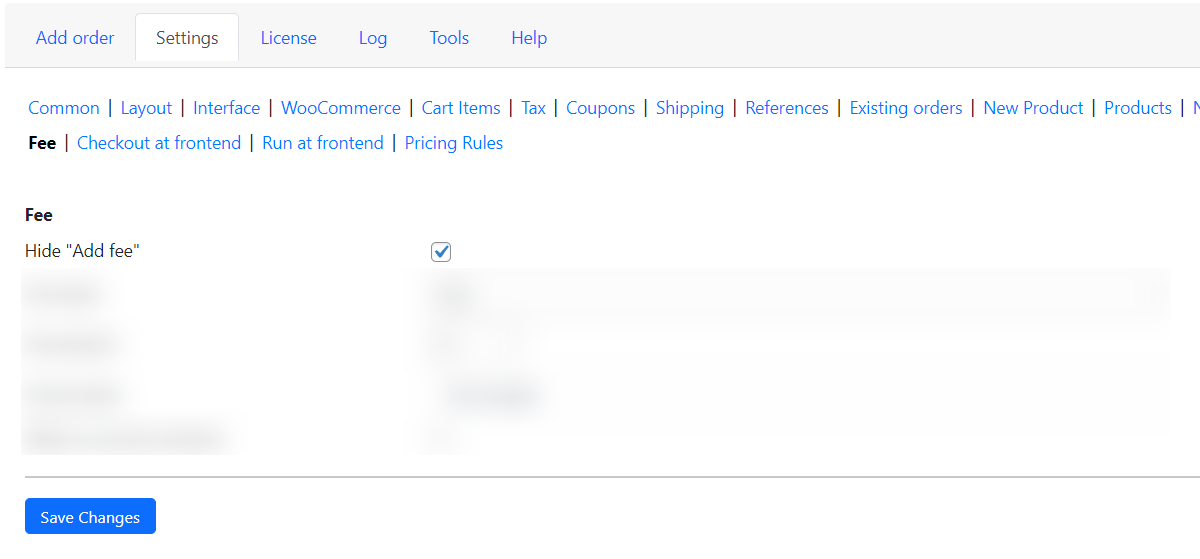
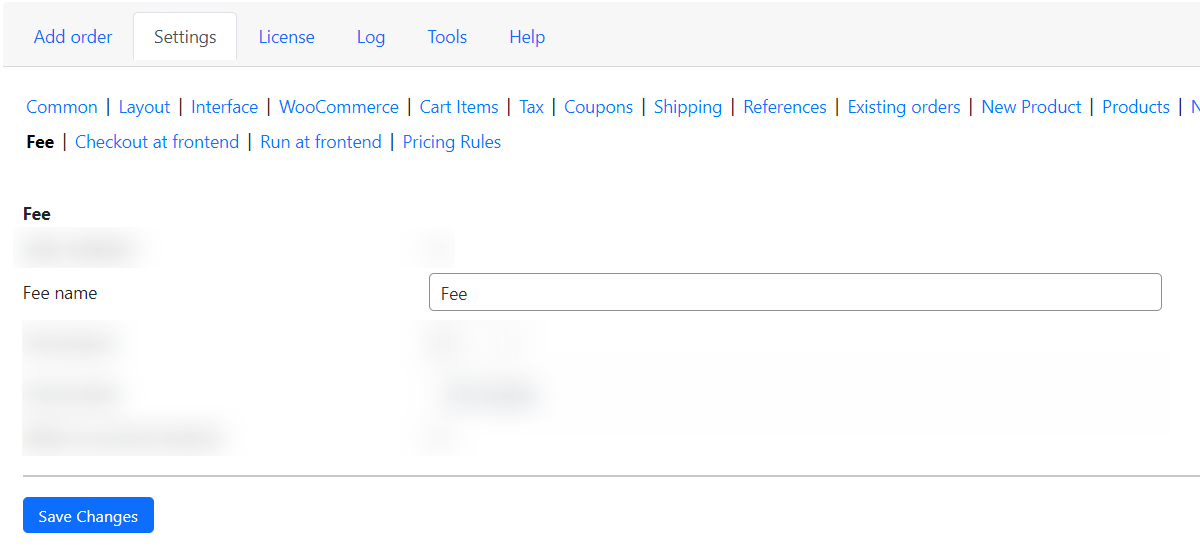
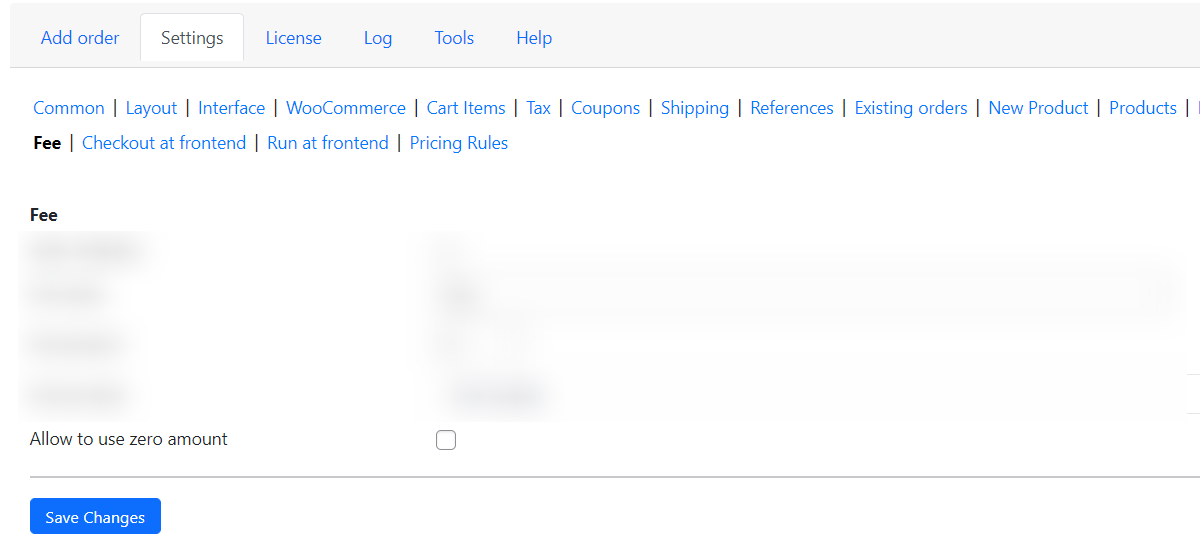
Fees are located in Settings>Fee.
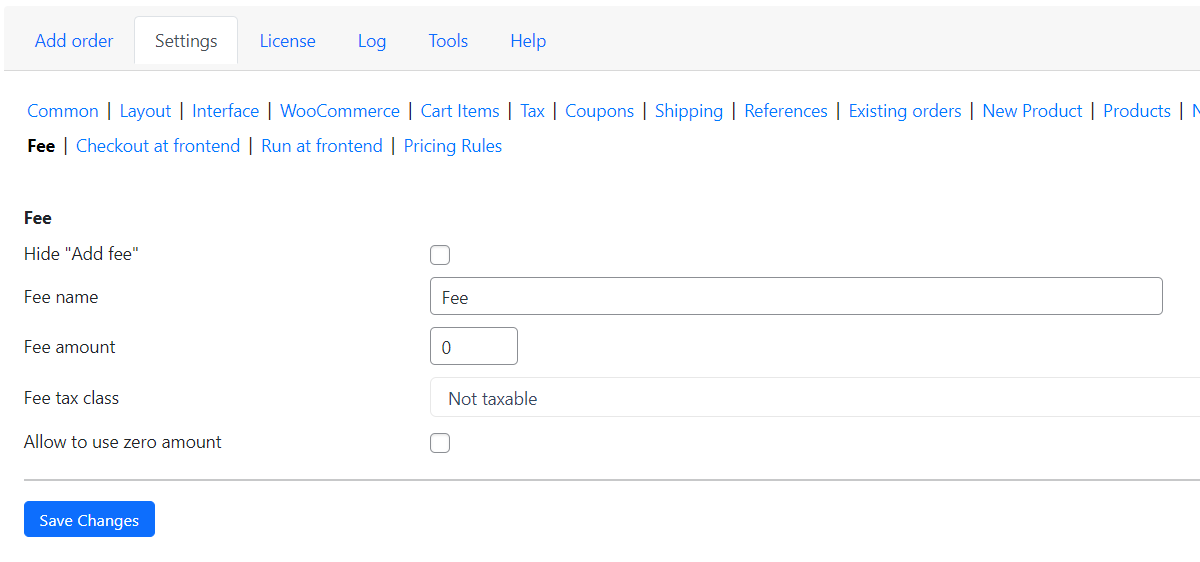
The feature Hide “Add fee” provides greater transparency to customers as they will not be surprised with any unexpected charges.

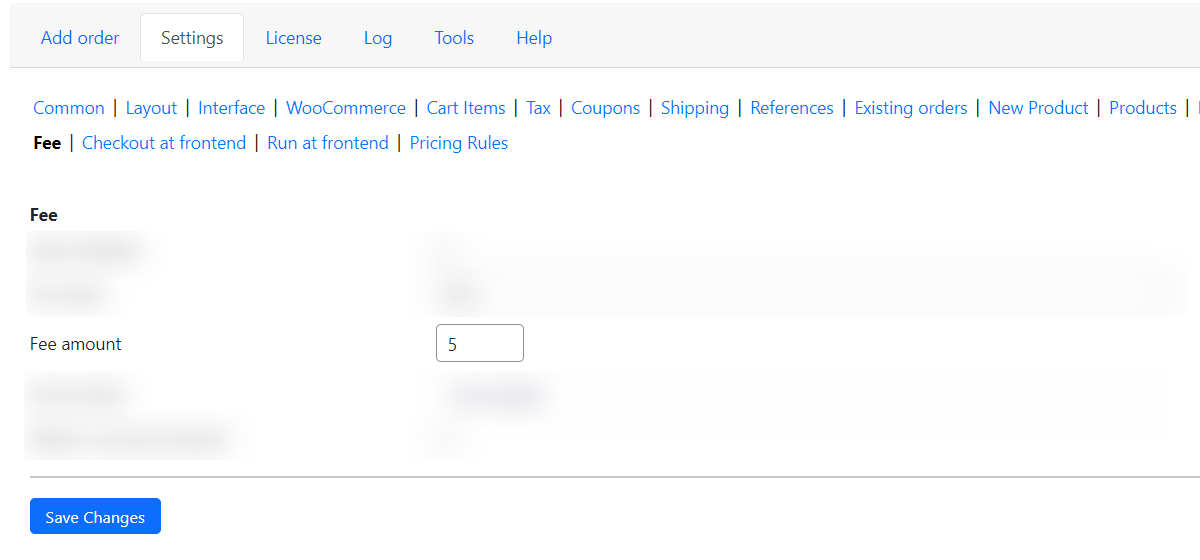
To specify the default fee name, fill in the “Fee name” field.
The “Fee amount” option helps set the default value for fees.
When it comes to taxes for the fee, you must choose an existing tax class. The “Fee tax class” option allows you to set one of 4 classes: Not taxable, Standard rate, Reduced rate and Zero rate.
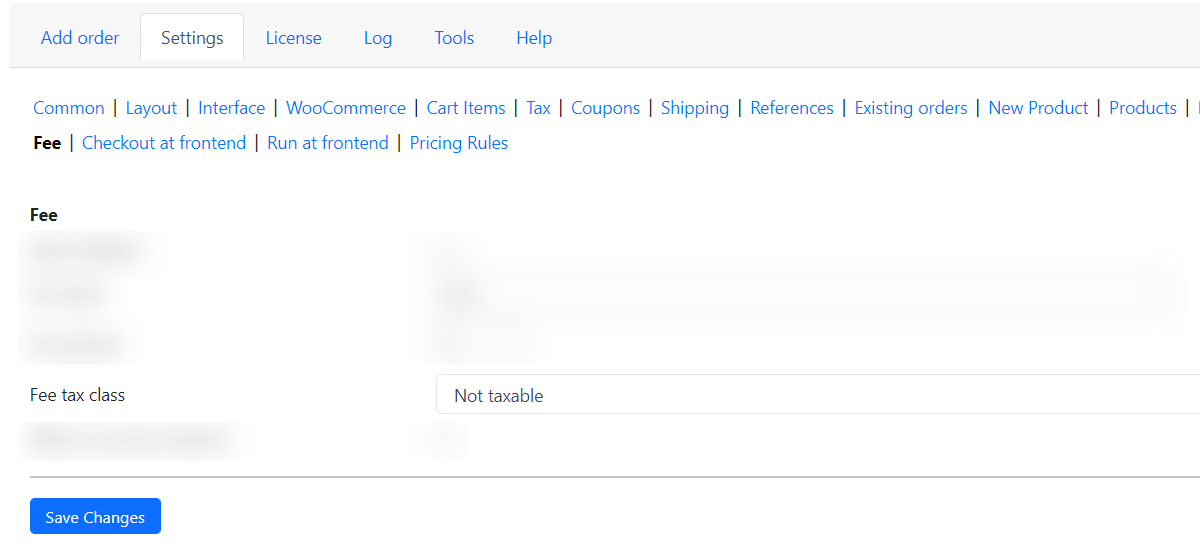
Enabling the “Allow to use zero amount” checkbox will give you the ability to use zero fees when carrying out transactions. This function may be useful for small payments or charity donations, where even small transaction fees can cut deeply into the amount of money being donated.
Conclusion on discounts, coupons and fees in Phone Orders for WooCommerce
In conclusion, the use of discounts, coupons, and fees in Phone Orders for WooCommerce can greatly benefit both customers and businesses. By offering discounts and coupons, businesses can attract more customers and increase sales. These incentives can also encourage customer loyalty and repeat purchases. On the other hand, implementing fees for specific services or order types can help businesses cover additional costs or provide premium services. However, it is important for businesses to carefully consider the impact of these discounts, coupons, and fees on their overall profitability and customer satisfaction. By finding the right balance and effectively communicating these offers to customers, businesses can successfully leverage these strategies to drive growth and success in the WooCommerce platform.
As a WooCommerce store owner, you’re always looking for ways to improve the customer experience and drive more sales. One effective strategy to achieve this is by implementing dynamic pricing, which allows you to adjust prices based on various factors such as customer behavior, inventory levels, and competitor prices. However, implementing dynamic pricing can be challenging, and it’s essential to test and optimize your pricing strategies to ensure they’re effective.
This is where A/B testing comes into play. By running experiments on your WooCommerce store, you can compare different pricing strategies and determine which ones are most successful at driving sales and revenue. In this article, we’ll explore how to use dynamic pricing and A/B testing to optimize your WooCommerce store’s pricing strategies and enhance the customer experience.
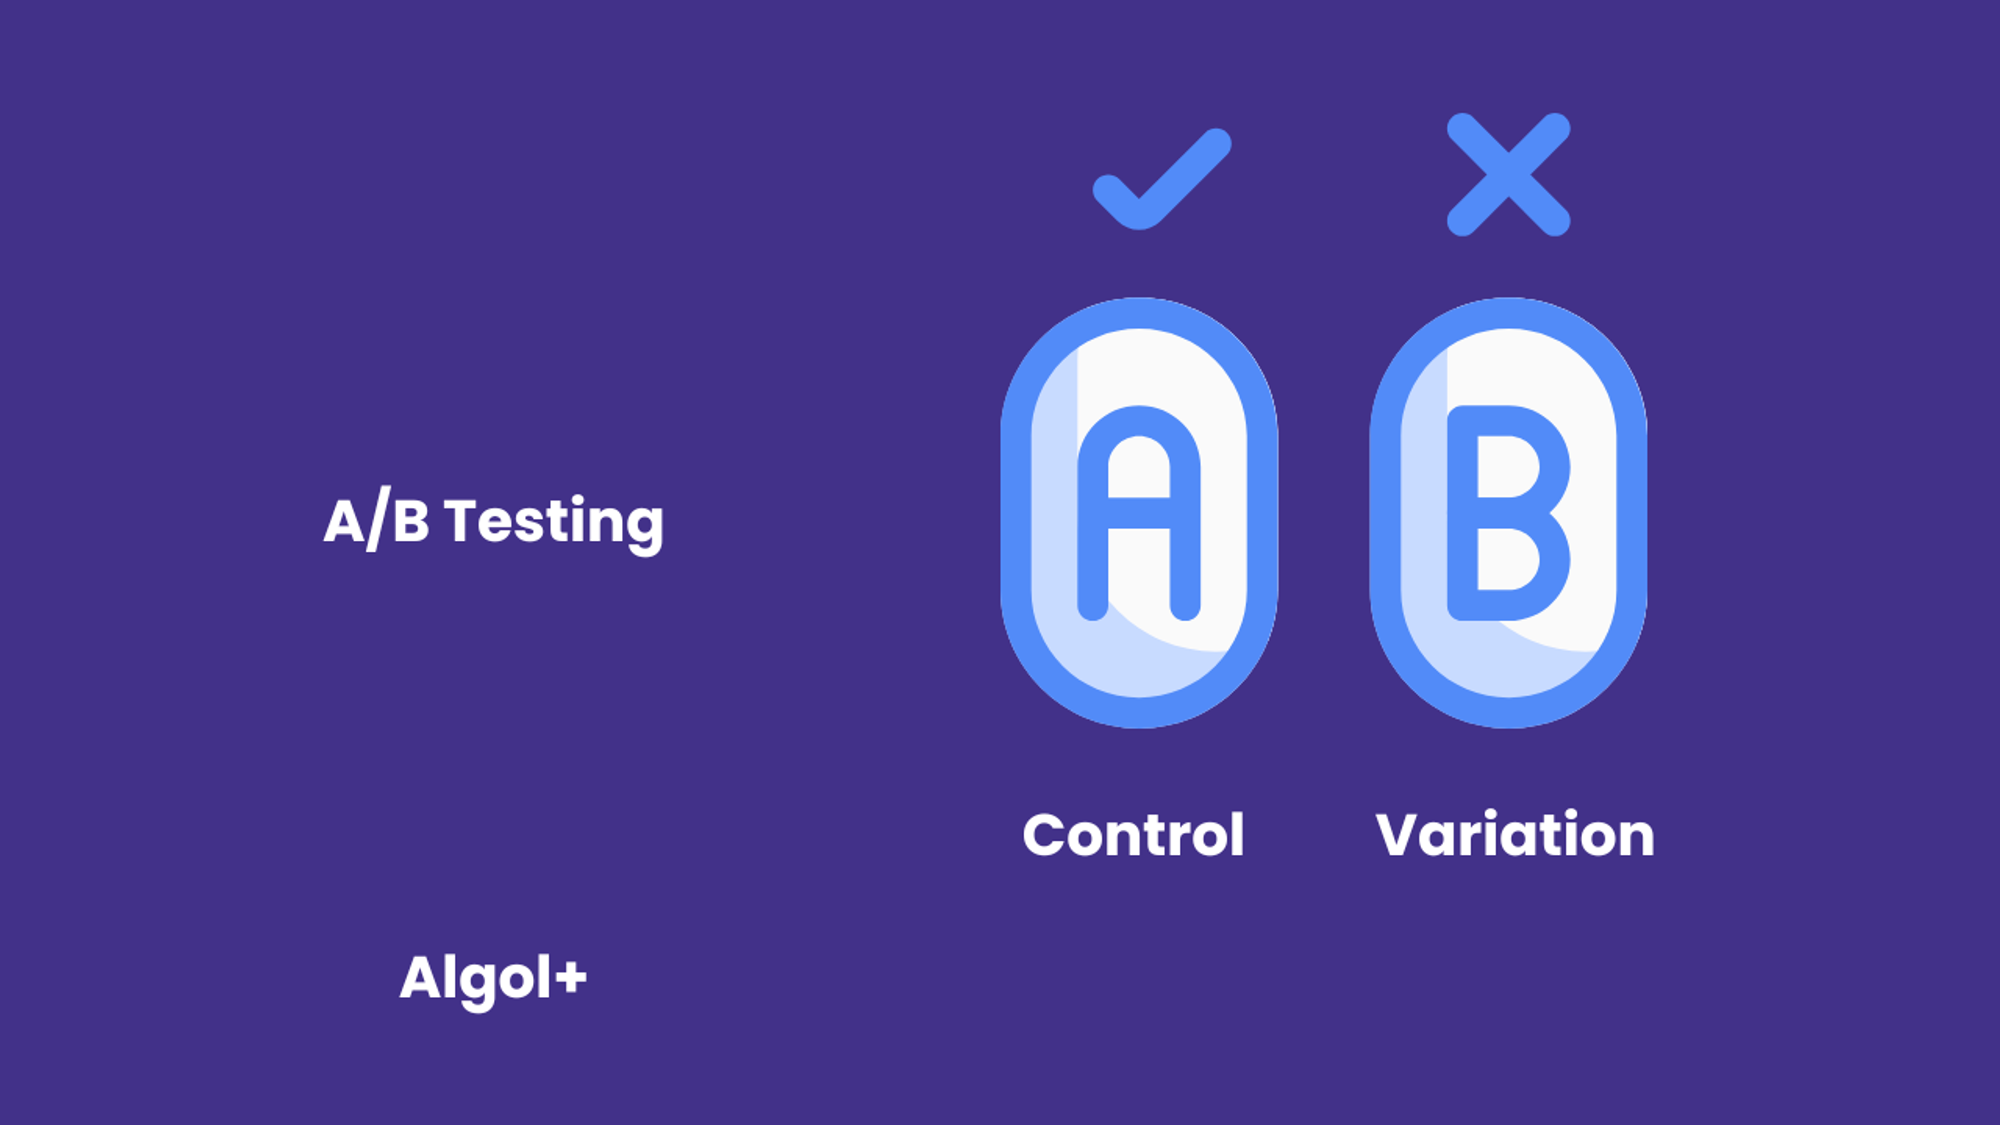
What is A/B testing?
A/B testing, also known as split testing, is a method of comparing two versions of a webpage, app, or other digital product to determine which one performs better. In the context of dynamic pricing and WooCommerce, A/B testing involves creating two versions of a product or service page, each with a different pricing strategy.
In an A/B test, a portion of your website’s visitors (usually 50%) are randomly assigned to view one of the two versions. The goal is to determine which version generates more sales, revenue, or customer satisfaction. By comparing the performance of the two versions, you can identify which pricing strategy is more effective and make data-driven decisions about how to optimize your WooCommerce store.
A/B testing can be used to evaluate various aspects of your pricing strategy.
Dynamic Pricing Strategies for WooCommerce
There are several dynamic pricing strategies you can use to optimize your WooCommerce store’s pricing. Here are a few examples:
Note: You can apply all these strategies in the Advanced Dynamic Pricing for WooCommerce plugin. To learn how to do this, read the article 10 Of The Most Inspiring Advanced Dynamic Pricing Ideas.
A/B Testing Your Dynamic Pricing Strategies
Once you’ve implemented dynamic pricing strategies on your WooCommerce store, it’s essential to test and optimize them to ensure they’re effective. Here’s how to use A/B testing to experiment with different pricing strategies:
Here is an example of what your rule in the Advanced Dynamic Pricing for WooCommerce plugin might look like. This rule is for Polo, and it activates a 10% discount on weekdays (Monday to Friday) from 9 a.m. to 3 p.m. (off-peak hours). There is also a limits section added here to ensure that the discount is used 100 times. All you have to do is upload data on 200 Polo purchases and compare the orders.

Which plugin to use to analyze AB testing results?
When it comes to analyzing A/B testing results in an e-commerce store, there are several WordPress plugins that can help you gain valuable insights and make data-driven decisions. One of the most popular and powerful plugins for this purpose is Advanced Order Export For WooCommerce.
Advanced Order Export For WooCommerce is a comprehensive plugin that allows you to export and analyze your store’s order data in various formats, including CSV, Excel, and XML. With this plugin, you can easily filter and segment your order data based on various criteria, such as product, customer, and order status. This makes it easy to analyze the results of your A/B tests and identify which pricing strategies and website features are most effective at driving sales and revenue.
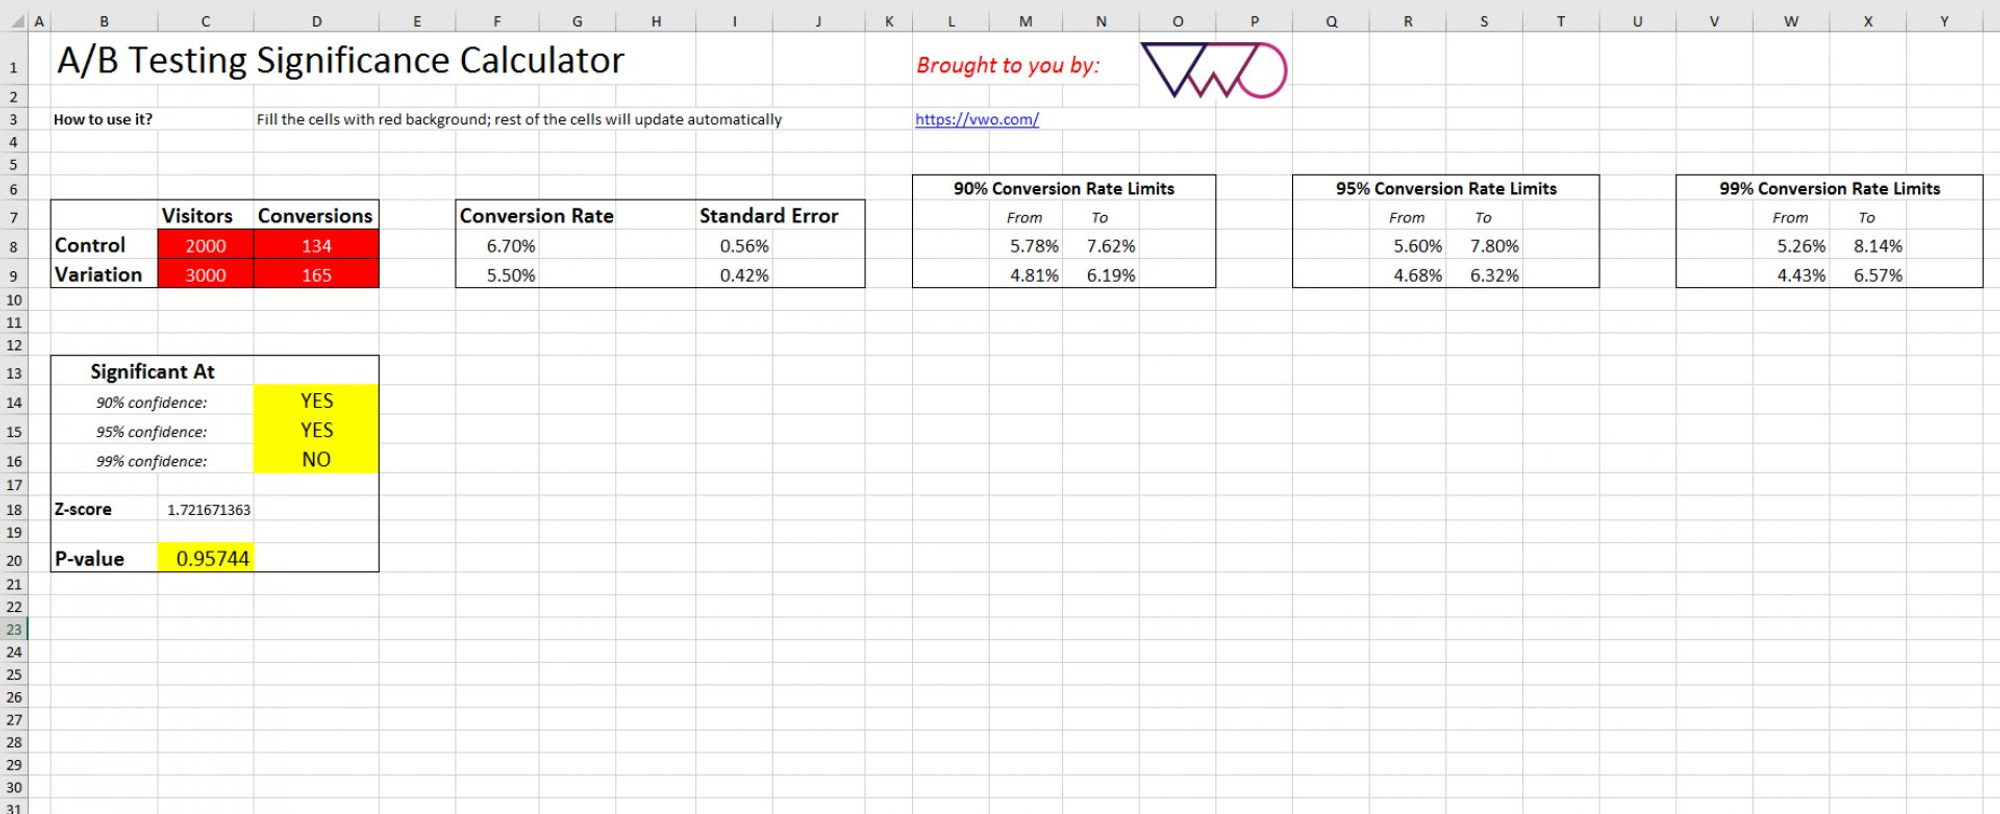
Once you have exported the order data, you can use a spreadsheet program like Microsoft Excel or Google Sheets to analyze the results. You might create a pivot table that summarizes the total sales and revenue for each pricing strategy, or you might use a chart to visualize the data and identify trends.
You can also use the AB testing calculator — A/B Test Statistical Significance Calculator [Free Excel].
Conclusion
Dynamic pricing and A/B testing are powerful tools for optimizing your WooCommerce store’s pricing strategies and enhancing the customer experience. By experimenting with different pricing strategies and analyzing the results, you can determine which ones are most effective at driving sales and improving customer satisfaction. So don’t be afraid to get creative with your pricing strategies and use A/B testing to unlock the full potential of your WooCommerce store. By doing so, you’ll be well on your way to maximizing your profits and achieving long-term success in the competitive world of e-commerce.
Table of Contents
The success of any online business depends heavily on their ability to capture and convert customers. However, if your WooCommerce store is not optimized for phone orders, you could be missing out on a valuable source of revenue. In this article, we’ll discuss how you can use analytics to optimize your WooCommerce phone order process and turn clicks into calls.
Analytics provide valuable insights into customer behavior and website performance, allowing you to identify areas of your website that need improvement in order to boost conversions. Here are a few key analytics metrics to pay attention to when optimizing your site for phone orders:
This metric tells you the percentage of visitors that leave your website after viewing only one page. A high bounce rate can indicate that visitors are not finding what they need on your website or that your website is difficult to navigate.
This metric shows the percentage of visitors that complete a desired action, such as making a purchase or signing up for a newsletter.
This metric tells you where your website’s visitors are coming from. Paying attention to this metric can help you identify which traffic sources are the most effective and where you should focus your marketing efforts.
Analyzing the journey of your customers from their entry on your website to the purchase can help you understand where they’re dropping off and identify any areas of improvement.
Monitor the type of devices your customers use to access your website. This can help you optimize your website for different device types and ensure that your pages are optimized for mobile users.
Now that you know which of your settings are below or above the recommended level, you want to figure out how to fix them.
If you have a high bounce rate, then make your site clear.
The reason for the lack of calls is often found in the design. If a web page is poorly laid out, then it is unlikely to inspire confidence. It’s even worse when the site does not contain the necessary information: prices, contacts, tariffs and the products themselves. Or all the pages are filled with “water”, and the texts contain grammatical and punctuation errors.
In order to fix this, you need to invite a specialist or edit the site yourself. What to pay attention to and check:
Thanks to these actions, you can achieve a low bounce rate, but also ensure that the customers reaches the end of the purchasing journey.
If you have a low conversion rate, then set up contextual advertising correctly.
Of course, if you have any. And if so, perhaps you have a situation where you have clicks but no conversions. Why does this happen?
There are two key points: whether the ad itself is well set up and the page to which it leads.
The task of contextual advertising is to “reach out” to representatives of your target audience (potential clients) and show them your advertisement. If your ad attractes them, they will click on it and go to your landing page. Next, they will see your page, which should continue the advertisement that the person clicked on, present the company and its main offer, involve in studying the page, close all key objections, build trust, show the assortment, lead to the main or intermediate conversion.
Does everything seem easy and impossible to make a mistake? But nevertheless, if you relax at the moment of setting up the ad, you will get a completely uninterested audience.
What should you do to avoid this?
First of all, remove non-target key phrases. For example, if you provide any non-free services, then you do not need to include “we will provide the service for free” in your phrases. Another example when a phrase can be understood in a different sense. You may have your own business in the quiz, and if you add “quiz for lady” to your key phrases, then you will face the fact that you will not get conversions, since your phrase is essentially the name of the movie (quiz lady). Users searching for this phrase obviously want to watch a film.
There is also another problem with key phrases – their incorrect grouping. Let’s look at the example of an online store of women’s dresses. Unprocessed queries and all phrases, in particular regarding types of dresses, lead to one page – the main page. When typing “stripe dresses”, the user expects to see only striped dresses. In this case, it was worth dividing the phrases into groups (polka dot dresses, mini dresses, etc.) and defining the corresponding page for each group.
Finally, the last but not least thing you can do is to target the right target audience who will see the ad. Most often, the analytical system attached to your website (age, region, behavior on the site) containes all information on your target audience.
If you have low conversions from mobile devices, then adapt your site.
More than half of Internet users from all over the world view web pages from a mobile phone, so it is important to adapt your landing pages, websites and other resources for the mobile user. This will help you avoid losing this audience due to the fact that it is inconvenient for them to read text or fill out a form.
How to adapt a website for mobile users to provide them with ease of use, registration, leaving an application and not lose in conversion:
Get rid of design elements, without which the landing page will not lose its meaning and remain intuitive. Remove all images that take a long time to load, hide some elements under buttons (for example, “Show more”), discard the video embedded in the page (for example, on the first screen).
Make sure that the images you leave on the site match the width of the mobile screen.
In addition, try to compress images using special services – this will reduce their size without significant loss in quality.
In order for the user to conveniently use the mobile version of the site, he must be able to do this with 2 simple movements – scrolling up and down and pressing a button.
If the user has to enlarge the text, scroll the page horizontally, or reach with his finger to press a button, he is likely to leave the landing page due to inconvenience of use.
Instead of a contact button in the corner, it’s better to make it possible for the user to call a phone number on the landing page with one click. At the same time, it is desirable that the phone number also places conveniently, avoiding the extreme corners where it is difficult to reach.
According to statistics, 53% of sites where it takes more than 3 seconds to search for a button lose potential customers. This is too long. The CTA should be detected within 1-2 seconds. Ideally, the button for performing the target action should be located immediately on the first screen, without the need to scroll, easy to press with your thumb. It should be a contrasting color so that it is immediately noticeable.
Do not overload the application form, especially in the mobile version. Filling it out is already difficult, and if there are many fields in it, the user will most likely not do it. Limit yourself to 1-2 really important fields.
Optimize your phone order! The simplest way to do this is to use the phone order system. This systems make it easier to manage orders, track customer information, and process payments.
Phone Orders for WooCommerce is a great way to add more convenience to your customers. This plugin allows you to easily manage orders placed via phone. This gives you to quickly process orders from customers who may not have access to a computer, or who would prefer to call to place the order.
Among its main advantages:
Phone Orders for WooCommerce is easy to set up and use. It takes just a few minutes to get started:
If you’re a WooCommerce store owner, Phone Orders for WooCommerce is definitely something you should consider.
Finally, we recommend continuing to review your site analytics and monitor current trends in your area. Times change, and so do customer preferences. Your supply must match demand. Work on this and the result will not keep you waiting.

Table of Contents
The 4th of July is a significant holiday that brings a surge of sales to retailers across the United States. As an online store owner, it’s crucial to prepare your WooCommerce store to handle the influx of customers looking for deals and to streamline your operations for the big day. Algol+ plugins offer a suite of tools that can help you optimize your store for this busy time. Let’s explore how plugins like Advanced Dynamic Pricing, Advanced Order Export, and Phone Orders can enhance your store’s performance and customer experience.
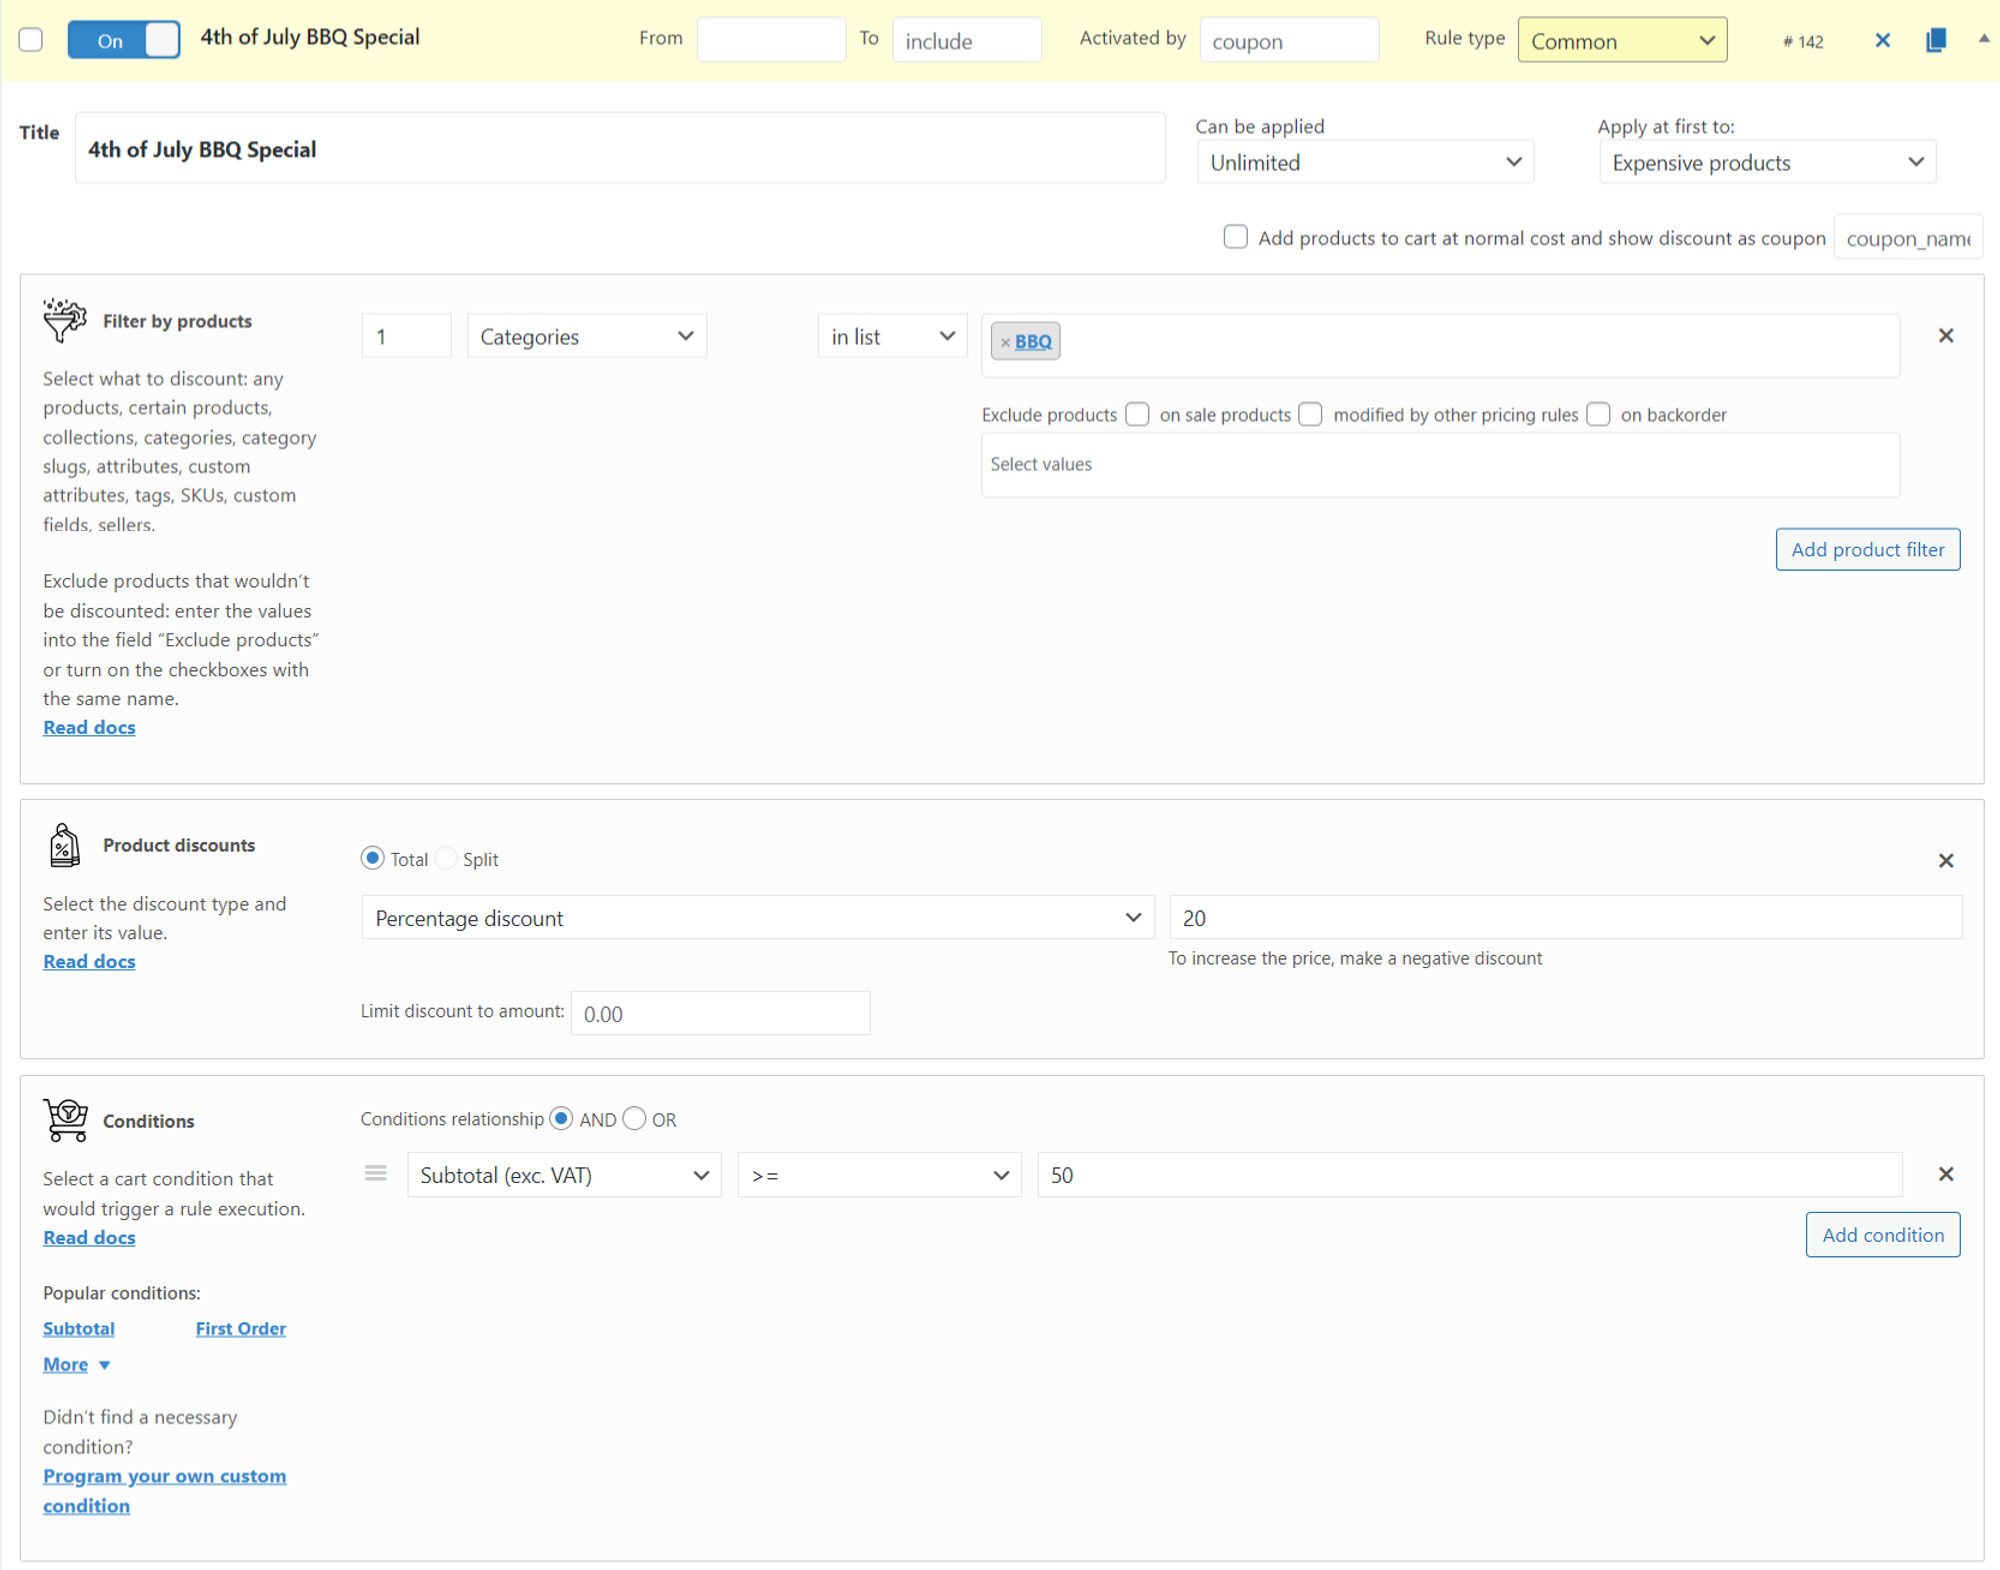
The Advanced Dynamic Pricing plugin allows you to set up dynamic pricing rules that automatically apply discounts based on various conditions. For example, you can create a “Buy One, Get One Free” offer for American flags, or offer a 20% discount on all barbecue-related products when a customer’s cart total exceeds $50.
Example:
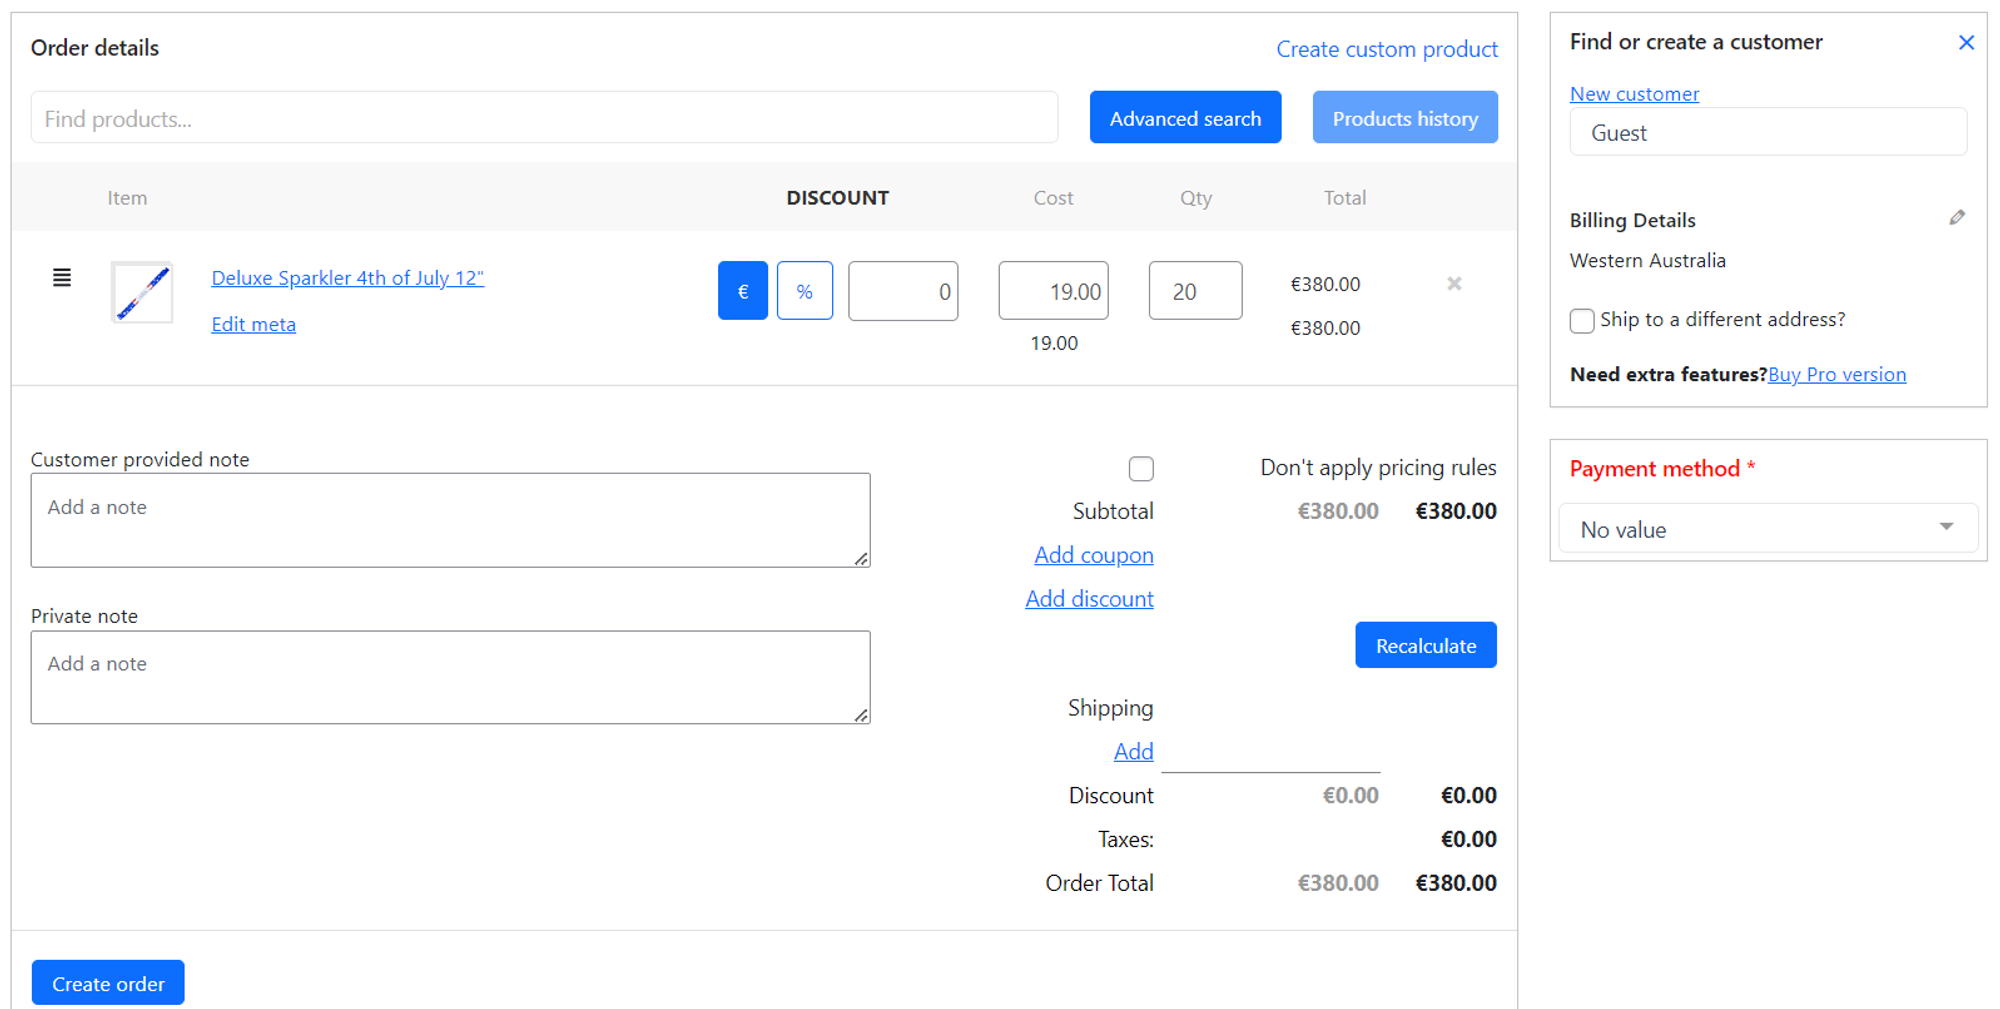
Not all customers are comfortable placing orders online, especially when it comes to last-minute purchases. The Phone Orders plugin enables you to take orders over the phone and manually enter them into your WooCommerce system. This is particularly useful for catering to less tech-savvy customers or handling complex orders that require customization.
Example:
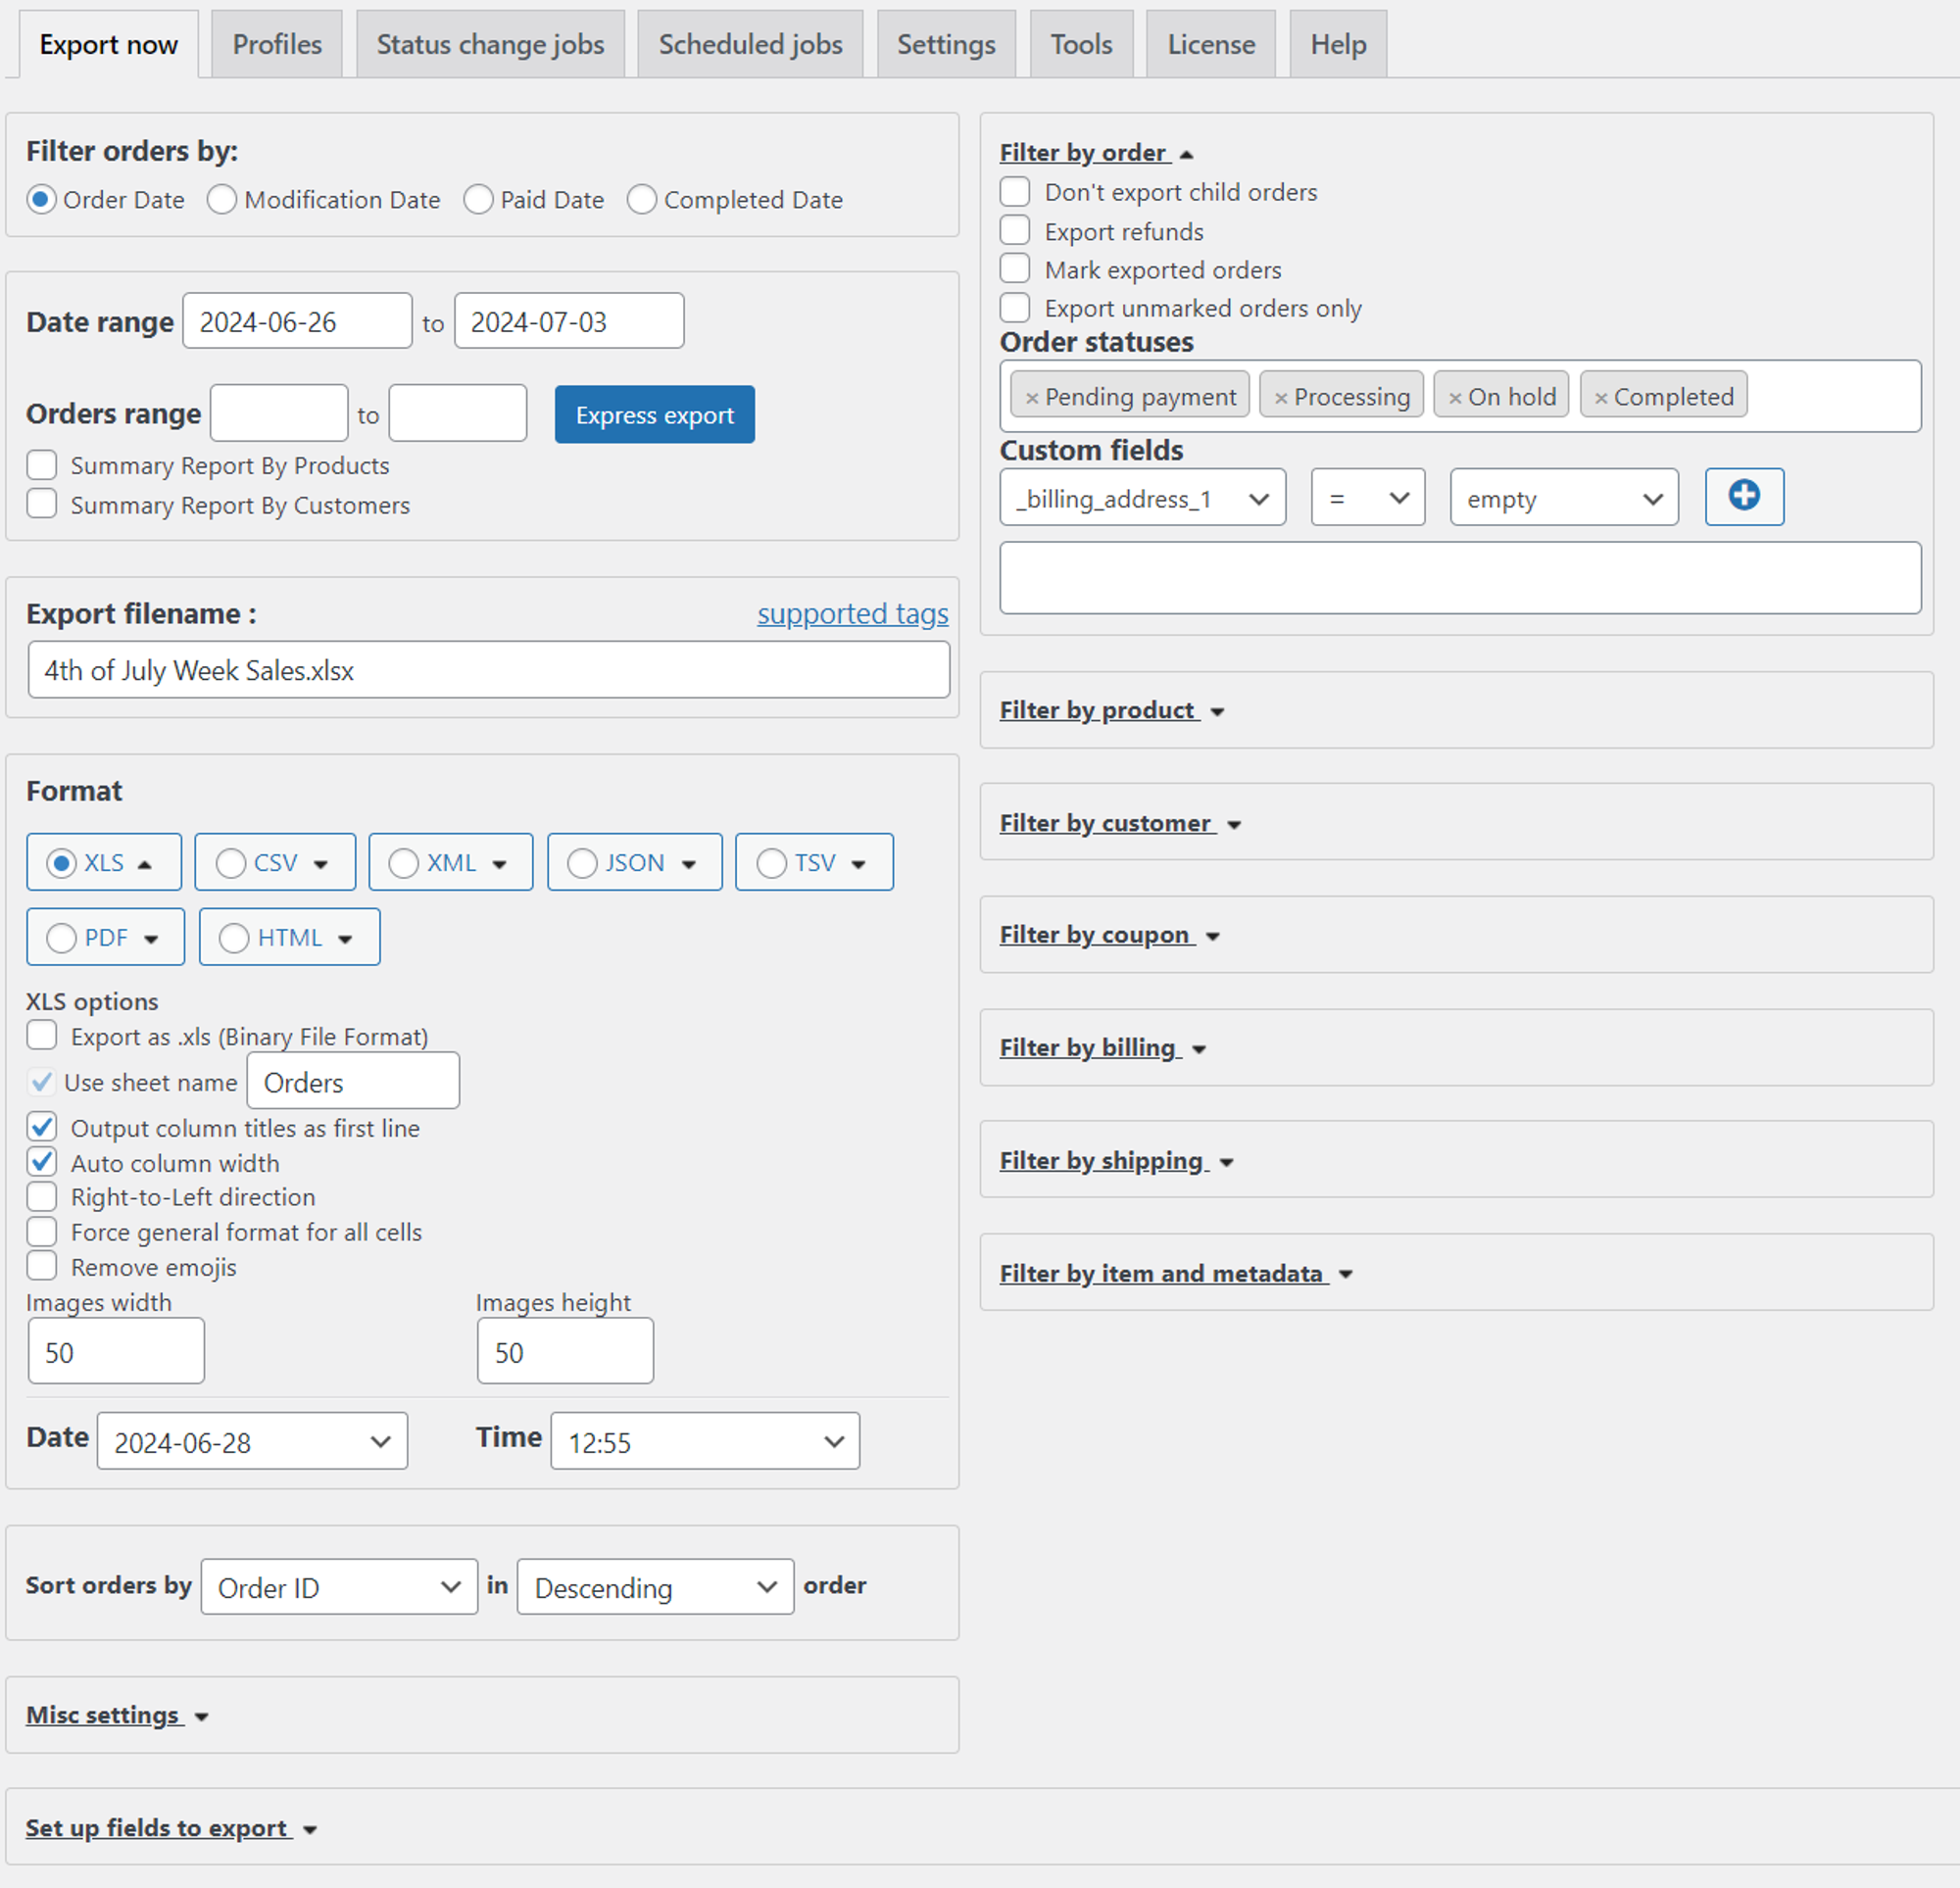
The Advanced Order Export plugin is not just a tool for simplifying your fulfillment process; it’s also a powerful instrument for statistical analysis. With its ability to export detailed order information, store owners can track and analyze sales data over time. This can be especially beneficial during the 4th of July sales when you want to understand consumer buying patterns.
For instance, you can export sales data for the week leading up to the 4th of July and use it to identify which products are the most popular, what times of day see the most orders, and which promotions are driving the most sales.
Example:
Preparing your WooCommerce store for the 4th of July doesn’t have to be a daunting task. By utilizing the Algol+ plugins, you can offer enticing deals, streamline your order processing, and provide personalized customer service. These examples illustrate just a few ways you can use these powerful tools to make the most of the holiday rush and ensure your customers have a memorable shopping experience.
Remember, the key to a successful holiday sale is preparation. Start setting up these plugins well in advance to ensure a smooth operation when the 4th of July arrives. Happy selling!